Sunday, July 31, 2011

orange olive oil bundt

After two consecutive pies on the Baked Sunday Mornings baking calendar, I was so excited for this Orange Olive Oil Bundt. Cake, finally! And it's in the breakfast section of the book. Score. I love cake for breakfast!


And that's exactly when I served it. Topped with yogurt and with orange supremes on the side. Unfortunately, this cake fell short for me. It's probably my fault, as I think I baked it a minute or two too long. It was weird. It was moist, but dry at the same time... Can that actually happen? To me, the flavor was so-so. My husband like it alot, (although he thought it was a lemon flavored cake) and ate pretty much the rest of it.


Not much to this recipe, but in true Baked form, we dirtied a mountain of dishes, beating the egg yolks and the wet ingredients in one bowl, the dry ingredients in another, and whipping the egg whites in a third, before bringing all the components together to bake in a bundt pan. One good thing about this cake, is that it got me to practicing my folding technique. I always felt awkward folding egg whites or whatever into batter, but now, I think I've got it! My movements seemed more natural, fluid, and it went really well! Yay for me!


Maybe if I had made the glaze, I would have liked it better? Bah. Care to see what the other Sunday mornings Bakers thought of it? Click on through to the Baked Sunday Mornings for the blog roll, and the recipe.

Wednesday, July 27, 2011

fraisier

After last month's Daring Bakers baklava fail, I was so happy to see this month's challenge!

Jana of Cherry Tea Cakes was our July Daring Bakers’ host and she challenged us to make Fresh Fraisiers inspired by recipes written by Elisabeth M. Prueitt and Chad Robertson in the beautiful cookbook Tartine.


A fraisier is basically a chiffon cake, with a pastry cream/whipped cream mousse filling, exposed strawberries on the sides, more strawberries inside, another layer of chiffon, and a layer of almond paste. Yea! Actual baking! No mandatory rolling! I love that Jana gave us lots of leeway to make this dessert our own. The only mandatory items were a cake with exposed fruits around the sides of the center layer, a pastry cream mousse and simple syrup, all from scratch, of course. We could play with different fruits, or flavors, but never having had a fraisier before, and since strawberries were still in season, I decided to stick to the recipe that was provided, except for a few minor changes.


I made the pastry cream filling first, because it's a two steps process, and needs to chill before you can move on to step two, and then use it to assemble the cake. I love pastry cream. It's a good thing I don't think of using it too often, because it could get very dangerous. It's like better, richer, silkier vanilla pudding. I would have used it as is, but adding the gelatin and the whipped cream made for a lighter filling (in texture only, of course).
Pastry Cream Filling
1 cup whole milk
1/2 teaspoon pure vanilla extract
1/8 teaspoon salt, preferably kosher
2 tablespoons cornstarch
1/4 cup sugar
1 large egg
2 tablespoons (1 oz) unsalted butter
3/4 teaspoon gelatin
1/2 tablespoon water
1 cup heavy cream
Pour the milk, vanilla, and salt into a heavy saucepan. Place over medium-high heat and scald, bringing it to a near boiling point. Stir occasionally.
Meanwhile, in a large bowl, whisk the cornstarch and sugar to combine
Add the egg to the sugar and cornstarch and whisk until smooth.
When the milk is ready, gently and slowly pour it down the bowl into the egg mixture, whisking constantly.
Pour the mixture back into the saucepan and continue to cook over a medium heat until the custard is thick, just about to boil and coats the back of a spoon.
Remove from heat and pass through a fine mesh sieve into a large mixing bowl. Allow to cool for ten minutes stirring occasionally.
Cut the butter into four pieces and whisk into the pastry cream, one piece at a time, until smooth.
Cover the cream with plastic wrap, pressing the plastic wrap directly onto the top of the cream to prevent a skin from forming. Chill in the refrigerator until cold, and for up to five days.
In a small dish, sprinkle the gelatin over the water and let stand for a few minutes to soften.
Measure 1/4 cup of the chilled pastry cream into a glass measuring cup and warm it on medium power in the microwave until it reaches 120 F (48.8 C). Add the gelatin and whisk until smooth. Gradually whisk the gelatin mixture into the remaining cold pastry cream.
In a stand mixer, fitted with the whisk attachment, whip the cream until it holds medium-stiff peaks. Immediately fold the whipped cream into the pastry cream with a rubber spatula.
I baked the chiffon in a smaller springform pan, maybe 6 or 7 inches, and used the leftover batter to make 4 mini cakes in an individual cheesecake pan. Although the bigger cake baked unevenly in my awesome oven (I should have rotated the pan halfway through the cooking time, but I was afraid that opening the door of the oven would make the cake collapse), the smaller cakes baked perfectly. I leveled out the bigger cake and split it, and I thought the layers were perfect height. The smaller cakes were much taller, and the finished cakes looked weird, with the cake layers being too thick for the amount of fruit and filling.

Chiffon and sponge cakes are not our favorite cakes - we would have preferred a shortcake type cake instead - but it did work in this recipe. It was light and summery, with the lemon flavor coming through nice and bright.

Basic Chiffon Cake
1 cup + 2 tablespoons all-purpose flour
1 teaspoon baking powder
3/4 cups sugar
1/2 teaspoon salt, preferably kosher
1/4 cup vegetable oil
3 large egg yolks
⅓ cup + 1 tablespoon water
1 teaspoon pure vanilla extract
3/4 teaspoon lemon zest, grated
5 large egg whites
¼ teaspoon cream of tartar
Preheat the oven to moderate 325°F.
Line the bottom of an 8-inch spring form pan with parchment paper. Do not grease the sides of the pan.
In a large mixing bowl, stir together the flour and baking powder. Add in all but 3 tablespoons of sugar, and all of the salt. Stir to combine.
In a small bowl combine the oil, egg yolks, water, vanilla and lemon zest. Whisk thoroughly.
Combine with the dry ingredients and mix thoroughly for about one minute, or until very smooth.
Put the egg whites into a stand mixer, and beat on medium speed using a whisk attachment on a medium speed, until frothy. Add cream of tartar and beat on a medium speed until the whites hold soft peaks. Slowly add the remaining sugar and beat on a medium-high speed until the whites hold firm and form shiny peaks.
Using a grease free rubber spatula, scoop about ⅓ of the whites into the yolk mixture and fold in gently. Gently fold in the remaining whites just until combined.
Pour the batter into the prepared pan. Bake for 45 to 55 minutes or until toothpick inserted into the center comes out clean.
Removed the cake from the oven and allow to cool in the pan on a wire rack.
To unmold, run a knife around the sides to loosen the cake from the pan and remove the spring form sides. Invert the cake and peel off the parchment paper. Refrigerate for up to four days.

Once the cake is cooled, and the pastry cream filling is chilling in the fridge, the cake is leveled and split horizontally. The cake layers are then soaked with a simple syrup. I made it easy on myself, and poured the simple syrup in a squeeze bottle, so I could drizzle it on. Not sure what it did for the cake, but hey, easy enough to do. And added sugar is never a bad thing!
Simple Syrup
1/3 cup sugar
1/3 cup water
Combine the water and sugar in a medium saucepan.
Bring the mixture to a boil and let the sugar dissolve. Stirring is not necessary, but will not harm the syrup.
Remove the syrup from the heat and cool slightly.
Transfer syrup to a lidded container or jar that can be stored in the refrigerator. Simple syrup can be stored for up to one month.
In order to assemble the fraisier, you need to line the springform pan in which you baked the cake with plastic wrap. I used acetate thinking it would give me a cleaner looking finished product. (It didn't really.) A bottom layer of cake which has been soaked in simple syrup goes in first, then you press cut strawberries against the side of the pan, and pipe the pastry cream filling around the strawberries to get them to stay upright against the side of the pan. A thin layer of filling goes on in the middle of the cake, then cut up strawberries, then the leftover filling, before topping the whole thing with the top layer of cake. You may want to check out the daring kitchen for full instructions and original recipes.

I've never had almond paste, and frankly, paste of any kind is not appetizing to me. I wanted a shiny red glaze on top of my cake, and as I was perusing old DB challenges, I came across the mirror cake from 2007. Perfect. So instead of the traditional almond paste, I went with a strawberry gelée.

Strawberry Juice
1 ½ pints of strawberries (18 oz)
¾ cup sugar
¾ cup water
Wash and hull strawberries; coarsely chop. Place strawberries in saucepan; crush to start juices flowing. Place over low heat; add sugar and water; simmer slowly 10 minutes. Pour juice and pulp through damp jelly bag or cheesecloth-lined colander and drain into a bowl for 15 minutes (Do not press down on fruit).
Strawberry Mirror
1 1/2 cups strawberry juice
1 tsp lemon juice
1 TBSP framboise liqueur
1 TBSP water
1 TBSP unflavored gelatin
Few drops of red food coloring
Place lemon juice, framboise, and water in a small bowl. Sprinkle gelatin over this mixture; set aside until spongy and soft.
Measure 1 ½ cups strawberry juice into a small saucepan and bring to a simmer; pour over gelatin mixture and stir to dissolve gelatin. Tint to desired color with red food coloring. Place bowl over bowl of ice water and stir occasionally until the mixture is syrupy and just beings to thicken (do not let jell); remove from ice water.
I did make another batch of plain pastry cream (no whipped cream or gelatine) to top my cakes once they were assembled and the filling was all used up. On the smaller cakes, for which I have no pictures, I plainly piped on the pastry cream. For the bigger cake, I spread an even layer of pastry cream on top of the cake, piped on a border that would prevent the strawberry gelée from dripping all over the side of the cake.

Once the strawberry gelée was thick enough, I gently spooned it onto the top of the cake, hoping that my border would hold it in. (It mostly did.) Back into the fridge it went to set completely before we could serve it.


The cake was a great success. Although not difficult to make, it makes an impressive dessert, and the perfect cake to serve at the peak of strawberry season.

I was amazed at all the wonderful creations whipped up by other daring bakers this month. This cake really does have the potential to be beautiful. Please visit the Daring Kitchen and spend a few minutes with the slide show on the main page. Beautiful! Too bad strawberry season isn't longer!

Friday, July 22, 2011

blueberry muffins

As a teenager, I worked at a rest stop that included a coffee/donut place. That place had super good blueberry muffins. Very unhealthy, completely devoid of nutritional anything, a super fluffy and moist crumb. Blueberries. Big sugar crystals on top.


The blueberry muffins I grew up on were not like that. At all. So when I moved out of my parents' house and had to make my own muffins, I discovered this recipe. And that was that. Anytime I'm craving big fluffy muffins full of sugar and not much else, this is the recipe I use. Whether it's blueberries, raspberries or mini chocolate chips, this recipe hits the spot. Now if only I could figure out how to make humongous like the donut place, all would be right in the world.


fluffy blueberry muffins
recipe adapted from All Recipes
yields 9 muffins

1/2 cup buttermilk or plain yogourt
3 tablespoons vegetable oil
1 tablespoon lemon juice
2 egg whites
1 1/2 cups all-purpose flour
3/4 cup white sugar
2 teaspoons baking powder
1/4 teaspoon salt
1 cup blueberries
2 tablespoons white sugar crystals for decoration

Preheat the oven to 400 degrees F. Line a muffin tin with 9 paper liners.

In a large bowl, whisk together the buttermilk/yogurt, oil, lemon juice, egg whites. In a separate bowl, stir together the flour, 3/4 cup sugar, baking powder and salt. Add the wet ingredients to the dry, and mix until just blended. Gently stir in the blueberries. Spoon batter evenly into the prepared muffin cups. Sprinkle remaining sugar over the tops for decoration.

Bake for 15 to 17 minutes in the preheated oven, or until the top springs back when lightly touched. Cool muffins in the tin on a wire rack.

I love it when fresh blueberries just burst and become yummy! That, plus the moist crumb of these muffins and the crunchy sugary top makes these perfect for pretty much any time of day.


Tuesday, July 19, 2011

nanaimo lamingtons

My daughter was watching you tube videos of an Australian kid's show the other day when she excitedly called me over. She kept saying something about "lemontons", and cutting it, and dipping it in chocolate, and rolling it in snow. When I didn't move fast enough, she said the magic words, "come see mom, they're making cake". She knows me so well. Of course that got me curious. So I watched the clip, then as soon as I was able to pry Cha off the computer, I googled a word close enough to lamingtons that I was directed to the wikipedia page.

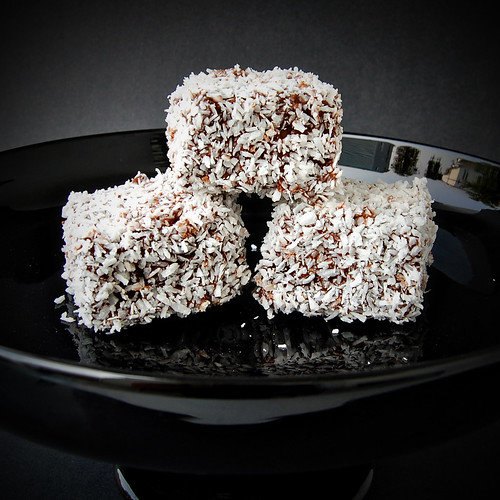
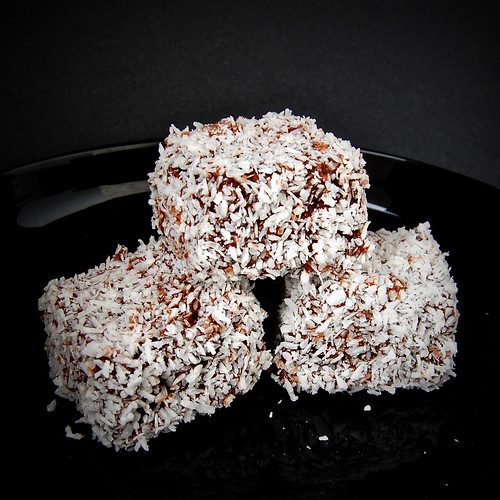
There I learned that lamingtons are a popular Australian snack, basically a sponge cake, cut into cubes, sometimes filled with jam or cream, then covered in a chocolate glaze and rolled in coconut. And they have a national holiday in Australia on July 21st. Perfect excuse to make them!


I'm not a big fan of coconut, so although I thought it would be fun to make them with Cha, they didn't look overly appetizing to me. I was trying to think of a jam that would go well with the chocolate and the coconut, and couldn't get excited about it. Then it dawned on me: chocolate + coconut + filling could very well equal a spin on the traditional Canadian snack, the nanaimo bar. That got me excited!


So I looked through a few lamington recipes to make sure I got the jist of it before I played with it. Sponge or pound cake seemed to be the standard. The chocolate glazed seemed to be pretty much the same everywhere I looked. Coconut, check. Then I decided that if I wanted something that was similar to nanaimo bars in flavor, I had to go with a chocolate cake. The chocolate glaze alone wasn't going to cut it. Sur La Table had a recipe for a chocolate pound cake, so I went with that. Then for nanaimo filling, I went to Canadian Living for a recipe.

Chocolate Velvet Pound Cake
Recipe adapted from Sur La Table, The Art & Soul of Baking

3/4 cup unsalted butter, softened
1/1/4 cups sugar
1 teaspoon water, at room temperature
2 teaspoons instant espresso powder
3 large eggs at room temperature
1 cup unbleached all-purpose flour
½ cup cocoa powder
¼ teaspoon baking powder
Pinch of salt
½ cup buttermilk, at room temperature

Preheat the oven to 350°F and position an oven rack in the center. Grease an 8x8 pan, set aside.

Cream the butter and sugar in a stand mixer until light in color, 4 to 5 minutes. Scrape down the bowl with a spatula.

In a small bowl, stir together the water and espresso powder until smooth. Beat in the eggs to blend. With the mixer running on medium, add the eggs to the butter mixture about 1 tablespoon at a time, allowing each addition to completely blend in before adding the next, scraping down the bowl occasionally.

Sift the flour, cocoa powder, baking powder, and salt into the medium bowl and whisk to blend. With the mixer running on the lowest speed, add 1/3 of the flour mixture until blended, then 1/2 the buttermilk, another 1/3 of the flour mixture, the rest of the buttermilk and the rest of the flour mixture. Scrape down the bowl and finish blending the batter by hand if necessary.

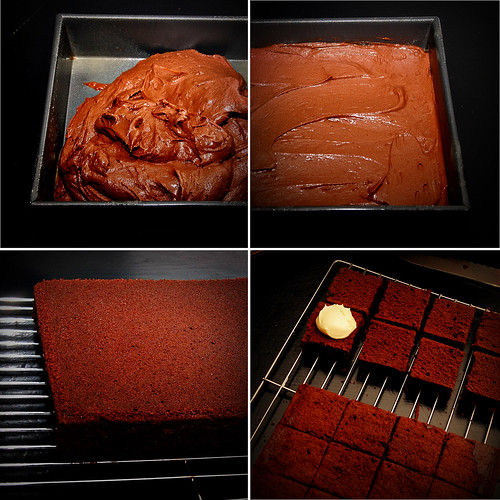
Scrape the batter into the prepared baking pan and smooth the top. Bake for 35-40 minutes, until firm to the touch and a toothpick inserted into the center comes out clean. Transfer to a rack to cool completely.


I greatly simplified this recipe, but I totally recommend this book, as it's super complete in its instructions and has great recipes and variations. After tasting this cake, I realized that it was probably all wrong for this recipe. It was moist, and dense with a tight crumb. Of course, it didn't absorb any of the glaze, but it made for a very yummy cake!


Nanaimo Bar Filling
recipe source: Canadian Living

2 tbsp butter
1 tbsp custard powder
1/4 tsp vanilla
1 cups icing sugar
1 tbsp milk, (approx.)

In bowl, beat together butter, custard powder and vanilla. Beat in icing sugar alternately with milk until smooth, adding up to 1 tsp (5 mL) more milk if too thick to spread.


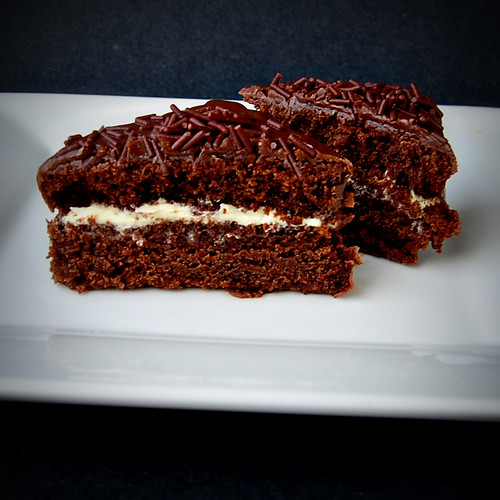
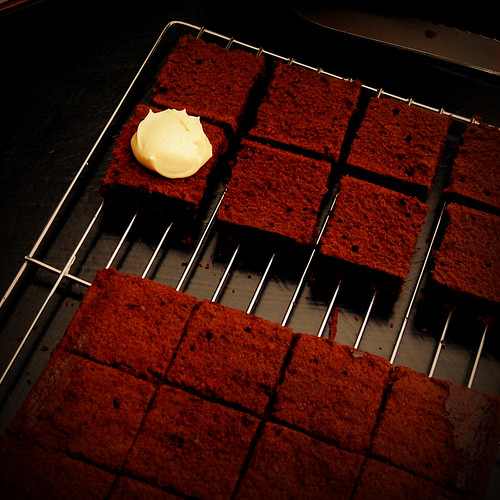
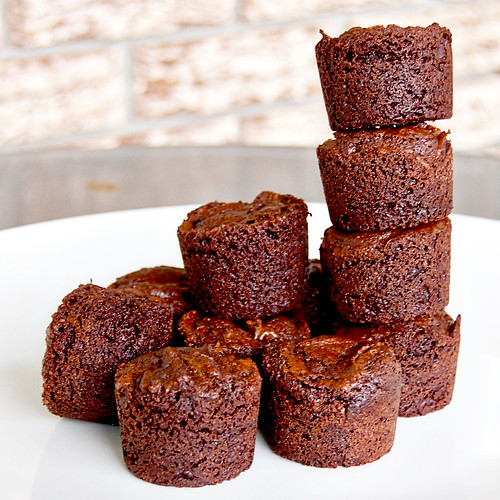
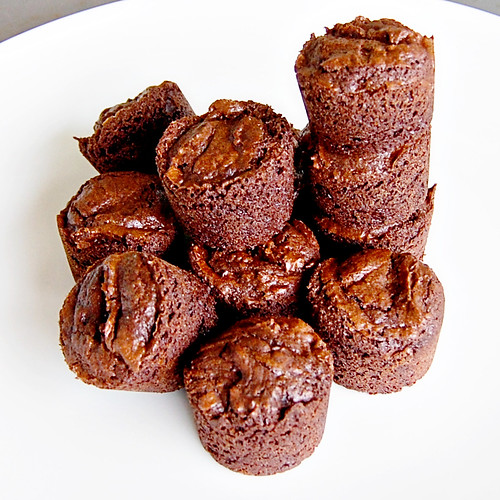
At this point, I leveled the cake, cut it in 16 squares, then I split each cube in half, spread some of the nanaimo bar filling on the bottom half, put the top half back on, and stashed the cake in the fridge over night. *Do not do it this way*. It was a total fail. I was trying to fill the squares individually so that the filling wouldn't go all the way to the edges, thinking that I'd have cleaner looking lamingtons when they were all done. Yeah, didn't work. If I were to do it again, I would level the cake, split it in half horizontally, spread a good layer of nanaimo filling on the bottom layer, put it back together, let it set in the fridge overnight, *then* cut it into squares. Yeah, that would be the way to go!

Chocolate Glaze
recipe source: All recipes

2 cups confectioners' sugar
scant 1/4 cup unsweetened cocoa powder
1 tablespoon butter
1/4 cup milk

In a large bowl, sift confectioners' sugar and cocoa. In a glass measuring cup, microwave milk and butter until the butter is melted. Add the milk to the sugar mixture and mix well to create a fluid, but not too runny icing.


This icing reminded me of what you pour over Texas Brownies. Super sweet and chocolatey, with a smooth texture. I had to add a splash of milk to my icing because it was coating the cakes too thickly.

Assembly
source : All recipes

2 (8 ounce) packages flaked coconut

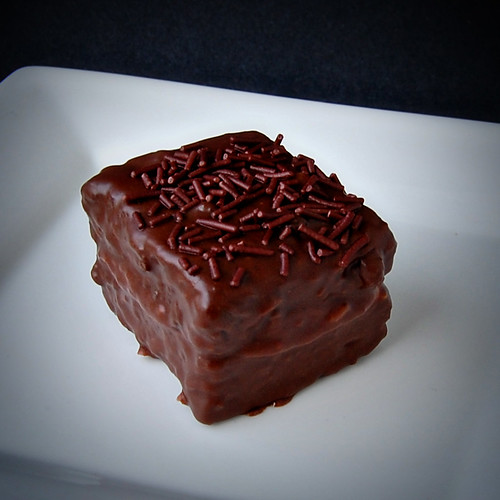
Place a drying rack on top of a piece of wax paper. Place coconut in a shallow container. Using tongs, dip each square into the icing, let the excess icing drip back into the bowl, then roll the cake in the coconut. Place onto rack to dry.


Cha had fun coating them in the coconut. I left a couple plain, because I didn't think that she would like the coconut, but she did. They look like snack cakes you get individually packaged in the grocery store, but taste so much better! I wouldn't say that they scream nanaimo bars, and I'm pretty sure someone who grew up eating lamingtons would not say that these are like the classic treat, but hey, they made a pretty good dessert. It is sweet though, so I recommend a glass of milk.

Sunday, July 17, 2011

peaches and dream pie

I really didn't want to make this pie. After the last Baked bumbleberry pie fail, I was afraid that this one would suck too (plus I don't like making pies in general). Since the Baked pie dough is really easy to make and work with, I thought that if I had some stashed in the fridge ready to go, I'd be more inclined to make this Peaches and Dream pie. I still waited until the night before this post for the Baked Sunday Mornings baking group was due to make the rest of it.


I did have a bit more trouble with the dough than the last time I made it. It was harder to roll than I remembered, and I couldn't get it to roll in a circle shape big enough for my pie plate. So I had some patching to do in one spot, and frankly, it didn't look great. I have very little experience with pie dough, and don't know how to make the edges pretty, especially with this pie plate... Am I just supposed to place the dough in the plate, cut off the excess and press the dough in the dents? In any case, I didn't even have enough dough to do that. Anyway, since my hopes for this pie weren't very high, I didn't dwell on the imperfect crust too much, and put it in the fridge while I made the other components.


Opening a can of peaches and arranging it on top of the pie crust was pretty straightforward. The recipe called for peach halves, but I didn't like that idea, so I went with canned sliced peaches in fruit juice, that I drained as well as I could, hoping to avoid making pie soup again.


The creamy filling is simply a cup of sour cream, two eggs, quarter teaspoon salt, half a cup dark brown sugar and flour. The recipe called for two tablespoons, but I put three. I was really trying to do everything I could to make this work.

On top of the pie is a streusel type topping made of flour, dark brown sugar and butter. Not quite sure if I got the texture of it right, as there was no picture of the pie in the book to refer to. It was supposed to be like "coarse sand", whatever that means.


In the oven it went, for 45 minutes. When I checked on it, the filling wasn't bubbling and it didn't seem set, so I put it in 10 minutes longer. My oven is slow, so I had a pretty good feeling I was going to have to bake it longer. After checking on it numerous times, I finally baked it for a total of 70 minutes.

After letting it cool overnight, I had a piece for breakfast. (It counts! It has fruit in it!)


And it was good! I was so happy that it set properly! I managed to get a really clean slice. The topping is awesomely sugary, and it goes really well with the peaches. The bottom crust is not crisp, just the way I like it. The creamy filling is... okay. Not my favorite part, but the pie as a whole is very good. I've never had peach pie before, so I can't compare, but you can be sure I'll have another slice of this one. And then another one... I might have to find someone to share it with actually, so I don't eat the whole thing.

For the complete recipe, and to see how the other Baked Sunday Mornings bloggers fared with their Peaches and Dream pie, head over to the blog.

Thursday, July 14, 2011

popovers

I feel like I haven't blogged about anything in forever! I made popovers for breakfast this morning. And I took pictures. Not good ones, but I took pictures nonetheless. And they were yummy! Not the pics, the popovers. So I thought I'd share.


I like popovers because they are insanely easy to make. Just dump all the ingredients in a blender and press a button. The hardest part is waiting for them to bake for 40 minutes. That's probably why I don't make them more often. When we're hungry for breakfast, we're hungry now!

I had planned on splitting them open, filling them with fruit salad and eating them with strawberry sauce. But we ate the fruit salad while waiting for the popovers to cook. So we had them with strawberry sauce and maple syrup. Super delicious.


This is a recipe that I adapted from Alton Brown to make it a bit sweeter. But you could totally omit the sugar and vanilla, add herbs or whatever, fill that popover with chicken salad and call that lunch. Oh man that sounds good. That'll be lunch soon!

Sweet Popovers
recipe adapted from Alton Brown via FoodNetwork

1 tablespoon unsalted butter, melted and cooled, plus 1 teaspoon room temperature for pan
4 3/4 ounces all-purpose flour, approximately 1 cup
1/2 teaspoons salt
1 tbsp sugar
2 large eggs, room temperature
1 cup whole milk, room temperature
1 tsp vanilla

Preheat oven to 400 degrees F.

Grease a 6-cup popover pan with the 1 teaspoon of butter.

Place all of the ingredients into a blender and process for 30 seconds. Divide the batter evenly between the cups of the popover pan, each should be about 1/3 to 1/2 full. Bake on the middle rack of the oven for 40 minutes. Remove the popovers to a cooling rack and pierce each in the top with a knife to allow steam to escape. Serve warm.


This is the part of the popover that I like the most. It kinda reminds me of a honey crueler. Delicious!

Sunday, July 3, 2011

bumbleberry pie

Early last week, I bought a bunch of different kinds of berries because they were on sale. I also had other fruits on hand, so the berries weren't eaten as fast as they should have been. Then I remembered that I was supposed to bake a blackberry pie for this edition of Baked Sunday Mornings. So I decided to use the berries to make a bumbleberry pie instead, to the great delight of my husband, who 1) love pie more than any other dessert in the world, and 2) has fond memory of, and still talks about, a bumbleberry pie he ate at least 4 years ago.

So, I set out to make the pie as per Matt and Renato's recipe in Baked Explorations, replacing the 7 cups of blackberries for 7 cups of a mixture of blackberries, raspberries, blueberries and strawberries. Yes. 7 cups of berries! (I never make pies, so this seems outrageous to me.)


I'm not a big fan of making crusts of any kind (although joining this baking group has me practicing), but, with my husband cheering me on, I'm happy to report that the crust part of this pie went really well.


While the crust was chilling in the fridge, I made the fruit filling, adding sugars, flour, lemon juice and lemon zest to the berries. Plopped the filling in the pie crust, dot the top with butter, cover the whole thing with the top crust, egg wash the crust and sprinkle it with sugar. Shoved it in the oven with instructions to my husband to take it out when the timer went off.


When I got home and checked on the pie, the little pool of berry juice that had collected on top if the crust hinted at a thin filling, but I was not expecting the mess that was this pie when I cut into it. Berry Soup. It might have been because I substituted other berries for the blackberries. Or the wrong thickener for berry pies. In any case, I don't recommend this recipe.

We ate some, and it was ok, if you could get over the look of it, but it wasn't spectacular. After it sat uneaten for a little longer, (and after I caught my daughter with a straw trying to drink the filling) I actually "drained" it by tilting the pie into a sieve, and returned the fruit to the pie, discarding the liquid. Still, it didn't scream "eat me, I'm delicious".  It's the first time I had to throw out pie because no one ate it. It was good, especially the crust, but it looked awful! I'm sorry to say that this little adventure did not encourage me to start making more pies. I'm actually a little bit apprehensive, since the next recipe for this baking group is another pie... We'll see if I get to it. If you want to check out how the other members of the group fared with their pie, please visit the Baked Sunday Mornings blog!


Saturday, July 2, 2011

chocolate bouchons - or two bite brownies

Unless I totally messed up this recipe somehow, bouchons, are really just a fancy sounding name for two bite brownies. Really good two bite brownies. I hadn't made brownies in a really long time, and I kinda know why now... they disappear way to fast. Too fast even for me to apply the Canada day treatment to them. They got eaten before I could dip them and decorate them. Oh well.


I guess there is such a thing as a bouchon  pan, but I used a small and tall muffin pan I bought at Ikea on impulse a while back. And since these are so tiny, I think a mini muffin pan would work as well! I got 12 brownies by putting about 2 tbsp of the thick batter into each muffin well.

Chocolate Bouchons - Two Bite Brownies
recipe adapted from William Sonoma Kitchen via Teenie Cakes

5 tbsp unsalted butter
3 ounces dark chocolate, chopped

1/3 cup all purpose flour
3 tbsp cocoa powder
1/2 tsp baking powder
1/8 tsp salt

2/3 cup sugar
1 egg
1 tsp vanilla

Preheat oven  to 350 degrees. Grease and flour your choice of mold.

In a microwave safe bowl, melt the 5 tbsp butter with the 3 ounces chopped chocolate. Until just melted. Let cool for about 10 minutes.

In a medium bowl, combine the 1/3 cup flour, 3 tbsp cocoa powder, 1/2 tsp baking powder and 1/8 tsp salt.

In another bowl, whisk the 2/3 cup sugar, 1 egg and 1 tsp vanilla until well combined. When the chocolate has cooled, whisk that in. Then add the flour mixture and stir until just combined.

Portion the dough into the 12 wells of the pan, about 2 tbsp per well. Bake for 18-22 minutes, until the tops of the brownies are shiny and a toothpick inserted in the middle comes up with only a few crumbs clinging to it.

Let cool in the pan for about 15 minutes, then turn out the pan onto a cooling rack to let the brownies cool completely right side up.


I over baked mine a bit, but they were still delicious! A shiny, chewy crust, with a moist and fudgy interior and a very chocolaty taste. Hard to stop eating them! Good thing it only makes 12!