Monday, December 29, 2014

toffee squares

This is one of my favorite super easy treat to make. It's quick, only three ingredients and has that salty-sweetness thing going which I love.


So easy, I let my kids make it! They love to smash an entire box of Ritz crackers. I leave the crackers in the sealed inner bag and let them squish all they want. Next, they get to stir in an entire bag of skor toffee bits and a can of sweetened condensed milk.

I pour the whole thing in a greased 8 x 8 and bake it for about 25 minutes in a 350 F oven, until it's golden brown. Let cool, cut into small squares and enjoy!

Easy-peasy, according to my children.


Friday, December 26, 2014

chocolate hazelnut bûche de noël

I made this dessert for my family's Christmas dinner this year and brought it to my parents's house. It's a really stunning dessert that requires no decorating skill. In fact, the hardest part about this recipe is finding the dulce de leche and not licking every single utensil clean!


The cake is simply eggs and sugar, beaten until doubled in volume, then flour and cocoa powder get folded in, followed by chopped hazelnuts. It bakes really quickly in the oven and has to be rolled up on a kitchen towel so it will keep its shape while cooling.

Once the cake is cooled, it gets brushed with some whipping cream that soaks in while the frosting gets prepared. The frosting is so good! Love the texture. Softened butter gets combined with nutella and dulce de leche. Most of that mixture gets used as filling and the rest goes on top. Chopped hazelnuts are both sprinkled over the frosting inside the roll and on top. Oh, and there's whole ferrero rochers in the very middle of the roll, plus halved ones decorating the top!

I made it on Christmas Eve and it hung out on the counter covered with plastic wrap for a good 30 hrs before we ate it. I was told the leftovers were even better on Boxing Day so the cake does keep well!

A definite keeper of a recipe!


Chocolate Hazelnut Bûche de Noël

recipe lightly adapted from: Mom's dish

5 Eggs
3/4 cups Sugar
1 cup Flour
4 tablespoons Cacao Powder
3/4 cups Crushed Toasted Hazelnuts
1 1/2 cups Unsalted Butter
13 ounces Dulce De Leche
1 cup Nutella
1 cup Crushed Hazelnuts
1/2 cups Whipping Cream
16 Ferrero Rochers

Preheat over to 350F. Line a 10" x 15" jelly roll pan with parchment paper.

Whisk eggs together with sugar until it doubles in volume.

In a separate bowl, sift flour and cacao to combine them together.

By thirds, using spatula, fold flour into the egg mixture. Be careful not to over-mix the dough. Fold in 3/4 cups of crushed hazelnuts. Spread the dough into the prepared pan. Bake for 12 minutes.

Remove the cake from the oven, place it on a kitchen towel. Roll up the cake making it into a long roll. Let roll cool to a room temperature.

Unroll the cake and brush the cream over the cake. Let the cream soak for a few minutes while you work on the frosting.

Combine butter, dulce de leche and nutella together and whisk until everything is well incorporated.

Spread 3/4 of the frostimg on to the inside of the roll. Place the Ferrero Rochers in a line at the edge of the long side of the cake.

Spread 3/4 of a cup of crushed hazelnuts over the frosting. Roll the cake tightly together. Spread the remaining frosting over the top of the cake. Sprinkle with remaining chopped hazelnuts and halved Ferrero Rochers.


Monday, September 1, 2014

Pretzel Crunch

This is my new favorite snack! The kids can't wait for it to cool, and my family just can't get enough. I made a double batch to package some for the kids' teachers, but when it came time to package it up, I just didn't want to! (I did anyway...)


Sure, they are not much to look at and not very complicated to make, and that might just be the dangerous part! Too easy to make just another batch!

Pretzel Crunch

Recipe created by Christina Tosi - Milk Bar
4 cups salted mini pretzels – about 1/2 of a 16-ounce bag
1/2 cup tightly packed brown sugar
1/4 cup granulated sugar
6 tablespoons milk powder
1/3 cup malted milk powder
1 1/4 teaspoons salt
14 tablespoons butter (1 stick, plus 6 tablespoons), melted

1. Preheat the oven to 275 degrees F.

2. Pour the pretzels in a large bowl and crush them with your hands to one-quarter of their original size. Add the milk powder, malt powder, sugar, and salt, toss to mix. Add the butter and toss to coat. As you toss, the butter will act as glue, binding the dry ingredients to the pretzels and creating small clusters.

3. Spread the clusters on a parchment- or silpat-lined sheet pan and bake for 20 minutes, until it looks toasted, and sugar coating bubbles and coats the pretzels.

4. Cool the pretzel crunch completely before storing. Stored in an airtight container at room temperature, the crunch will keep fresh for 1 week; in the fridge or freezer, it will keep for 1 month. 


I used small letter shaped pretzels so I didn't crumble them up, just left them as-is. The last few times I made this recipe, the butter separated from the rest of the ingredients while baking, so I might try to reduce the amount of butter next time I make this. I also toss the mixture once while baking, and a few times while its cooling so that the sugar coats the pretzels properly. And lastly, if the pretzels aren't very salty, I suggest adding a pinch of salt of two. The very first batch I made with the bottom of the bag where all the salt had collected, and it was my most favorite batch to date. I'm sure the added salt made the difference!

Sunday, August 17, 2014

chewy chocolate mint cookies

Two Baked Sunday Mornings posts in a row: I'm on a roll! And these cookies were crazy good, so I'm really glad I made them!

They remind me of the chocolate cream cheese snacking cookies we made last summer in that they are soft and tender but... refreshing. And I totally didn't expect that. The mint, and there's a lot of it in this recipe, took them to a whole other level.


Instead of the chunks called for in the recipe, I used callebault chocolate chips and I didn't roll them in sugar before baking. These only bake for 10 minutes and stayed nice and soft after cooling.

I had plans to turn these into ice cream sandwiches but I was assured that they wouldn't last long and they didn't.

For the recipe, and to see how the other bakers enjoyed their cookies, click on through to the Baked Sunday Mornings blog.


Sunday, August 10, 2014

vanilla bean malt cake


This morning's recipe for Baked Sunday Mornings is one that I made last fall, then again, at xmas time, one of the first recipes I made from Baked Elements.


I'm not a big fan of malt, but really liked this recipe. It produces a really nice and moist vanilla cake that doesn't scream malt but has that little something extra.

I had first tried to make little acorn cakelets but I overfilled my moulds and it made a big mess. The cake is a bit too airy to keep the distinct impression of the mould anyway. But the rest of the batter made for really cute mini bundt cakes! These are about 3 or 4 inches across the bottom and perfect to share!

Love this recipe. To find it and to see how the other Baked Sunday Mornings bakers did, head over to the blog!


Sunday, July 13, 2014

boston cream cake

We were celebrating my SIL's birthday today, so I quickly whipped up this easy but quite delicious Boston cream cake.


I kept going back and forth all week trying to decide what to make. I had a ton of egg yolks left over after making an angel food cake earlier in the week, so I quickly decided to make pastry cream out of them before they dried out and went bad.

Pastry cream  
7 large egg yolks
3/4 cup sugar
1/4 tsp salt
1/3 cup cornstarch
3 cups whole milk
3 Tbsp unsalted butter
1 Tbsp pure vanilla extract
In a large bowl, whisk together the egg yolks, half of the sugar, the salt, and cornstarch until the mixture is pale, thick and smooth.
In a medium saucepan over medium heat, stir together the milk and the remaining half of the sugar. Continue stirring until the mixture boils. Remove the pan from the heat, and slowly stream the liquid into the egg mixture, whisking constantly. Transfer the tempered egg mixture back to the saucepan and, whisking constantly, bring to a boil over medium-high heat. Boil until thickened to pudding consistency.
Remove the pan from the heat and stir in the butter, and vanilla until combined. Strain throught a fine-mesh sieve into a large bowl.
Once the pastry cream have cooled for about 15 minutes, wrap the bowl in plastic wrap, pressing the plastic directly onto the top of the cream to prevent a skin from forming. Refrigerate until firm, about 4 hours of overnight.
 Recipe source: Baked Explorations
I was still hesitating between a strawberry shortcake style cake, or one with rhubarb and strawberry compote as the filling with the pastry cream but settled on the Boston cream cake after my husband suggested it.

I used a basic yellow chiffon style cake recipe because I wanted the cake to stay nice and fluffy even straight out of the refrigerator.

Great Yellow Cake
3/4 cup canola oil
1/2 cup water
1/3 cup apple juice
2 cups (9 oz.) unbleached all-purpose flour
1 Tbs. baking powder
1/2 tsp. kosher salt
1-1/2 cups sugar
4 large eggs
1/4 tsp. pure vanilla extract
Preheat the oven to 350°F. Spray or butter two round cake pans, each 8 inches in diameter and 2-inches deep, and line the bottoms with parchment.
In a liquid measuring cup, mix the oil, water, and apple juice and set aside. In a medium bowl, whisk together the flour, baking powder, and salt and set that aside as well.
In the bowl of a stand mixer with the whisk attachment, combine the sugar, eggs, and vanilla. Whip on medium-high speed until the mixture is thick, has tripled in volume, and makes a fat ribbon that holds its shape for a few seconds on top of the batter when you lift the whisk, about 4 minutes.
With the motor running on medium speed, add the liquid in a slow, steady stream. (The trick here is to incorporate and emulsify the liquid into the eggs without causing the eggs to deflate. Adding the liquid slowly in a constant stream is the name of the game.)
Add the dry ingredients to the egg mixture and mix on low speed just until the batter is smooth and lump-free, about 30 seconds. (Be careful not to overbeat, which will make the cake tough.)
Divide the batter between the cake pans. Bake until the cakes are golden, spring back to a light touch, and a toothpick inserted into the center comes out clean, about 35 minutes.
Let the cakes cool in the pans for 40 minutes, then invert onto a wire rack. Remove the parchment and let cool completely.
Recipe source: Sweet Cream and Sugar Cones (Bi-Rite Creamery)

I had a hard time deciding on the glaze, but went with a modified version of the glaze I had made for the Mile high cake, just cutting out some of the cream so the glaze wouldn't be too soft.

Milk Chocolate Glaze
5 ounces good-quality milk chocolate, coarsely chopped
5 ounces good-quality dark chocolate (60–72%), coarsely chopped
1 cup heavy cream
2 tablespoons light corn syrup
1 ounce unsalted butter, at room temperature, cut into ½-inch cubes
Place the chopped chocolate in a large heatproof bowl and set aside.
In a small saucepan over medium heat, combine the heavy cream and corn syrup and bring just to a boil.

Remove from the heat and pour over the chocolate. Let sit for 2 minutes, then slowly blend the chocolate and cream together, whisking from the center, until the chocolate is completely melted and the mixture is smooth. Whisk for another 2 to 3 minutes to release excess heat from the mixture. Add the butter and whisk again until the butter is completely melted and incorporated. Leave the glaze at room temperature for about 3 hours, until slightly thickened (it should drip thickly when poured slowly from the spoon).
Spoon teaspoonfuls of glaze up to 2 inches apart around the top edge of the cake, allowing glaze to drip down the sides of the cake. Spoon the remaining glaze over the top center of the cake and smooth with an offset spatula, covering the top completely. Chill the cake until the glaze sets, at least 1 hour.
Recipe source: Baked Explorations
I split each cake into two layers and filled each layer with 3/4 cups pastry cream. Once all my layers were stacked, I left the cake set in the refrigerator over night. The next morning, I made the glaze first thing, and finished the cake around noon. A quick trip into the refrigerator to set the glaze, and that was it!

I think the pastry cream between the layers helped the cake stay moist and gave it a really good texture. The glaze consistency was just right, and the flavor spot on. I had lots of leftover glaze, but I'm sure we'll find a way to use it up :)

Monday, June 30, 2014

cinnamon buns

This month the Daring Bakers kept our creativity rolling with cinnamon bun inspired treats. Shelley from C Mom Cook dared us to create our own dough and fill it with any filling we wanted to craft tasty rolled treats, cinnamon not required!
I had never made cinnamon buns before, so I stuck to the provided recipe and made the classic pastries filled with cinnamon sugar.


Although whenever we buy cinnamon rolls, we get the kind frosted with a thick layer of cream cheese frosting, I glazed these with a powdered sugar, milk and vanilla mixture, and we quickly ripped into them, effectively ruining our dinner.

Cinnamon Buns
(from The Bread Baker's Apprentice by Peter Reinhart)
Makes 8-12 large or 12-16 smaller buns

Ingredients
6½ tablespoons (100 ml) (3 oz) (90 gm) granulated sugar
1 teaspoon (5 ml) (6 gm) salt
5½ tablespoons (85 ml) (2¾ oz) (80 gm) shortening, unsalted butter or margarine, at room temperature
1 large egg, slightly beaten
1 teaspoon (5 ml) lemon extract OR vanilla extract OR 1 teaspoon (5 ml) grated lemon zest
3½ cups (840 ml) (16 oz) (450 gm) unbleached bread (or all-purpose/plain) flour
2 teaspoons (10 ml) (¼ oz) (6 gm) instant yeast (active dry worked as well)
1 1/8 – 1 ¼ cups (270-300 ml) whole milk or buttermilk, at room temperature
½ cup (120 ml) (3½ oz) (100 gm) cinnamon sugar (6½ tablespoons (100ml) (3 oz) (90 gm) granulated sugar plus 1½ tablespoons (20 ml) (1/3 oz) (10 gm) ground cinnamon)

In a stand mixer fitted with the paddle attachment, cream together sugar, salt and shortening. Add the egg and extract to the creamed sugar and shortening and mix together until smooth. Add the flour, yeast and milk to the mixer and mix on low speed until the dough begins to form a ball.

At this point, switch to the dough hook attachment and knead for 10 minutes. The dough will be silky and supple, but not overly sticky. You may need to add a touch of flour if your dough is too sticky.

Lightly oil a bowl, turn the kneaded dough out into it, turning to coat, then cover the bowl with plastic wrap.
Allow the dough to rest (ferment) until it has doubled in size, approximately 2 hours.

Once the dough has rested and risen, you are ready to shape the cinnamon buns. Prepare your a sheet pan by lining it with parchment paper.

Spray your work surface lightly with cooking spray and turn the dough out onto the work surface. Using a rolling pin, roll the dough, into a rectangle about 2/3 an inch (15 mm) thick, 14 inches (350 mm) wide and 12 inches (300 mm) long (for large buns) (or 18 inches (450 mm) wide by 9 inches (230 mm) long for smaller ones). You may need to sprinkle the dough and/or work surface with a bit of flour to keep the dough from sticking. Sprinkle the cinnamon sugar filling over the surface of the dough.

Starting with a long end, roll the dough, creating a spiral, into a log shape, making sure to end with the seam side down. Cut the dough into pieces approximately 1¾ inches (45 mm) thick (for large buns) (1¼ inch (30 mm) for smaller buns).

Place buns approximately ½ inch (15 mm) apart on the prepared pan. They shouldn't be touching at this time.

Allow the shaped buns to proof at room temperature for 75 – 90 minutes until they have nearly doubled in size. They will now be touching each other.

If you are not planning on baking the buns the same day as you are preparing them, you can place them into the refrigerator after they are shaped (before this rise) for up to 2 days. If you do so, you will need to allow them to return to room temperature prior to baking, which means removing them from the refrigerator about 3 or 4 hours before baking.

Preheat the oven to moderate 350°F/180°C/gas mark 4 degrees at the end of this proofing time.

Bake the buns for 20 – 30 minutes, until golden brown

Allow the buns to cool for 10 minutes in the pan, then drizzle with glaze (recipe below). Remove the buns from the pan to a cooling rack and allow them to cool for at least 20 minutes before eating.

White fondant glaze

Sift 4 cups (500 gm) (17½ oz) of confectioners' (icing) sugar into a large bowl. Add 1 teaspoon (5 ml) of lemon, orange or vanilla extract and between 6 tablespoons to ½ cup (90 to 120 ml) warm milk, whisking well until all of the sugar is dissolved. (Add the smaller amount of milk first, whisking briskly, then add slowly until you have the consistency you want for drizzling over the buns.)


I used lemon extract in the dough, and next time, I'll use vanilla instead. I also used shortening in the dough, mainly because I was too lazy to let the butter reach room temperature. I used 1/3 cup of white sugar, and 1/3 cup of dark brown sugar, plus 2 tbsp cinnamon for the filling. I also spread some butter on the dough before rolling it up.

It's a good thing it takes a good part of the day to make cinnamon roll, because fresh out of the oven, they are amazingly soft and delicious! I'm very happy the Daring Bakers pushed me to make this! Another item off my to bake list!

Thanks Shelley for an amazing challenge, and for compiling all of this month's variations on Pinterest! I loved seeing how every Daring Baker interpreted this challenge differently!


Saturday, June 28, 2014

brown sugar shortcakes

Last year, I had the pleasure of testing some of the new recipes in Matt Lewis and Renato Poliafito's newest cookbook: Baked Occasions. All were awesome, as expected, but of the recipes I tested a few of them really stood out, including these brown sugar shortcakes.


They are soooo good! We used to buy shortcakes from the strawberry farm where we go pick berries every year, but no more. This is THE recipe. So delicious, and the texture is perfect.

Can't share the recipe just yet, but be sure to pre-order the new book so you can make these shortcakes, and other insanely delicious recipes when the book comes out in October. I can't wait to get my hands on this one!

Monday, May 26, 2014

"world's best cake"

I made this quick cake for my parents' wedding anniversary after seeing it a million times on my instagram feed.

worlds best cake

Called the World's Best Cake it's a yellow cake based topped with a vanilla meringue sprinkled with sliced almonds. The whole thing is baked, then sliced into two sections so it sandwiches a filling of whipped cream.

I had made something similar in the past, with a zabaglione filling, so I was familiar with the technique and resulting cake.

I baked my cake in two 6 inch cake pans, but because I was using short pans, the meringue rose over the top and baked in an unattractive mushroom shape. The cake layers were also too thick to be stacked, so I ended up with two small 6 inch cakes that I covered with whipping cream. Next time I would bake the cake in 8 inch pans, a change that I have reflected in the recipe below.

World's Best Cakerecipe source: Sweet Paul via Bakers Royale

10½ tablespoons (1 stick plus 2 1⁄2 tablespoons) butter, softened
1 2⁄ 3 cups granulated sugar
1 1⁄ 3 cups unbleached all-purpose flour
1 teaspoon baking powder
5 large eggs, separated
1⁄ 3 cup whole milk
1⁄4 cup sliced almonds
1 cup heavy cream
1⁄2 vanilla bean

Heat the oven to 350°F, with a rack in the middle position. Line two 8 inch removable-bottom cake pans with parchment paper. 

Beat the butter and 2⁄ 3 cup of the sugar in a large bowl with an electric mixer until light and creamy, about 3 minutes. Add the flour and baking powder and mix well on low speed. Mix in the egg yolks and milk. Evenly divide the batter between the pans.

In a large clean bowl, beat the egg whites and the remaining 1 cup sugar to soft peaks. Evenly divide meringue and spread on each cake layer. Sprinkle with the almond slices. Bake for 30 minutes, or until the meringue is golden brown and puffed. 

Cool on a wire rack in the pan. 

When the cake is cool, put the cream in a medium bowl and scrape in the vanilla seeds. Discard the vanilla pod. Beat to soft peaks with an electric mixer, about 3 minutes. Spread the cream on top one cake layer and then place the second cake layer on top. Let the cake sit for 1 hour in the fridge before serving.

Monday, May 19, 2014

glazed cherry loaves

My daughter is on a cherry kick, and I was totally going to make her a sweet cherry cake for her bday earlier in the month, but I didn't. I made her a charlotte, which collapsed when I removed the ring. So I sent my husband to the grocery store before guests arrived. She got cherry cupcakes to bring to school, but they were made from a mix, and obviously don't count. Poor kid never gets a cool birthday cake.

cherry loaves

So when I spotted this loaf recipe from Averie Cooks I knew I had to make it immediately. Plus I had recently remembered I had this cool twist donut pan and also needed to use that ASAP.

naked cherry loaves

I have made a cherry cupcake recipe in the past, but I think this recipe wins for ease and simplicity. The texture is moist and a bit coarse, and so good! It would have been fine without the glaze, but it's prettier with it. I simply whisked enough milk in powdered sugar to get a drizzling consistency, then added a bit of almond extract for flavor.

glazed cherry loaf

Cherry Bread
recipe adapted from : Averie Cooks

one 10-ounce jar maraschino cherries, juice reserved
1 3/4 cup all-purpose flour
1 cup granulated sugar
2 teaspoons baking powder
pinch salt
2 large eggs
1/2 cup canola or vegetable oil
1 teaspoon almond extract
1 teaspoon vanilla extract

Preheat oven to 350F. Spray your choice of baking vessel with non stick spray.
Roughly chop cherries and set juice aside.
In a large mixing bowl, whisk flour, sugar, baking powder, and salt to combine; set aside.
In a small mixing bowl or glass measuring cup, combine eggs, oil, cherry juice, almond extract, vanilla extract.
Pour wet mixture into dry ingredients and stir to combine; don't overmix. Batter will be very thick.
Fold in the chopped cherries.
Divide batter into the prepared pans, smoothing the tops lightly with a spatula. 

Bake until bread is domed, set, and lightly golden. A toothpick inserted in the center should come out clean, or with a few moist crumbs, but no batter. 

My twists baked for about 23 minutes, whereas the three cupcakes I made took about 25 minutes. If baking in larger loaf pans, baking time could be up to 40 minutes.

cherry loaf cross close up

Sunday, April 27, 2014

carrot cake with cinnamon cream cheese frosting

For the past couple of years, I always plan to make Easter treats for the kids at school, but then life gets crazy, and I don't. Last year, I felt especially bad, so the Easter bunny share some of his stash of carrots with the kids so that we could make carrot muffins to bring to school after Easter break.

I would have totally forgotten about that had my oldest not mention this "new tradition" the day before Easter. A quick trip to the store and I knew exactly what we were gonna use the Easter bunny's carrots for!

cake

Except I didn't share this with the kids at school. I even had omitted the nuts thinking I would send this to school. We kept it to ourselves. This was very good cake. We especially liked the addition of cinnamon in the cream cheese frosting.

carrot cake piece

For the recipe, and to see how other Baked Sunday Mornings members enjoyed this cake, click on through to the Baked Sunday Mornings website.

Sunday, March 16, 2014

classic crème brûlée

The Baked Sunday Mornings Bakers made Crème Brulée this morning.


I wasn't sure I was was going to get around to making it this weekend but dreaming about work woke me up early, so I had plenty of time to steep a vanilla bean and seeds into some cream while setting up the rest of the recipe.

Egg yolks are whisked into sugar and a bit of salt and then the mixture is tempered with the still hot cream before being strained into a clean container.


According to the book, the recipe yields 4 servings but a half a cup of cream per serving seemed a bit much to me, so I poured the cream and egg mixture into 8 smaller containers. The custard is baked in a bain-marie in the oven until the edges are set and the center still soft.

The custards need to cool, then chill for 4 hours before sugar is added to the top of them, and melted with a blow torch. Usually, white granulated sugar is used to make the glass-like top of the crème brûlée but in this case, dark brown sugar is used to give it a more pronounced caramel flavour. Brown sugar does not spread as nicely as white sugar, so I had a hard time melting the sugar evenly since it was bumpy.

I thought the crème brulée had the perfect texture with a nice crunchy top. And it looked so cute in the little teacups! Loved it!


For the recipe, and to see how my fellow bakers enjoyed this recipe, click on through to the Baked Sunday Mornings blog!

Monday, March 10, 2014

Cinnamon Roll Cake

I needed a dessert to bring to my parent's house for dinner after the kids had invited themselves over this weekend. I was all set to make Classic Creme Brulée as part of Baked Sunday Mornings, but when I poured the cream in a saucepan, it came out.... not quite liquid.

So.... Spent a couple of hours trying to decide what to make and waited until the very last minute to make this cake.


It's not real pretty, not fancy and not complicated, but it was so good! It hung out on the stove top while dinner was cooking so was still warm and gooey when we had it for dessert with a scoop of vanilla ice cream. The cake itself was moist and light and the topping created gooey swirls of cinnamon and brown sugar yumminess.

This is a very simple 3-bowls and no mixer cake. The batter itself is simply flour, sugar, baking powder, salt, eggs, milk and vanilla whisked together like pancake batter. Melted butter gets poured in the batter and gently combined. The resulting mixture gets spread in a greased 9x13 pan.

The butter for the topping was supposed to be room temperature, but mine was fridge cold, so I simply cut it into some brown sugar, cinnamon and flour. Once it seemed combined enough, I poured it on batter and used a knife to swirl the topping into the batter as best as I could.

My cake baked for way longer than the recommended 30 minute average. Maybe, 45 to 50 minutes total.

Once I got around to it, and while the cake was still warm, I made the quick glaze out of powdered sugar, milk and vanilla, and poured it on top of the cake where it quickly seeped into the nooks and crannies to settle.


Not much to look at, but it made for a homey satisfying dessert, that could totally be considered breakfast.... cause you know: cinnamon!

Cinnamon Roll Cake
recipe source: Rumbly Tumbly

Cake:
3 c. flour
1/4 tsp.salt
1 c. sugar
4 tsp. baking powder
1 1/2 c. milk
2 eggs
2 tsp. vanilla
1/2 c. butter, melted

Topping:
1 c. butter, softened
1 c. brown sugar
2 Tbsp. flour
1 Tbsp. cinnamon

Directions:
Mix everything together except for the butter. Slowly stir in the melted butter and pour into a greased 9×13 pan. For the topping, mix all the ingredients together until well combined. Drop evenly over the batter and swirl with a knife. Bake at 350 for 28-32 minutes.

Glaze:
2 c. powdered sugar
5 Tbsp. milk
1 tsp. vanilla

While warm drizzle the glaze over the cake.


Saturday, March 1, 2014

flourless walnut chocolate cake and dacquoise

I don't do free. No fat free, no sugar free, no gluten free, no dairy or egg free. I live life full, and fully aware of the impact it has on my health! Actually the only free I do is the free food I share with people.


So when I made this cake, I certainly didn't make it because it was gluten free. I picked it for my mom's birthday out of the book Bake it like you Mean it by Gesine Bullock-Prado because it look amazing, and was in the meringue section of the book. My mom loves meringues, so I thought it would be a sure bet.

I knew she would enjoy it, but I was surprised how much the rest of us liked it. My husband and I fought over the last piece.

The cake consists of a flourless walnut chocolate layer, topped with a chocolate filling, then a layer of dacquoise. I made it over three days, making the dacquoise first and storing it in an airtight container for a couple of days. The night before my mom's birthday, I got my husband to play sous-chef and we got the flourless walnut chocolate cake layers in the oven in an half hour. A couple of hours before the birthday dinner, I quickly whipped up the chocolate filling and assembled the cake.

Making the filling was strange for me. 8 egg yolks, 12 oz of chocolate chips and a pinch of salt get combined in the food processor. Yes, the food processor. A half cup of boiling coffee gets poured while the food processor is doing its thing. Then, once everything is combined, a cup of butter gets added to the mix. So I'm pretty sure it's not a buttercream, a mousse maybe? Not technically... So i'm going with an insanely good chocolate filling.

Combined, these three components made for a super rich and delicious cake. The cake was fudgy, the dacquoise got chewy from being sandwiched with the chocolate filling which was super silky. On top of the cake, the little meringue disks stayed crispy.

Probably not the best cake to have after a huge meal, but over the next couple of days, we thoroughly enjoyed it. I just wish I had gotten more and better pictures, but was pressed by time and fading daylight. I wouldn't even post this if it wasn't for the fact that I wanted to remember this cake so I could make it again.

Thursday, February 27, 2014

shaped breads

February's Daring Bakers challenge was so dangerous! Easy, simple ingredients, so yummy, and pretty on top of it!

Daring Baker Sawsan, of Chef in Disguise, challenged us to make beautiful, filled breads.


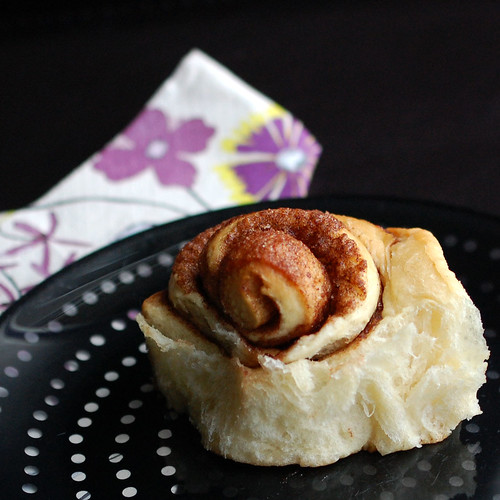
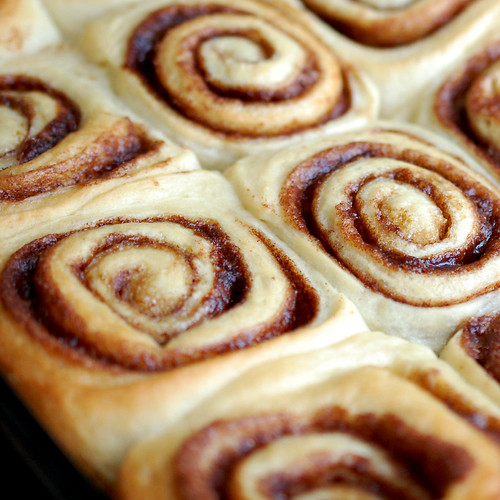
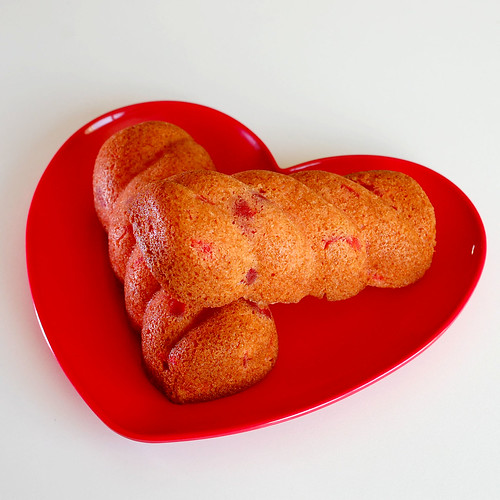
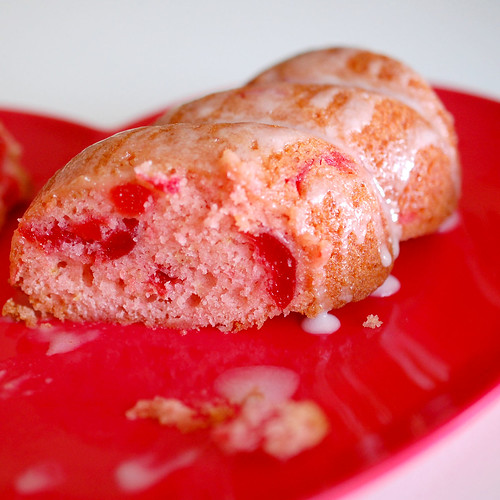
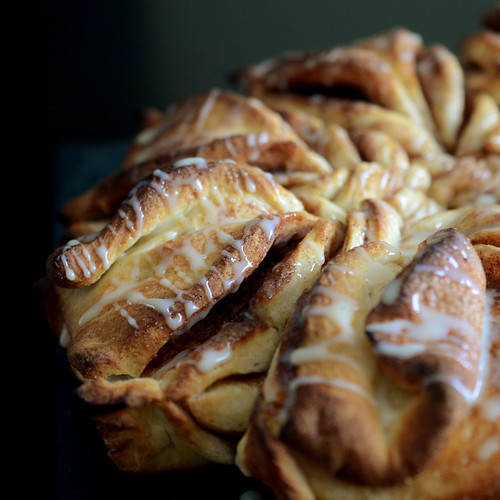
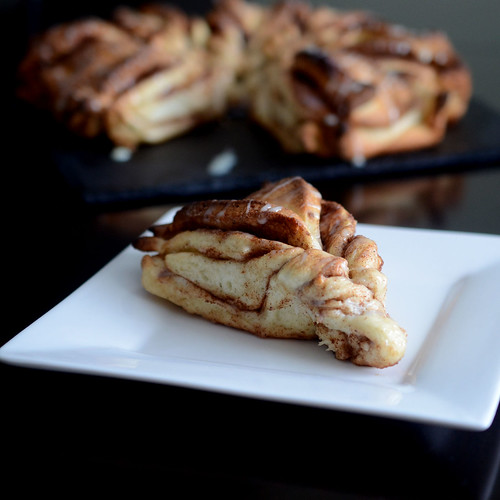
Sawsan provided us with two recipes, and two shaped breads to attempt. The first one I made was filled with cinnamon sugar. The other recipe made two "loaves" one of which i filled with nutella, the other, with berry preserves.
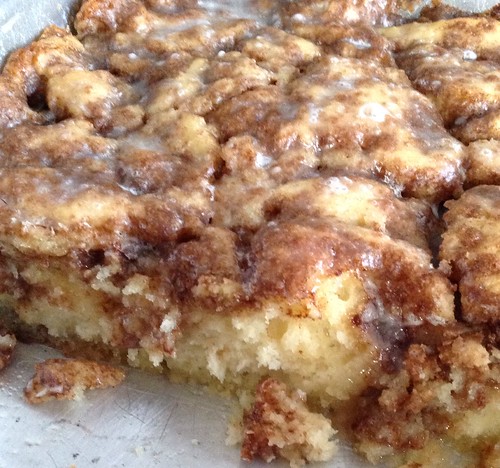
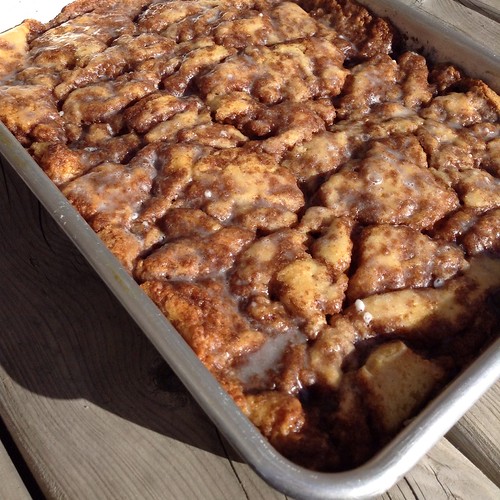
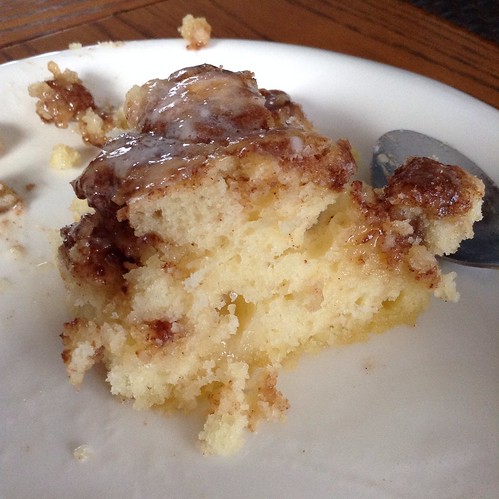
Cinnamon bread
Servings: 8

1/4 cup (60 ml) warm water
3/4 cup (180 ml) warm milk
1 large egg
1/4 cup (60 ml) (60 gm) (2 oz) butter, softened
1/4 cup (60 ml) (50 gm) (1-3/4 oz) white sugar
1/2 teaspoon (3 gm) salt
3-1/4 cups (780 ml) (450 gm) (16 oz) plain (all-purpose) flour, approximately
2 teaspoons (10 ml) (8 gm) dry yeast
1/4 teaspoon (1 gm) cardamom, optional

1/4 cup (60 ml) of milk
1 tablespoon (15 gm) (1/2 oz) sugar

1/2 stick (4 tablespoons) (1/4 cup) (60 ml) (60 gm) (2 oz) butter
4 tablespoons (60 ml) (25 gm) (1 oz) cinnamon
1/2 cup (120 ml) (100 gm) (3-1/2 oz) sugar

1 can (400 gm) (14 oz) sweetened condensed milk

In a bowl whisk the egg with milk, water, sugar, butter and yeast. Set aside

In another bowl sift the flour with the salt and the optional cardamom. Add the liquid ingredients to the dry ingredients and knead until you get a smooth dough.

Note: This recipe requires between 3-1/4 and 3-1/2 cups of flour depending on the weather, humidity and the flour brand. Start with 3-1/4 cups and if you feel that the dough is too soft, add the extra 1/4 cup.

Place the dough in a bowl you have brushed with some oil and cover it with a wet cloth and leave it in a warm place to double.

Turn the dough out onto a lightly floured surface. Divide the dough into 4 parts. Roll each part into a circle at least 20 cm (8 inch) in diameter.

Brush the first layer with butter then sprinkle with sugar and cinnamon. Place the second layer on the first layer repeat the brushing and sprinkling and then do the same with the third layer. Top with the fourth layer, this time only brush it with butter.

Using a knife make cuts that divide the dough circles into 8 triangles. Make cuts that go 2/3 of the way in the middle of each triangle. The cuts should not reach the base of the triangle nor the tip. Take the tip of each triangle and insert it into the cut you made and pull it from the underside.

Arrange the triangles on your baking sheet. Pinch the two angles at the base of the triangle together.
Brush the dough with milk.

Allow to rest for 15 minutes during which you would heat your oven to very hot 500°F/240°C/gas mark 9 (rack in the middle). (Go for the hottest your oven will do).

Bake for 5 minutes on very hot 460°F/240°C/gas mark 9, then lower the temperature to moderately hot 390°F/200°C/gas mark 6 and bake for 15-20 more minutes

Note: ovens do differ greatly, so the time may differ,what you want is to bake it until the under side is golden brown and the bread is baked all the way to the center. If the top of the bread is not golden brown by that time and you have a broiler (grill) in your oven. Turn on the broiler (grill) for a couple of minutes until the bread is golden brown on top. If on the other hand the top is getting too dark, consider lowering the oven temperature and covering the top of the bread with foil to stop it from over browning

Take it out of the oven and allow to cool for 5 minutes then transfer to a wire rick and drizzle with sweetened condensed milk while it is still warm.
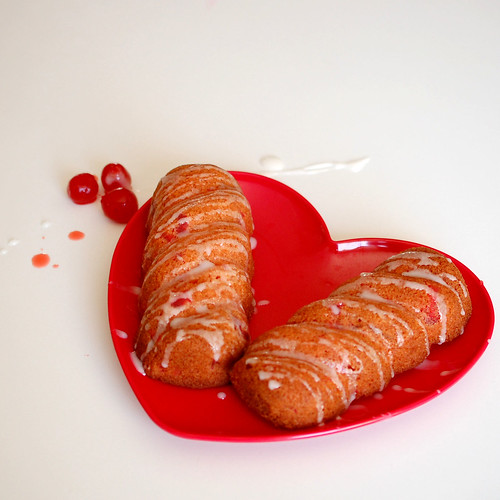


Nutella twists

Servings: This dough recipe makes two loaves, 16 small pieces each

1 can (400 gm) (14 oz) sweetened condensed milk
3 large eggs
1 cup (240 ml) vegetable oil
1 cup (240 ml) warm water
3 teaspoons (15 ml) (12 gm) yeast
7 cups (1 kg) (2.2 lbs) all-purpose (plain) flour, approximately
Pinch of salt

Instead of the eggwash use
2 tablespoons (30 ml) (25 gm) (1 oz) milk powder
3 tablespoons (45 ml) lukewarm water
1teaspoon (5 ml) (5 gm) sugar
1/4 teaspoon (1 gm) instant coffee

For the filling
½ jar (200 gm) (7 oz) of nutella (or similar)

Mix the condensed milk, yeast, oil, water, and eggs in the bowl of your mixer. Add the flour one cup at a time and knead using the kneading attachment or by hand till you get a soft dough. The dough will be slightly sticky due to the sweetened condensed milk, don’t worry once the dough rests it will have a wonderful consistency.

Place the dough in a lightly oiled bowl, cover and allow to rest till it doubles in size

Punch down the dough and divide it into 2 parts. Wrap one part in a plastic bag and work with the other. Divide the dough ball into 4 parts. Roll each part into a circle at least 20 cm (8 inch) in diameter. You can use a plate or any other round item as a template if you want your layers to be identical and uniform. 

Spread the Nutella (or similar filling) on the first layer. Place the second layer on top of the first and repeat. Top with the fourth layer, this time only brush it with butter.

Note: To help with the slippery Nutella, you can place the filled layers before cutting into the fridge for 20-30 minutes, this will help the Nutella to firm up. That will make the cuts and twists easier.

Using a knife make cuts that divide the dough circles into 8 triangles starting at the center but don’t go all the way to the outer edge. Then divide each triangle into two. That gives you a total of 16 triangles. Gently lift the triangles one at a time and twist them.

Repeat for the other dough ball.

Brush the dough with egg wash replacement. Allow to rest for 15 minutes during which you would heat your oven to very hot 500°F/240°C/gas mark 9.

Bake for 5 minutes on very hot 460°F/240°C/gas mark 9, then lower the temperature to moderately hot 390°F/200°C/gas mark 6 and bake for 15-20 more minutes.

Note: Ovens do differ greatly, so the time may differ,what you want is to bake it until the under side is golden brown and the bread is baked all the way to the center. If the top of the bread is not golden brown by that time and you have a broiler (grill) in your oven. Turn on the broiler (grill) for a couple of minutes until the bread is golden brown on top. If on the other hand the top is getting too dark, consider lowering the oven temperature and covering the top of the bread with foil to stop it from over browning.


This challenge was very dangerous for me. I could have made bread all month long! So delicious! Thanks Sawsan for the great challenge!


Saturday, February 15, 2014

cinnamon toast crunch frosting

I made yummy frosting this morning! The cinnamon flavored cupcake itself was just meh, but the cinnamon toast crunch frosting was really, really good!


The original recipe called for 1 3/4 cups of crushed cereal, but since Cinnamon Toast Crunch is one of the kid's favorite, so of course, there was only a tiny bit left. Once powdered in the blender, I was able to get about 3/4 cups of crushed cereal.

The frosting had some texture to it, from the the brown sugar and the crushed cereal, so I just plopped it on the cupcake instead of piping it prettily, afraid that the crushed cereal would clog up the piping tip.

I thought it was a really nice change from boring old vanilla frosting. Now just need to find a cupcake recipe to match this frosting!

Cinnamon Toast Crunch Frosting
recipe adapted from: BS' in the Kitchen

1 1/2 cups butter (room temperature)
4 tsp vanilla
1 tsp Wilton butter flavouring
2 tbsp sweetened condensed milk
4 tbsp brown sugar
4-5 cups icing sugar
1 1/2 tsp cinnamon
3/4 cup cinnamon toast crunch cereal crumbs (run through a foodprocessor)
Whipping cream to lighten the texture if necessary

Whip the butter with the vanilla, butter flavouring, sweetened condensed milk and brown sugar. When the mixture is creamy, add the icing sugar and cinnamon. Whip until fluffy, then add the powdered cereal. Continue whipping the frosting, adding whipping cream as needed, until desired consistency is obtained.

Sunday, January 5, 2014

antique caramel cake

My fellow bakers at Baked Sunday Mornings made this Antique Caramel Cake a few weeks back. I didn't because.... I got lazy and didn't have a reason to make it. But after reading all blog posts, I jumped on the occasion to make it for my sister in law's birthday.


And it got great reviews! The cake was nice and moist, and the caramel frosting was delicious. Like going on the list of my favorite frosting. (Note to self: Build list of favorite frosting recipes.) Some of the BSM bakers complained of the frosting being fussy, as it's made with cream cheese and is quite soft. I made sure to frost the cake in a cold spot in the kitchen (not hard to find these days, but I actually opened a window while I was frosting.) I did manage to get the cake frosted without too many problems but it did start to droop after sitting at room temperature for most of the afternoon.

I was kinda surprised when I made the cake that it didn't call for salt, vanilla or baking powder. Just baking soda dissolved in vinegar, added in at the very last before baking. The flavor of the cake was just fine without the salt and vanilla. The sides baked up nice and straight and it didn't dome very horribly.


The original recipe can be found here, and makes two 8-inch layers. I double the recipe, and made 3, 9-inch layers. This is one I'd make again in heartbeat!