Monday, February 27, 2012

double chocolate loaf with peanut butter cream cheese spread

I've missed a few challenges, but i'm back in for February's. The Daring Bakers’ February 2012 host was – Lis! Lisa stepped in last minute and challenged us to create a quick bread we could call our own. She supplied us with a base recipe and shared some recipes she loves from various websites and encouraged us to build upon them and create new flavor profiles.

I'm quite familiar with quickbreads, probably the first things I've ever made since they are so simple. As I kid, my mom let me mix muffin batter. Being so excited to help, I'm sure I totally overmixed the batter, resulting in dense and heavy muffins and loaves. But now I know better. Barely mix wet and dry ingredients together, bake, you're done.


I had missed this recipe when the Baked Sunday Mornings group made it before I joined, so I thought this was the perfect time to try it. I used 72% chocolate, and it was very deeply chocolaty. A little too much for my liking, but the peanut butter cream cheese spread complimented it quite nicely.

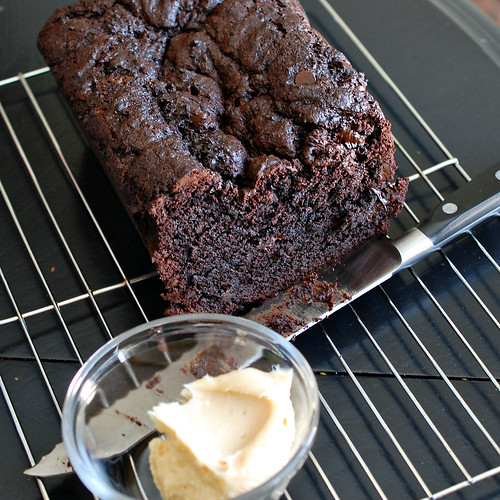
Double Chocolate Loaf with Peanut Butter Cream Cheese Spread
recipe source: Baked Explorations, by Matt Lewis and Renato Poliafito

For the Double Chocolate Loaf
3/4 cup firmly packed dark brown sugar
1 cup dark unsweetened cocoa powder, (like Valrhona ), sifted
1 1/2 cups all purpose flour
3/4 cup granulated sugar
1 1/2 teaspoons baking soda
3/4 teaspoon baking powder
1 teaspoon salt
2 large eggs
1 large egg yolk
3/4 cup buttermilk
1/2 cup vegetable oil
1 teaspoon pure vanilla extract
8 ounces good-quality dark chocolate (60-72%), coarsely chopped

For the Cream Cheese Spread
5 ounces cream cheese, softened
2 tablespoons creamy peanut butter
1/3 cup sugar

Make the Double Chocolate Loaf
Preheat the oven to 350 degrees F and position the rack in the center. Butter a 9 by 5 inch loaf pan, dust it with flour, and knock out the excess flour.

Place the brown sugar in the bowl of a standing mixer fitted with the paddle attachment. Press out any lumps with the back of a large spoon. Add the cocoa, flour, granulated sugar, baking soda, baking powder, and salt. Scrape down the sides and bottom of the bowl.

In a separate bowl, whisk the eggs and egg yolk until blended, then add the buttermilk,oil, and vanilla; whisk until combined.

Turn the mixer to low and slowly stream the wet ingredients into the dry ones, mixing just until combined. Stir in the dark chocolate chunks by hand.

Pour the batter into the prepared pan and bake for 1 hour to 1 hour and 10 minutes, or until a toothpick inserted in the center of the loaf comes out clean.

Let the cake cool in the pan for 15 minutes, then turn it out onto a wire rack to cool completely.

Make the Peanut Butter Spread
In the bowl of a standing mixer fitted with the paddle attachment, beat together the cream cheese and peanut butter until smooth. Add the sugar and beat until incorporated. (If you are not using the spread immediately, place it in a ramekin, tightly cover it in plastic wrap, and refrigerate it for up to 3 days.)

Serve the loaf plain or toasted, topped with the peanut butter spread.

The loaf will keep , in an airtight container or wrapped tightly, at room temperature for up to 3 days.

Sunday, February 26, 2012

hawaiian carrot cake with coconut icing

My mom's birthday is today, and we met for brunch this morning. I asked her what kind of cake she wanted for her birthday, and gave me the standard "don't go through any trouble" answer and "just a carrot cake will be fine".


Although I have a few standard recipes for carrot cake (one of which is my mom's carrot cake) I had seen the yummiest looking one in LCBO's Food and Drink magazine a while back. We don't drink, so I seldom get to go to the store and pick up a free copy of the magazine, but I always get super excited when my mom shares hers with me. One, it's a free magazine, two, it's glossy throughout on thick paper, and three, it's super pretty! And the recipes are quite good too. Well this one was anyways, even though my oven decided to give up on me and make me bake the cake for two hours at 225 degrees. Of course, it didn't raise. And it was underbaked, but even at that it was pretty good! As it has 4 cups of shredded carrots and one cup of pineapple, I'm pretty sure that even if baked properly, it would have been super moist too.

But the frosting... the frosting was delicious! I was afraid that the coconut in it would ruin it for me texture-wise, but it was fine. Super silky and delicious.

Once I get my oven fixed, I'll be sure to make this cake again, properly this time!


Hawaiian Carrot Cake with Coconut Icing 
source: LCBO's Food and Drink Spring 2011 magazine

1 cup chopped canned pineapple
4 cups grated carrot
2½ cups all-purpose flour
1 tbsp baking powder
2 tsp baking soda
1 tsp salt
2 tsp cinnamon
1 tsp nutmeg
1 cup butter, at room temperature
1¼ cups golden brown sugar
4 eggs
2 tsp vanilla
½ cup milk

Preheat oven to 350°F (180°C). Spray or oil two 9-inch (1.5-L) round cake pans.

Finely chop drained pineapple, place in a sieve and press with a spoon to remove as much juice as possible. Grate carrots using a food processor. Measure out 4 cups (1 L) and set aside. Place flour in a large bowl. Sprinkle with baking powder, baking soda, salt, cinnamon and nutmeg. Stir until blended.

Place butter in a large mixing bowl and beat with an electric mixer until creamy. Gradually beat in sugar, then beat on medium for about 3 minutes. Beat in eggs, then vanilla. Beating on low speed, add about a third of flour mixture and beat just until mixed, followed by half the milk. Repeat additions, ending with flour. Batter will be very thick. Gradually mix in pineapple and carrots.

Divide between pans. Spread to pan sides. To remove air pockets, bang pans on counter 5 to 6 times. Bake until centres seem set when lightly tapped, from 40 to 45 minutes. Place on a baking rack to cool. After about 15 minutes, turn cakes out of pans and cool completely on racks. It’s best to bake cakes a day ahead of icing and leave at room temperature overnight.

Coconut Icing

2 pkgs (250 g each) regular cream cheese, at room temperature
1 cup (250 mL) butter, at room temperature
¼ cup (50 mL) sour cream or natural yogurt
1 tsp (5 mL) vanilla
2½ cups (625 mL) sifted icing sugar
1 cup (250 mL) sweetened flaked coconut
Cut cream cheese into chunks. Place butter in a bowl and beat with an electric mixer until creamy. Beat in sour cream and vanilla. Reduce speed to low and beat in cream cheese, piece by piece. Beating too much will cause thinning. Add about a third of the icing sugar and beat on low until just mixed in. Scrape sides of bowl and beaters occasionally. Gradually add remaining sugar, beating just until smooth. If too thick or thin, work in a little sour cream or sugar. Remove about a quarter of the icing to be used on top cake layer and set aside. Stir coconut into the remaining icing.

Slice cakes horizontally in half. Place top of 1 cake, dome-side down, on a platter. Spread with a third of the coconut icing leaving a narrow border of cake around edge. Lay the bottom of that cake, cut-side down, on top. Spread with half the remaining coconut icing, leaving a narrow cake border. Top with the bottom half of the second cake, cut-side down. Spread with the remaining coconut icing, leaving a cake border. Top with the fi nal layer, cut-side down. Spread with plain icing right to the edges. Garnish with toasted, fresh coconut. Best to refrigerate several hours or overnight before serving.


Because I'm learning about cake decorating, I decided to top them with hawaiian looking flowers, or my version of hawaiian flowers... I had a lot of fun! Can't wait until next class when I actually learn how to make these properly! Loved the effect of them on the cake! So pretty!


Sunday, February 12, 2012

chocolate whoopie pies

I was pretty excited to see the chocolate whoopie pies on this week's Baked Sunday Mornings schedule. In the fall I always make the pumpkin whoopies from the first Baked book, but I've never made any other kind. So I was happy to try the chocolate version.


Whoopie Pies are kinda like frosting sandwiched between two cupcake tops. Neater to eat than a cupcake, but not quite as cute. These are made with cocoa powder, espresso powder and coffee for flavor. No butter to soften, don't even need a mixer for this recipe. Just a couple of bowls... Well three, because it is after all, a Baked recipe. I first used a 1/4 cup ice cream scoop for my first batch, but they were really really too big, so switched over to a 2 tbsp measure for better proportioned cookies. Mine really didn't look like the picture, and although the description in the book said they were supposed to be super moist, mine were more like a cross between a cookie and a cupcake. Not as moist as I was expecting. Plus they looked nothing like the picture in the book. I must have screwed up somewhere.


I was actually expecting to to screw up the frosting, because I usually have issues with fancy buttercream, but the swiss meringue vanilla buttercream came together quite easily. It's not our favorite kind of frosting, as it's very, very buttery, but it was still nice. I used a pastry bag and a closed star tip to pipe a pretty border of frosting onto the cookies. I was going to roll the sides in pretty sprinkles, but decided they were cute enough on their own, plus I had gone through the trouble of using a pastry bag, didn't want to hide my cute piping job!


I brought the cookies to a work meeting and they were very well received. I joined Baked Sunday Mornings after the group made the red velvet whoopie pies last year, but they might be next on my list. Click on through to the Baked Sunday Mornings site for the recipe, and to see how the other bakers enjoyed this recipe!