
Milk Bar is a great cookbook full of treats that are far from run of the mill. The recipes are complicated. They require many components and special ingredients. The preparation of said recipes is a bit quirky. And I love it! The more complicated the better.
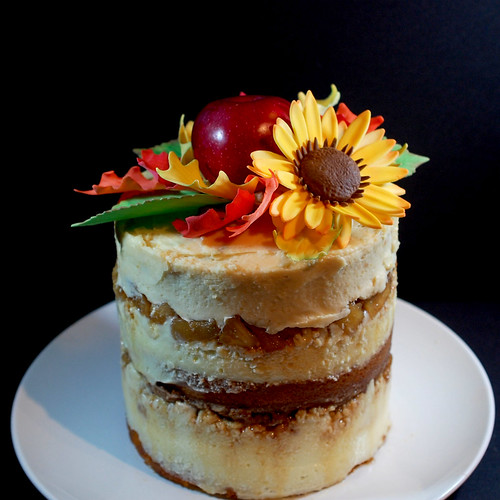
This Apple Pie Layer Cake recipe has 6 components. I made it over two days, then froze the cake overnight to serve the next night at dinner.
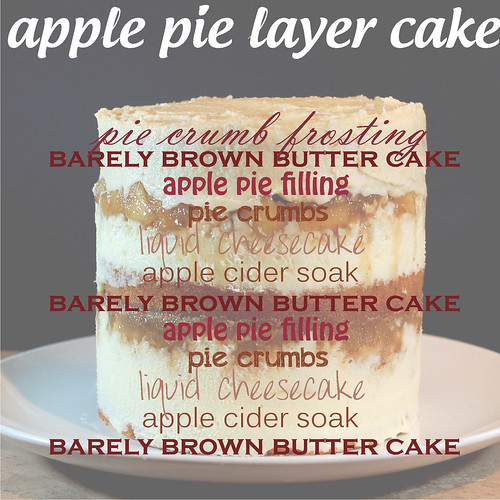
The Barely Brown Butter Cake gets mixed for 10 minutes total, but other than that, it's really easy to make. They bake it in a sheet pan and cut out layers later, but when I bake Milk Bar cakes, I always bake them in cake tins. The cake layers looked dry when I cut into them, but were far from it. They were flavorful, and moist, but dense.
The Apple Cider Soak is just a matter of adding sugar and cinnamon to apple cider, really nothing to it.
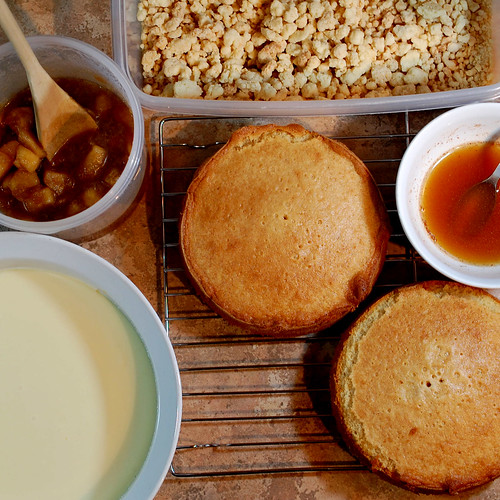
The recipe for the liquid cheesecake calls for lining the baking pan with plastic wrap before baking, but I never bothered the couple of times I made this. The only thing I did was decrease the salt a bit. The cookbook author likes her stuff really salty. I should have made a double batch of that, as it is delicious! A great dip for fruits, too!
The pie crumb is easy to make, and does add a nice crunchy component to the cake. I decreased the salt in this recipe as well. The apple pie filling was nice a sweet, and the combination of it with the pie crumbs reminded us of an apple crisp between layers of cake.
The only thing I would change is the frosting. It just didn't do it for me. Next time, I'll just frost the whole thing in whipped cream.
This cake was absolutely delicious! I would make it again, in a heartbeat. And even though it has many components, it's quite easy to make.
Apple Pie Layer Cake
recipe source: Milk Bar, by Christina Tosi via Sweet Peony
makes 1 (6 inch) layer cake, 5 to 6 inches tall; serves 6 to 8
1 recipe Barely Brown Butter Cake
1 recipe Apple Cider Soak
1 recipe Liquid Cheesecake
1 recipe Pie Crumb
1 recipe Apple Pie Filling
1 recipe Pie Crumb Frosting
1 6-inch cake ring
2 strips acetate (3” x 20”)
To assemble the cake:
Put a piece of parchment or a Silpat on the counter. Invert the cake onto it and peel off the parchment or Silpat from the bottom of the cake. Use the cake ring to stamp out 2 circles from the cake. These are your top 2 cake layers. The remaining cake “scrap” will come together to make the bottom layer.
For Layer 1, the bottom: Clean the cake ring and place it in the center of a sheet pan lined with clean parchment or a Silpat. Use 1 strip of acetate to line the inside of the cake ring. Put the cake scraps inside the ring and use the back of your hand to tamp the scraps together into a flat even layer.
Dunk a pastry brush in the apple cider soak and give the layer of cake a good bath of half of the soak.
Use the back of a spoon to spread half of the liquid cheesecake in an even layer over the cake.
Sprinkle one-third of the remaining half recipe of pie crumbs evenly over the liquid cheesecake. Use the back of your hand to anchor them in place.
Use the back of a spoon to spread one-half of the apple pie filling as evenly as possible over the crumbs.
For Layer 2, the middle: With your index finger, gently tuck the second strip of acetate between the cake ring and the top ¼ inch of the first strip of acetate, so that you have a clear ring of acetate 5 to 6 inches tall – high enough to support the height of the finished cake. Set a cake round on top of the filling and repeat the process for layer 1 (if 1 of your 2 cake rounds is jankier than the other, use it here in the middle and save the prettier one for the top).
For Layer 3, the top: Nestle the remaining cake round into the apple pie filling. Cover the top of the cake with all of the pie crumb frosting. Give it volume and swirls, or do as we do and opt for a perfectly flat top. Garnish the frosting with the remaining pie crumbs.
Transfer the sheet pan to the freezer and freeze for a minimum of 12 hours to set the cake and filling. The cake will keep in the freezer for up to 2 weeks.
At least 3 hours before you are ready to serve the cake, pull the sheet pan out of the freezer and, using your fingers and thumbs, pop the cake out of the cake ring. Gently peel off the acetate and transfer the cake to a platter or cake stand. Let it defrost in the fridge for a minimum of 3 hours (wrapped well in plastic, it can be refrigerated for up to 5 days).
Slice the cake into wedges and serve.
Barely Brown Butter Cake
makes 1 Quarter Sheet Pan
40 g Brown Butter (2 tablespoons)
55 g Butter (4 tablespoons, 1/2 stick)
250 g Granulated Sugar (1 1/4 cups)
60 g Light Brown Sugar (1/4 cup tightly packed)
3 Eggs
110 g Buttermilk (1/2 cup)
65 g Grapeseed Oil (1/3 cup)
2 g Vanilla Extract (1/2 teaspoon)
185 g Cake Flour (1 1/2 cups)
4 g Baking Powder (1 teaspoon)
4 g Kosher Salt (1 teaspoon)
Heat the oven to 350 degrees F.
To make the brown butter, place 2 tablespoons of butter in a microwave-safe bowl and top with a microwave-safe plate. Microwave for 3-5 minutes. The butter will pop while browning. Check the butter, and if not browned enough, microwave again in 1 minute increments. While the brown butter is cooling, stir periodically to incorporate the caramelized bits of butter. Cool completely.
Combine the butters and sugars in the bowl of a stand mixer fitted with the paddle attachment and cream together on medium-high for 2 to 3 minutes. Scrape down the sides of the bowl, add the eggs, and mix on medium high for 2 to 3 minutes. Scrape down the sides of the bowl once more.
Stream in the buttermilk, oil, and vanilla while the paddle swirls on low speed. Increase the speed to medium-high and paddle 5 to 6 minutes, until the mixture is practically white, twice the size of your original fluffy butter-and-sugar mixture, and completely homogenous. You’re basically forcing too much liquid into an already fatty mixture that doesn’t want to make room for it, so if it doesn’t look right after 6 minutes, keep mixing. Stop the mixer and scraped down the sides of the bowl.
On very low speed, add the cake flour, baking powder, and salt. Mix for 45 to 60 seconds, just until your batter comes together and any remnants of dry ingredients have been incorporated. Scrape down the sides of the bowl. Mix on low speed for another 45 seconds to ensure that any little lumps of cake flour are incorporated.
Pam-spray a quarter sheet pan and line it with parchment, or just line the pan with a Silpat. Using a spatula, spread the cake batter in an even layer in the pan. Bake for 30 to 35 minutes. The cake will rise and puff, doubling in size, but will remain slightly buttery and dense. At 30 minutes, gently poke the edge of the cake with your finger: the cake should bounce back slightly and the center should no longer be jiggly. Leave the cake in the oven for an extra 3 to 5 minutes if it doesn’t pass these tests.
Take the cake out of the oven and cool on a wire rack, or, in a pinch, in the fridge or freezer. The cooled cake can be stored in the fridge, wrapped in plastic wrap, for up to 5 days.
Apple Cider Soak
makes about 60 g (1/4 cup)
55 g Apple Cider (1/4 cup)
5 g Light Brown Sugar (1 teaspoon tightly packed)
0.25 g Ground Cinnamon (pinch)
Whisk together all of the ingredients in a small bowl until the sugar is completely dissolved.
Liquid Cheesecake
makes one 6” baking dish
227 g Cream Cheese (8 ounces)
150 g Sugar (3/4 cup)
15 g Cornstarch (1 tablespoon)
2 g Kosher Salt (1/2 teaspoon)
25 g Milk (2 tablespoons)
1 Egg
Heat oven to 300 degrees F. Put cream cheese into the bowl of a stand mixer fitted with the paddle, and beat on medium speed for 2 minutes. Scrape down the sides of the bowl. Add the sugar and mix for 1-2 minutes, until the sugar has been completely incorporated. Scrape down the sides of the bowl.
Whisk together the cornstarch and salt in a medium bowl. Whisk in the milk in a slow, steady stream, then whisk in the egg until the slurry is homogenous.
With the mixer on a medium low speed stream in the egg slurry. Paddle for 3 or 4 minutes, until the mixture is smooth and loose. Scrape down the sides of the bowl.
Line the sides and bottom of a 6” x 6” baking pan with plastic wrap. Pour the cheesecake batter into the pan and bake for 15 minutes. It is done when it is set on the edges but still jiggly in the center. If the edges aren't quite set, bake for 5 minute increments until it's done- no more than 25 minutes.
Cool completely to finish the baking process and allow the cheesecake to set. It will be creamy, and spreadable and can be stored in the fridge in an air-tight container for up to a week.
Pie Crumb
makes about 350 g (2 3/4 cups)
240 g Flour (1 1/2 cups)
18 g Sugar (2 tablespoons)
3 g Kosher Salt (3/4 teaspoon)
115 g Butter, melted (8 tablespoons, 1 stick)
20 g Water (1 1/2 tablespoons)
Heat the oven to 350 degrees F
Combine the flour, sugar, and salt in the bowl of a stand mixer fitted with the paddle attachment and paddle on low speed until well mixed.
Add the butter and water and paddle on low speed until the mixture starts to come together in small clusters.
Spread the clusters on a parchment – or Silpat-lined sheet pan. Bake for 25 minutes, breaking them up occasionally. The crumbs should be golden brown and still slightly moist to the touch at that point; they will dry and harden as they cool.
Let the crumbs cool completely. Stored in an airtight container, the crumbs will keep fresh for 1 week at room temperature or 1 month in the fridge or freezer.
Apple Pie Filling
makes about 400 g (1 3/4 cups)
1 Lemon
300 g Granny Smith Apples (2 medium )
14 g Butter (1 tablespoon)
150 g Light Brown Sugar (2/3 cup tightly packed)
1 g Ground Cinnamon (1/2 teaspoon)
1 g Kosher Salt (1/4 teaspoon)
Fill a medium bowl halfway with cold tap water. Juice the lemon into it. Fish out and discard any seeds. You will use this lemon water to keep your apple pieces looking fresh and pert.
Peel the apples, then halve and quarter them. Put each apple quarter on its side and cut a small slice down the length of the apple to remove the seeds and core. Cut each apple quarter lengthwise into thirds and then crosswise into fourths, leaving you with 12 small pieces from every apple quarter. Transfer these pieces to the lemon water as you go.
When you’re ready to cook, drain the apples (discard the lemon water) and combine them in a medium pot with the remaining ingredients. Slowly bring to a boil over medium heat, using a spoon to gently stir the mixture as it heats up and the apples begin to release liquid. Reduce the heat and simmer the apples gently for 3 to 5 minutes. Be careful not to cook the apples so much that they turn into applesauce.
Transfer to a container and put in the fridge to cool down. Once completely cooled, the filling can be stored in the fridge in an airtight container for up to 1 week; do not freeze.
Pie Crumb Frosting
makes about 220 g (3/4 cup), or enough for 2 Apple Pie Layer Cakes, or 1 generously frosted cake
1/2 recipe Pie Crumb
110 g Milk (1/2 cup)
2 g Kosher Salt (1/2 teaspoon)
40 g Butter, at room temperature (3 tablespoons)
40 g Confectioners’ Sugar (1/4 cup)
Combine the pie crumbs, milk, and salt in a blender, turn the speed to medium-high, and puree until smooth and homogenous. It will take 1 to 3 minutes (depending on the awesomeness of your blender). If the mixture does not catch on your blender blade, turn off the blender, take a small teaspoon, and scrape down the sides of the canister, remembering to scraped under the blade, then try again.
Combine the butter and confectioners’ sugar in the bowl of a stand mixer fitted with the paddle attachment and cream together on medium-high for 2 to 3 minutes, until fluffy and pale yellow. Scrape down the sides of the bowl with a spatula.
On low speed, paddle in the contents of the blender. After 1 minute, crank the speed up to medium-high and let her rip for another 2 minutes. Scrape down the sides of the bowl. If the mixture is not a uniform, very pale, barely tan color, give the bowl another scrape and mix for one more minute.
Use the frosting immediately, or store it in an airtight container in the fridge for up to 1 week.
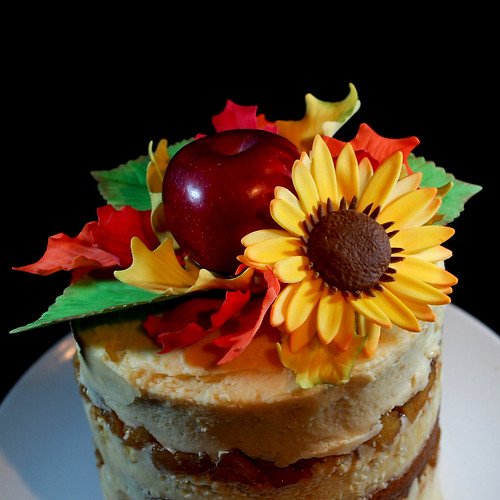
The sunflower and the leaves were made of fondant and gumpaste. Only the apple is real.
Hats off to you! This cake is all the things you said it was - beautiful, surpising, and unique! I'd love to have a slice!
ReplyDeleteOh my goodness!!! That cake/pie is absolutely gorgeous!! I'm not sure I'd have the patience to make one, but wow, I'd love to eat one!! Really beautiful.
ReplyDeleteThat could not look more amazing.
ReplyDeleteWhat a gorgeous cake! I'd like to tackle a cake like this someday, kudos to you. Thank you for the recipe :)
ReplyDeleteThis looks incredible! Every part of it sounds amazing!
ReplyDeleteWow, I have got to get a copy of that book! This is incredible. Every single component sounds delicious. (Did you make the fondant/gumpaste leaves and sunflower? Also incredible!!)
ReplyDelete