
So I chose to challenge my fellow bakers to make whoopie pies for my first time hosting. I figured something that was not all that common, easy enough and that wasn't too time consuming because, after all, December is an insanely busy time for us bakers (and non-bakers!).
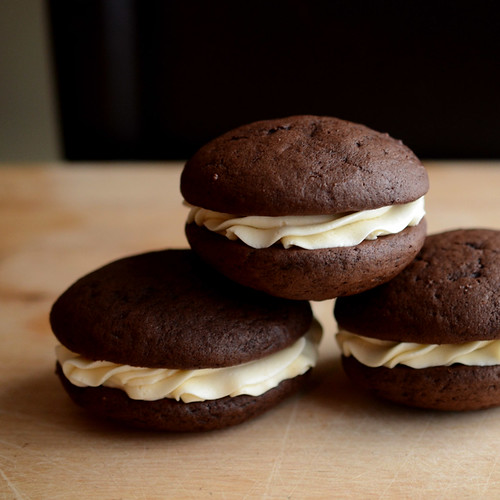
Whoopie pies are a cross between a cookie and a cake (not a pie!), with two round, mound-shaped halves sandwiching a sweet creamy filling.
According to Wikipedia, Whoopie pies are considered a New England phenomenon and a Pennsylvania Amish tradition. It is also Maine’s official state treat. The traditional Whoopie pie consists of a chocolate cake and a vanilla marshmallow filling, but pumpkin and gingerbread cake is also common enough. Want to know why they are named Whoopie pies? Check Wikipedia for the cute story!
I personally love them because of the infinite flavor combination possible. They remind me of cupcakes, but more portable and easier to eat. So I provided three recipes for the cookie/cake, and three filling recipes, and challenged the bakers to come up with some delicious flavor combination of their own.
CLASSIC CHOCOLATE WHOOPIE PIES WITH MARSHMALLOW CREME FILLING
Recipe source: King Arthur Flour
Servings: 8 large or 16 small whoopie pies
Ingredients
For the Whoopie Pies
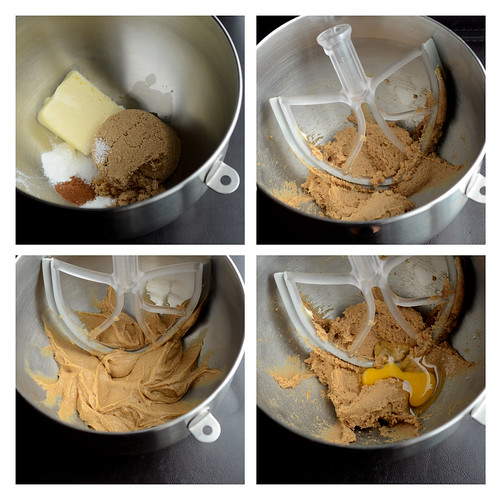
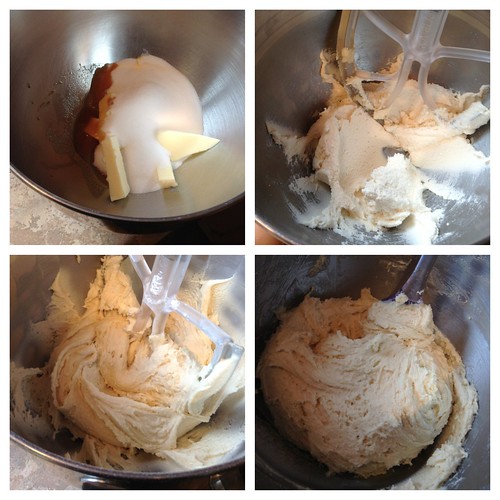
1/2 cup (120 ml) (4 oz) (115 gm) butter
1 cup (240 ml) (7 oz) (200 gm) brown sugar, firmly packed
1 teaspoon (5 ml) (5 gm) espresso coffee powder, optional
1 teaspoon (5 ml) (5 gm) baking powder
1/2 teaspoon (3 gm) baking soda
3/4 teaspoon (4½ gm) salt
1 teaspoon (5 ml) vanilla extract
1 large egg
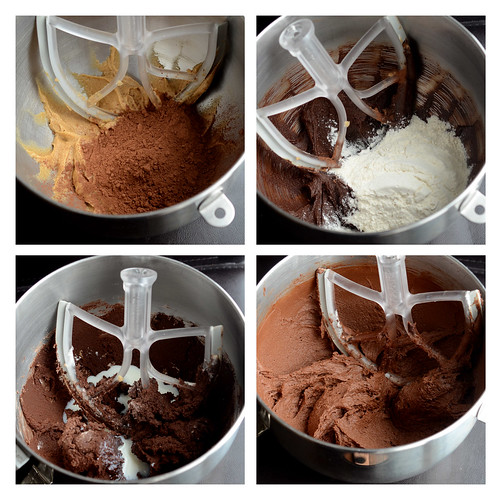
1/2 cup (120 ml) (1½ oz) (45 gm) Dutch-process cocoa, sifted
2 1/3 cups (560 ml) (10 oz) (285 gm) unbleached all-purpose (plain) flour
1 cup (240 ml) milk
Directions:
1) Preheat oven to moderate 350°F/180°C/gas mark 4. Lightly grease (or line with parchment) two baking sheets.
2) In a large mixing bowl, beat together the butter, brown sugar, espresso coffee powder (if using), baking powder, baking soda, salt, and vanilla till smooth. Add the egg, again beating till smooth.
3) Add the cocoa, stirring to combine.
4) Add the flour to the batter alternately with the milk, beating till smooth. Scrape down the sides and bottom of the bowl, and beat again briefly to soften and combine any chunky scrapings.
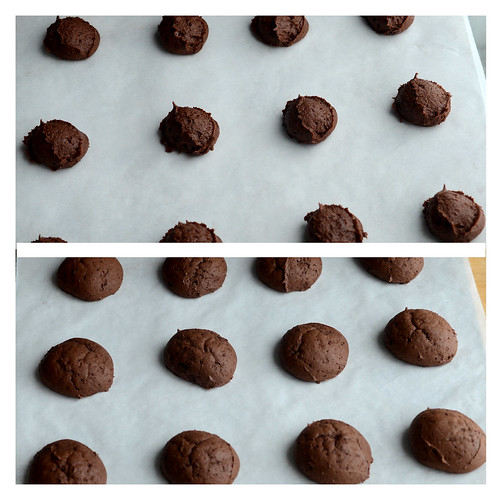
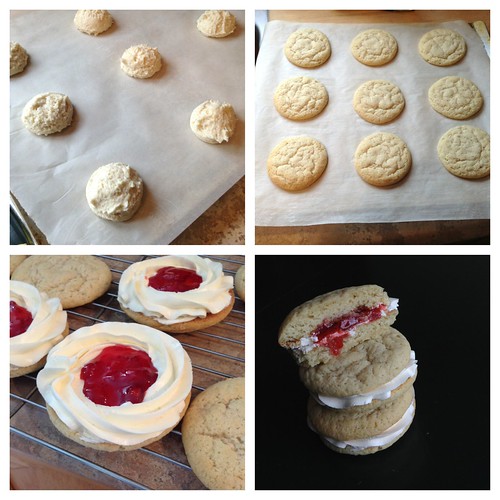
5) Drop the dough by the 1/4-cupful (60 ml) onto the prepared baking sheets, leaving plenty of room between the cakes; they'll spread. A muffin scoop works well here.
6) Bake the cakes in a preheated moderate oven for 15 to 16 minutes, till they're set and firm to the touch. Remove them from the oven, and cool on the pans. While still lukewarm, use a spatula to separate them from the pan or parchment; then allow to cool completely.
(pictured are mini whoopie pies, using 1 tablespoon batter)
Ingredients
For the Marshmallow Creme Filling
1 cup (240 ml) (6 oz) (175 gm) vegetable shortening
1 cup (240 ml) (7 oz) (4½ oz) (125 gm) confectioners' sugar or glazing sugar
1-1/3 cups (320 ml) (4 oz) (115 gm) Marshmallow Fluff or marshmallow creme
¼ teaspoon (1½ gm) salt dissolved in 1 tablespoon (15 ml) water
1½ teaspoons vanilla extract
Directions:
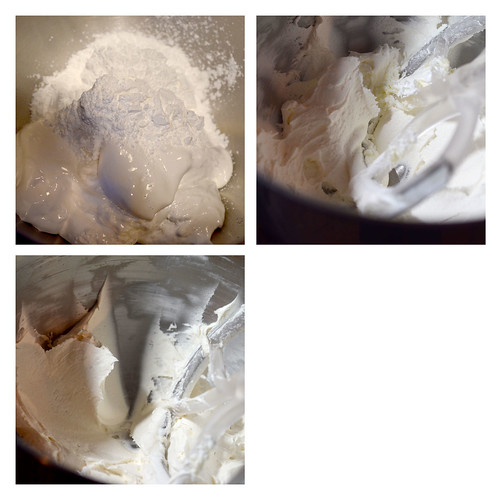
1) (To make the filling:) Beat together the shortening, confectioners' sugar, and marshmallow until well combined.
2) Dissolve the salt in the water, and add to the marshmallow mixture. Add the vanilla, and beat until smooth. If the filling is too thin, add confectioners’ sugar until desired consistency is reached.
Assemble the Whoopie Pies
1) Spread or pipe filling onto the flat side of half the cakes (with the filling). Top with the remaining cakes, flat side towards the filling. Wrap individually, in plastic wrap, until ready to serve.
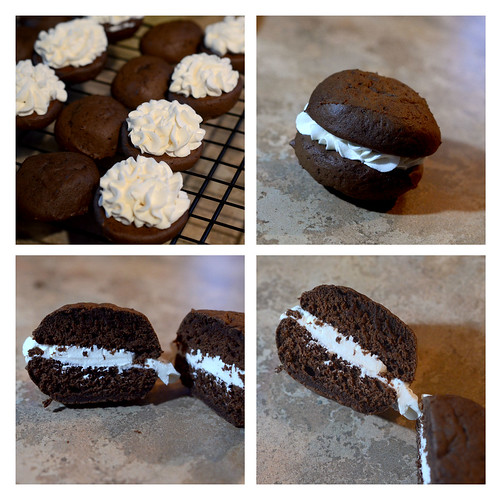
The whoopie pies will keep for up to 3 days on a parchment lined baking sheet covered with plastic wrap, in the refrigerator.
RED VELVET WHOOPIE PIES WITH CREAM CHEESE FILLING
Recipe source: Baked Explorations, by Matt Lewis and Renato Poliafito
Servings: 18 small whoopies
Ingredients
For the Whoopie Pies
2 1/2 cups (600 gm) (10 ½ oz)) (300 gm) all-purpose (plain) flour
3 tablespoons (45 ml) (3/4 oz) (22 gm) dark unsweetened cocoa powder, sifted
1/2 teaspoon (2½ gm) baking powder
1/2 teaspoon (2½ gm) baking soda
1/2 teaspoon (3 gm) salt
1/4 cup (60 ml) canola oil
1/2 cup plus 2 tablespoons (150 ml) buttermilk
2 tablespoons (30 ml) liquid red food coloring
1/2 cup (1 stick) (120 ml) (4 oz) (115 oz) butter, softened, cut into pieces
1 tablespoon (15 ml) (12½ gm) vegetable shortening, at room temperature
3/4 cup (180 ml) (5-1/4 oz) (150 gm) dark brown sugar, firmly packed
1/4 cup (60 ml) (2 oz) (55 gm) granulated sugar
1 large egg
1 teaspoon (5 ml) pure vanilla extract
Directions:
1. In a large bowl, sift together the flour, cocoa powder, baking powder, baking soda and salt.
2. In a small bowl, whisk together the canola oil, buttermilk and red food coloring.
3. In the bowl of an electric mixer fitted with the paddle attachment, cream the butter and shortening until smooth. Scrape down the bowl and add the sugars. Beat until the mixture is light and fluffy, about 5 minutes. Add the egg and vanilla extract and beat until combined. Scrape down the sides and bottom of the bowl then mix on low speed for a few more seconds. Do not over mix.

4. Turn the mixer to low. Add the flour mixture, alternating with the buttermilk mixture, in three separate additions, beginning and ending with the flour mixture until just combined. Scrape down the sides and bottom of the bowl, then mix on low speed for a few more seconds.
5. Cover with plastic wrap and chill the batter in the refrigerator for about 15 minutes.
6. While the batter is chilling, preheat the oven to moderate 350°F/180°C/gas mark 4. Line two baking sheets with parchment paper.
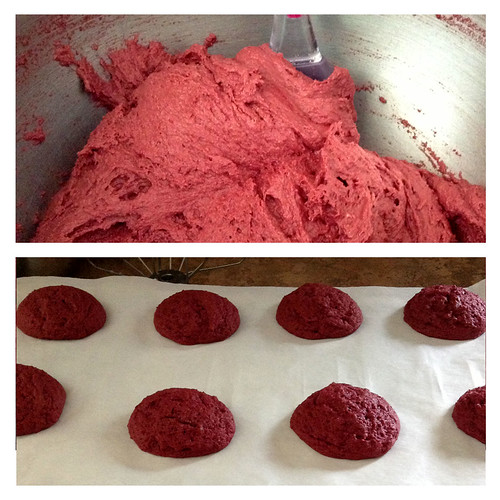
7. Remove the batter from the refrigerator. Use a small ice cream scoop with a release mechanism to drop tablespoons of the dough onto the prepared baking sheets about 1-inch (25 mm) apart. Bake in a preheated moderate oven for 10-12 minutes, until the cookies are just starting to crack on top and a toothpick inserted into the center of a cookie comes out clean. Let the cookies cool completely on the pan while you make the filling.
Ingredients
For the Cream Cheese Filling
3 cups (750 ml) (13 ¼ oz) (375 gm) confectioners’ sugar
1/2 cup (120 ml) (1 stick) (4 oz) (115 gm) unsalted butter, softened
8 ounces (225 gm) cream cheese, softened
1 teaspoon (5 ml) pure vanilla extract
1/4 teaspoon (1½ gm) salt
Directions:
1. Sift the confectioners’ sugar into a medium bowl and set aside.
2. In the bowl of an electric mixer fitted with the paddle attachment, beat the butter until it is completely smooth. Add the cream cheese and beat until combined.
3. Add the confectioner’s sugar, vanilla, and salt and beat until smooth. Be careful not to over beat the filling or it will lose structure.
(The filling can be made 1 day ahead. Cover the bowl tightly and put it in the refrigerator. Let the filling soften at room temperature before using.)

Assemble the Whoopie Pies
1. Turn half of the cooled cookies upside down (flat side facing up)
2. Use an ice cream scoop or a tablespoon to drop a large dollop of filling onto the flat side of the cookie.
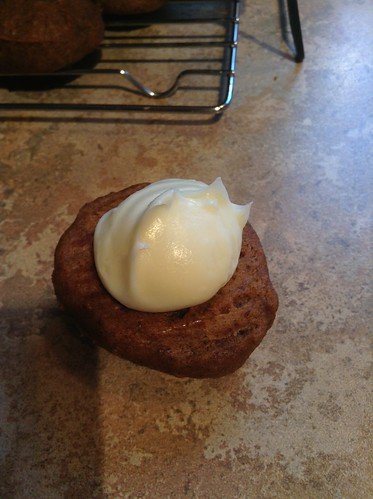
(cream cheese filling pictured on a pumpkin whoopie pie)
3. Place another cookie, flat side down, on top of the filling.
4. Press down slightly so that the filling spreads to the edges of the cookie.
5. Put the whoopie pies in the refrigerator for about 30 minutes to firm up before serving.
The whoopie pies will keep for up to 3 days on a parchment lined baking sheet covered with plastic wrap, in the refrigerator.

(Mini whoopie pies are pictured with standard American buttercream frosting as a filling. Cream cheese filling will be much looser and will not hold its shape if piped.)
VANILLA WHOOPIE PIES
Recipe source: FoodNetwork Magazine
Servings: 8 whoopies
Ingredients
2 ¾ cups(660 ml) (11-2/3 oz) (330 gm) flour
1 teaspoon (5 ml) (5 gm) baking soda
¾ teaspoon (3¾ gm) baking powder
¾ teaspoon salt
½ cup (1 stick) (4 oz) (115 gm) butter, softened
1 1/3 cups (320 ml) ( (10-2/3 oz) (300 gm) granulated sugar
2 teaspoons (10 ml) vanilla
1 large egg
2/3 cup (160 ml) buttermilk
Whisk flour, baking soda, baking powder and salt in a bowl. In a separate bowl, beat butter, granulated sugar and vanilla with a mixer on medium-high speed until fluffy; beat in the egg. On low speed, beat in the flour mixture in 3 batches, alternating with the buttermilk in 2 batches; beat until just combined.
Line 2 baking sheets with parchment paper. Scoop 16 mounds of batter onto the baking sheets, about 2 inches (50 mm) apart (about 2 tablespoons (30 ml) batter per cookie); gently form into rounds with damp fingers and smooth the tops. Refrigerate until firm, about 30 minutes.
Preheat the oven to moderately hot 400°F/200°C/gas mark 6. Bake the cookies until they spring back when pressed, 10 to 12 minutes. Cool 5 minutes, then remove to a rack to cool completely.
OLD FASHIONED VANILLA FILLING
Recipe source: Baked Explorations, by Matt Lewis and Renato Poliafito
Servings: way more than you actually need to fill the whoopies
Ingredients
1 cup (240 ml) (8 oz) (225 gm) granulated sugar
1/4 cup (60 ml) (1 oz) (30 gm) all-purpose (plain) flour
1 cup (240 ml) whole milk
1/4 cup (60 ml) heavy cream (about 35%)
1 cup (2 sticks) (8 oz) (225 gm) unsalted butter, cool but not cold, cut into ½-inch (15 mm) cubes
1 teaspoon (5 ml) pure vanilla extract
In a medium, heavy-bottomed saucepan, whisk the sugar and flour together. Add the milk and cream and cook over medium heat, whisking occasionally, until the mixture comes to a boil and has thickened, 10 to 15 minutes.

Transfer the mixture to the bowl of a stand mixer fitted with the paddle attachment. Beat on high speed until cool, at least 7 minutes. (You can speed up the process by pressing bags of frozen berries or frozen corn against the sides and bottom of the mixing bowl.) Reduce the speed to low and add the butter; mix until thoroughly incorporated. Increase the speed to medium-high and beat until the frosting is light and fluffy. You can’t overbeat this mixture. Just let it go until it’s nice and smooth.
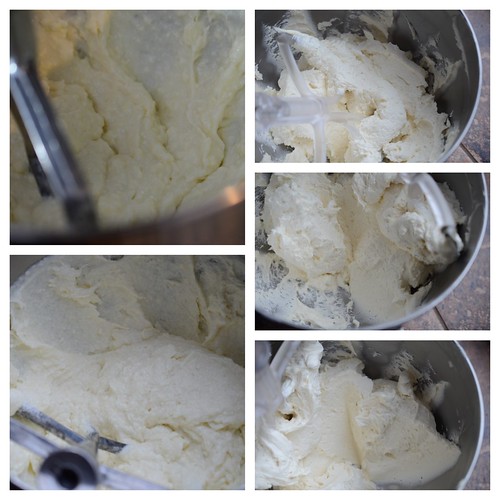
Add the vanilla and continue mixing until combined. If the frosting is too soft, put the bowl in the refrigerator to chill slightly, then beat again until it is the proper consistency. If the frosting is too firm, set the bowl over a pot of simmering water and beat with a wooden spoon until it is the proper consistency.
***
At first I was afraid my challenge was too simple, or boring, but the members of this group quickly got on the whoopie pie making bandwagon and created all kinds of delicious combinations of cookies and filling. A huge THANK YOU to everyone who has participated this month, especially after the passing of founding member Lis in November. Also, kudos to Ruth and Shelley who are making sure the Daring Kitchen community stays strong. Thank you guys!
For more information about this community of bakers, please visit The Daring Kitchen.
WOW! What an amazing job you did, hosting your first challenge! Your photography is beautiful and your whoopie pies look amazing! Thank you for this challenge, it was my first and I loved every moment! www.readysetyum.com
ReplyDeleteHi. It was a fun challenge, very thoughtfully put together, considering the time of the year. I think whoopie pies were on many to-do lists. Thanks for making it happen.
ReplyDeleteYour whoopies look great.
Compliments of the season to you.
Hope the new year brings you joy and peace (and a lot more time to participate). :-)
All of your recipes look so great! Thank you for hosting this challenge - it was so fun!
ReplyDeleteThank you for hosting this beautiful challenge. I loved being part of it! Happy holidays to you!
ReplyDeleteMerci pour ce joli challenge! Les Whoopie Pies sont vraiment adorables et craquants!
ReplyDeleteThank you for great challenge! I made classic chocolate whoopie pies with mascarpone filling and they were perfect! Happy holidays!
ReplyDeleteThank you for hosting this month challenge, I enjoyed it very much. Happy holidays!
ReplyDeleteWhat a fun challenge! And tasty, too. Thanks for hosting this month!
ReplyDeleteFun challenge, thanks!
ReplyDeleteThanks for a lovely challenge!
ReplyDeletehttp://louiseandthestyleworld.blogspot.gr/2013/12/daring-bakers-december.html
It was my first time in making and eating whoopie pies, so thank you for the challenge, I learned something new this month !
ReplyDeleteI'm not sure I would have made whoopie pies on my own, so thanks for the nudge - they were delicious! And so easy, which I definitely appreciated this month ;)
ReplyDeleteYou did an amazing challenge and I loved every minute of it. Your whoopies, of course, are beautiful!!
ReplyDeleteThanks for hosting. They were pretty good but i think I should have made the cream cheese ones :)
ReplyDeleteAll of your whoopies turned out great! I love how you piped the filling on them, it looks so pretty. Thanks again for hosting!
ReplyDeleteMy family loved having the Whoopie Pies as part of our Christmas desserts. Thanks for the challenge!
ReplyDeleteThanks for a great challenge! :)
ReplyDelete