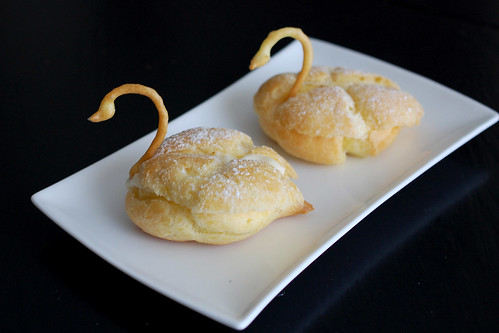
I was very excited when I saw August's challenge! Kat of The Bobwhites was our August 2012 Daring Baker hostess who inspired us to have fun in creating pate a choux shapes, filled with crème patisserie or Chantilly cream. We were encouraged to create swans or any shape we wanted and to go crazy with filling flavors allowing our creativity to go wild!
A couple weeks prior to the challenge being announced, I had played with pâte à choux for the first time, planning on making eclairs to bring to a family gathering. Although my eclairs shells turned out fine, I undercooked my pastry cream and it was too soupy to pipe in the shells. So that was a fail!
I was quite ready to give it another go, and this time, it did turn out!
I used the pâte à choux recipe provided by our hostess, but took the lazy way out, and used the stand mixer to finish the dough. There doesn't seem to be much variations between pâte à choux recipes, so you can't go wrong!
Pâte à choux
½ cup (120 ml) (115 gm) (4 oz) butter
1 cup (240 ml) water
¼ teaspoon (1½ gm) salt
1 tsp sugar
1 cup (240 ml) (140 gm) (5 oz) all-purpose flour
4 large eggs
Line at least two baking sheets with silicone mats or parchment paper, or grease pans well.
Preheat oven to moderately hot 375°F/190°C/gas mark 5 .
In a small saucepan, combine butter, water, salt and sugar. Heat over medium until butter melts, then remove from stove.
Add flour all at once and beat the mixture until the dough pulls away from the sides of the pot.
Transfer the mixture to the bowl of a stand mixer, and using the paddle attachment and a low speed, mix briefly before adding the first egg. Beat for about a minute, until well combined. Add remaining eggs one at a time, beating for about a minute after each addition. Resulting mixture should be somewhat glossy, very smooth, and somewhat thick.
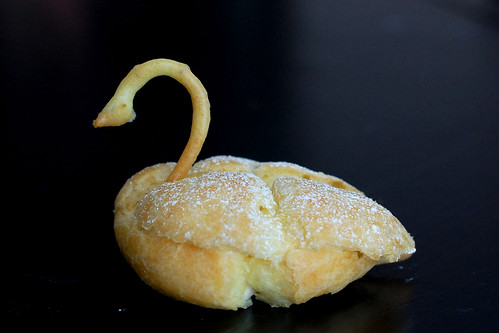
Scoop or pipe the mixture in desired shapes and bake in a 375 F oven. Start checking the progress at 20 minutes (10 minutes for the swan heads). The dough should be golden.
To make the swan bodies, pipe the dough in a tear drop-like shape, about 1.5 inch long and 1 inch wide.
The swan heads are piped using a much smaller plain tip, in a 2 shape.
I chose a crème chiboust to fill my pastries with. I had never heard of this kind creamy filling before researching pâte à choux, but a crème chiboust is a pastry cream combined with italian meringue. It's traditionally used to make St-Honoré cake.
The pastry cream is made by combining flour, salt, sugar, egg yolks and milk in a saucepan, and cooking it while constantly stirring until thick. Gelatine is then added in, with vanilla, and a bit of heavy cream. The pastry cream is kept warm while the italian meringue is being made, by heating water and sugar to 240F degrees, then adding it to whipped egg whites and whipping the resulting meringue until the mixture is cooler, but still warm. The two mixtures are then combined to make chiboust cream.
Crème Chiboust
recipe adapted from Tartelette and Gary Rhodes
1/4 cup cold water
1/2 cup + 2 Tablespoons sugar
½ cup all-purpose flour
1/4 teaspoon salt
5 egg yolks
2 cups whole milk
1 Tbsp vanilla
¼ cup whipping cream
5 egg whites
dash of salt
1 cup sugar
Bloom the gelatin in the 1/4 cup of cold water.
Put the sugar, flour, and salt into a saucepan and stir together with a whisk. Add the yolks and enough milk to make a paste. Whisk in the remainder of the milk. Place over low heat and stirring constantly, cook until thick. Remove from heat and stir in the vanilla and the gelatin. Stir until the gelatin is completely dissolved. Stir in the whipping cream.
In another saucepan, boil together the sugar and water to around 240°F, which takes 2-3 minutes. While the sugar is boiling, whisk the egg whites to firm peaks. Gradually pour the boiled sugar onto the egg whites, whisking all the time; slowly continue to whisk the egg whites until just warm. Fold the meringue into the custard.
I was afraid the crème chiboust would set solidly if I let it cool, so I used it immediately. It was a bit soft for piping, but held up anyways. I should have strained the pastry cream before combining it with the italian meringue, as it was a bit lumpy, but still, super delicious! Once cold, it did set very solidly, so next time I would decrease the amount of gelatine, but it was still very delicious!
Now that I know how simple make cream puffs can be, and what pretty creations you can make with them, this could get very, very dangerous!
Thanks for the challenge Kat. Can't wait to see what challenge September brings!