Monday, December 31, 2012

2012 recap

Everyone is doing end of the year recaps, so I figured I should too!

In 2012, I wrote 40 blog posts.


Top 5 most viewed posts in 2012 were :

1. Crackle buns that I turned into a turtle (that one got a feature on the kitchn! who hoo!)


2. Oreo chocolate cake I made for my Oreo-loving daughter's 5th birthday because I was too buzy/lazy to decorate her a pretty cake


3. Banana peanut butter pie I made with the Baked Sunday Mornings crew (this picture got featured on Baked's blog The National Baking Society)


4. Pineapple upside-down cake, probably the cake I enjoyed eating the most all year.


5. Vanilla bean macarons filled with nutella ganache, because macarons are still in, and nutella is... nutella!


I baked along with the Baked Sunday Mornings crew 14 times this year.

I tool part in 9 challenges with the Daring Bakers, skipping January (scones), October (mille-feuille) and November (12 days of cookies).

Of these 40 posts, 16 of them got accepted by Tastespotting. (yah!)


I also decorated a bunch of cakes that I didn't blog about...


I had a blast in 2012. Here's to a sweet 2013!

Friday, December 28, 2012

eggnog muffins with cranberry filling

On boxing day I was confronted with a massive amount of leftover food from Christmas parties. I had a carton of eggnog that was about to expire, so I had to find creative way to use it before then. I made eggnog waffles, and then turned to the internet to find a muffin recipe that I could make and freeze for lunches when we go back to work and school in January.


I was looking for a muffin recipe that didn't require the use of a mixer, since it was being used for something else, and I didn't have any softened butter I could use for these muffins, so I found what I was looking for at Annie's Eats.

As I was spooning the batter in the cute little baking cups, I thought that I could make use of other leftovers, and added a spoonful of cranberry sauce in each of the half filled baking cups before adding a bit more batter on top.


Eggnog muffins with cranberry filling

recipe lightly adapted from Annie's Eats

Yield: one dozen

1 1/3 cups all-purpose flour
¼ tsp. baking soda
½ tsp. baking powder
½ tsp. salt
¼ tsp. freshly ground nutmeg
1 cup eggnog
¼ cup vegetable or canola oil
1 tbsp. apple cider vinegar
1 tsp. vanilla extract
1 cup sugar

1/4 cup cranberry sauce

Preheat the oven to 350˚ F. Line cupcake pans with paper liners. In a medium bowl, combine the flour, baking soda, baking powder, salt and nutmeg; whisk to combine. In another bowl combine the eggnog, vegetable oil, vinegar, and sugar. Whisk until well blended. Add in the dry ingredients and mix just until incorporated.

Divide the batter between the prepared cupcake liners, filling the cups 1/2 full. Add a spoonful of cranberry sauce to each liner, and fill each liner 2/3 full with the rest of the batter.  Bake 22-24 minutes, or until a toothpick inserted in the center comes out clean. Allow to cool in the pan 5 minutes, then transfer to a wire rack to cool completely.


They came out absolutely delicious! My mom used to make muffins filled with jam, and these totally brought back memories. The muffin itself is sweet and flavorful, and very moist. The cranberry sauce complemented the muffin nicely. A nice burst of freshness in the sweet muffin.


It was my first time using the rigid kind of baking cups for muffins. I was happy to see that they kept their shape while baking on a rimmed baking sheet, and pleasantly surprised that did not become discolored while baking by the fat in the batter. So glad I stocked up when I saw them a little while back! So cute!

Thursday, December 27, 2012

triple chocolate toffee panettone

I waited until the last minute to complete this month's Daring Bakers challenge. Had many projects on the go this month, and had to wait until after Christmas to be able to focus on this project.


The December 2012 Daring Bakers’ challenge was hosted by the talented Marcellina of Marcellina in Cucina. Marcellina challenged us to create our own custom Panettone, a traditional Italian holiday bread!

I've never had panettone before, but have seen tall boxes of it in stores. I'm kinda leery about pastry that comes in a box and has a long shelf life. That, combined with pictures of panettone that I've seen made me imagine a tall crusty bread with a dry crumb. 


Although traditional panettone has dried fruits and candied citrus peel in the recipe, that flavor combination did not appeal to me. I chose to replace the traditional filling with three kinds of chocolate chips, toffee chips and coarse sugar.

I decided to make the entire recipe over the course of one day, starting at 8 am and pulled it out of the oven at 9 pm. Most of the work is waiting for the dough to rise.

One of my loaves rose more than the other and the shorter one kinda collapsed a bit in the middle after I took it out of the oven. I was worried about having under baked it, so I peeked in and couldn't resist pulling pieces of dough out for a taste. 


The texture of this bread is really something else. Flaky and fluffy at the same time. Straight out of the oven, it was amazing! Not dry at all! I had to stop myself from going back and plucking just another piece from the interior of the bread, or else I'd have had nothing left to photograph.

I really loved the flavor combination too! Not sure I'd make it again, after all, it calls for almost a pound of butter, and you need to dedicate an entire day to make it, but I really enjoyed this challenge.

The only issue I had was finding the right papers to bake this in. I ended up using a 6-inch  store-bought disposable pan that had a tube in the middle. I cut out the tube and added a cake board to the bottom of the pan. I also I had butter dripping to the bottom of my oven and smoking up the kitchen when I put my bread in. Of course, instead of staying on top of the dough, the butter just melted right off the side of the bread. I should have seen this coming, but no. Regardless, the mess worth it!


Here's the recipe that was provided for us with a few modifications regarding flavoring. For the original recipe, please click here.

Panettone

Makes 2 Panettoni

Sponge
1 satchel (2¼ teaspoons) (7 gm) active dry yeast
1/3 cup (80 ml) warm water
½ cup (70 gm) unbleached all purpose flour

Mix the yeast and water in a small bowl and allow to stand until creamy, about 10 minutes or so. Mix in the flour. Cover with plastic wrap and allow to double in size for about 20 to 30 minutes.

First Dough
1 satchel (2¼ teaspoons) (7 gm) active dry yeast
3 tablespoons (45 ml) warm water
2 large eggs, at room temp
1¼ cup (175 gm) unbleached all-purpose (plain) flour
¼ cup (55 gm) (2 oz) sugar
½ cup (1 stick) (115 gm) unsalted butter, at room temp

In the bowl of a stand mixer, mix together the yeast and water and allow to stand until creamy, about 10 minutes or so. With the paddle attached mix in the sponge, eggs, flour, and sugar. Add in the butter and mix for 3 minutes until the dough is smooth and even. Cover with plastic wrap and allow double in size, about 1 – 1 ¼ hours

Second dough
2 large eggs
3 large egg yolks
2/3 cup (150 gm) (5-2/3 oz) sugar
3 tablespoons (45 ml) honey
1 tablespoon (15 ml) vanilla extract
1 teaspoon (5 ml) (6 gm) salt
1 cup (2 sticks) (225 gm) unsalted butter, at room temp
3 cups (420 gm) (15 oz) unbleached all-purpose (plain) flour; plus up to (2/3 cup) 100 gm for kneading

With the paddle mix in thoroughly the eggs, egg yolks, sugar, honey, vanilla, and salt. Mix in the butter until smooth. Add the flour and slowly incorporate. At this stage the dough will seem a little too soft, like cookie dough. Replace the paddle with the dough hook and knead for about 2 minutes. Turn out the dough and knead it on a well-floured surface until it sort of holds its shape.
Don’t knead in too much flour but you may need as much as 2/3 cup (100 gm). Be careful the excess flour will affect the finished product.

First Rise
Oil a large bowl lightly, plop in your dough and cover with plastic wrap. Rise in a warm place for 2 – 4 hours, until tripled  in size.

Filling and final dough
1½ cups chocolate chips (combination of milk, white and semi-sweet)
½ cup toffee chips
1/2 cup coarse sugar

Combine all your filling ingredients and mix well
Press out one portion of dough into an oval shape
Sprinkle over one quarter of the filling and roll up the dough into a log
Press out again into an oval shape and sprinkle over another quarter of the filling
Roll into a log shape again.
Repeat with the second portion of dough
Shape each into a ball and slip into your prepared pans, panettone papers or homemade panettone papers.

Cut an X into the top of each panettone and allow to double in size.
Rising time will vary but ff it has been rising in a warm place it should be doubled in about 2 hours.

Baking
When you think your dough has only about 30 minutes left to rise preheat your oven to moderately hot 400°F/200°C/gas mark 6 and adjust your oven racks.
Just before baking carefully (don’t deflate it!) cut the X into the dough again and place in a knob (a nut) of butter on top.

Place your panettoni in the oven and bake for 10 minutes
Reduce the heat to moderate 350°F/180°C/gas mark 4 and bake for another 10 minutes
Reduce the heat again to moderate 325°F/160°C/gas mark 3 and bake for 30 minutes until the tops are well browned and a skewer inserted into the panettone comes out clean.
Cooling your panettone is also important. If you have use papers (commercial or homemade) lie your panettoni on their side cushioned with rolled up towels. Turn gently as they cool. If you have used pans cool in the pans for 30 minutes then remove and cushion with towels as above.


Wednesday, December 26, 2012

Eggnog waffles

Leftover eggnog about to expire = boxing day breakfast!


Eggnog waffles
recipe source: Coconut and Lime

2 1/4 cup flour
1 tablespoon sugar
1 tablespoon baking powder
1/4 teaspoon salt
1/8 teaspoon nutmeg
1 cup milk
1 cup eggnog
2 tablespoons canola oil
2 teaspoons vanilla
2 eggs

Whisk together the dry ingredients in a large bowl. In a small bowl, whisk together the wet ingredients. Add the wet ingredients to the dry and stir to combine. Follow the instructions included with your waffle iron to complete the waffles. For most large, Belgian-style waffle irons you would use 1 cup of batter for each waffle and cook it for about 4 minutes.

Sunday, December 23, 2012

holiday spice cake with eggnog buttercream

I like to bring treats to the adults taking care of my kids for Christmas. Well anytime really, but Christmas especially. I've done cupcakes in the past, but I find that little 6 inch cakes are also very pretty to give, and they are easy to share.

I chose a recipe from Baked Elements this year, mainly because it was on the Baked Sunday Mornings schedule, but I know I couldn't go wrong with a spice cake that smells like Christmas, topped with an old-fashioned boiled milk frosting.


My plan was to double the cake and frosting recipe, but after consulting a fellow Sunday Mornings baker, we decided I should just make the recipe twice instead. And I'm glad I didn't double the recipe right away! It made the 5, 6-inch cakes I needed, plus a small cupcake so I could actually taste the cake and write up a review!


For some reason when I set out the make the cake I was expecting a straight forward cream butter, sugar, eggs, alternate dry ingredients with wet recipe, but then I realized that this was a Baked recipe... So that meant creaming butter and sugar, adding an egg, sifting dry ingredients together, alternating dry ingredients with ice cold water, then folding in a molasses-spice mixture, whipping egg whites, and folding them into the batter, all the while dirtying a massive amount of dishes. But of course, the dishes are always worth it in the end!

I've made the boiled milk frosting a few times in the past with great success (and reviews!) but I know that the method is finicky. I was very happy to have it come together with minimal issues. The only thing is, I didn't have any rum, so I added a tablespoon of vanilla and a teaspoon vanilla paste to the recipe instead. Because for some reason, I thought the recipe would require eggnog. So that's what I bought, not rum...

I only frosted the tops of the cakes, and topped them with white sprinkles, non pareils and dragees, as suggested by the Baked boys. I even sprinkled luster dust on the frosting. But I just couldn't resist adding a little gumpaste/fondant penguin I had made the weekend prior. Of course, then the cake was too tall for the cake boxes, but it made for pretty pictures :)


The cake itself was amazing. Super moist and light, and very flavorful. It made me feel the same way I did when I first made and tasted the apple spice cake from the 2nd book. Wondering why on earth you would want to make plain jane "white" cake when you can make cakes that taste like this! Although the frosting wasn't as smooth as I would have liked it to be, the texture was fine on the tongue, and very yummy. I wonder if whipping it some more might have improved on the texture, but I was so afraid to mess it up, I didn't dare try. The day after I tasted this, I had a gingerbread cupcake from a fancy schmancy bakery here and it was nothing, nothing compared to this cake.

My kids' teachers, bus driver and babysitter all got cute cakes topped with holly instead of the penguin.


As I'm getting the house ready to host my in-laws tomorrow for Christmas Eve dinner, I would like to wish all my fellow Sunday Mornings bakers a very sweet Christmas. May the holiday season fill you with joy and happiness! I'll probably be skipping the shortbread recipe next week, so I will also wish you the best for 2013. Looking forward to baking with you some more in the new year!

And oh! Am I following you on Twitter? Do you have a FB page I can like? Are you on Instagram? Feel free to leave links in the comments!


Please visit the Baked Sunday Mornings blog for the recipe and to see how the other bakers did!

Saturday, December 8, 2012

spicy brownies

I worked late one day last week, and although it was past my regular bed time, I was way to wired to sleep. So I made brownies.


I'm a big fan of Haagen Dazs Mayan Chocolate ice cream, so I was pretty sure these brownies spiced with chili powder, cinnamon and ginger would be a hit.

The recipe calls for freshly ground cinnamon and ancho chili powder, but when making brownies at 10 pm... you use what's in the cupboard. In my case, preground cinnamon and mexican chili powder.

I don't often make brownies, although they are simple enough to make. Butter and chocolate are melted together, then sugar gets whisked in, then eggs. Some flour, and, in this cake, a bunch of spices, and the resulting batter goes in the oven. The recipe says to bake it for 30 minutes, but I baked mine for at least 45 minutes. And it was in no way overbaked. Fudgy in the center, a very thin crisp top. The edges were barely crispier than the middle, so I didn't even have to cut them off to get nice squares.


I really like the flavor. Added a bit of kick to the usual chocolate, but it was in no way hot-spicy. The recipe can be found on the Baked Sunday Mornings blog, and while you're at it, check out what the other bakers thought of Baked's Matt and Renato's Spicy Brownies.

Sunday, December 2, 2012

campfire cake

The last time I made cake for my husband's family, it didn't work out too great. The frosting should have been refrigerated, the layers in the bottom tier slid everywhere... It was a mess. So I was determined to show them I could actually make a cake that was structurally sound.

The birthday girl had requested chocolate (and a mocha frosting, but that piece of info didn't get to me before I decided on the cake I wanted to make) but I wanted to make something a bit more than just my regular chocolate cake with chocolate frosting...


I had spotted 
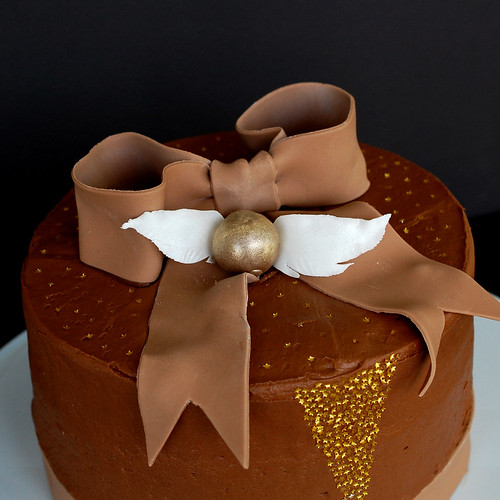
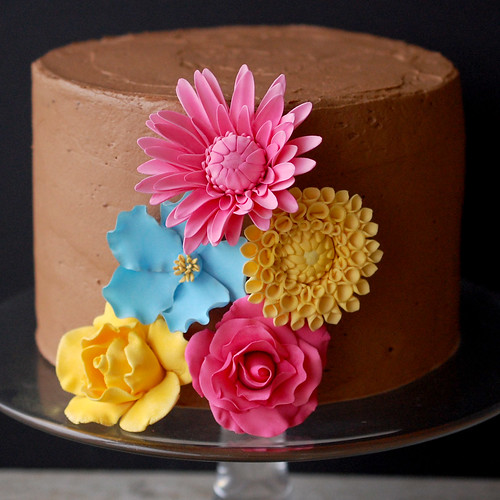
Sweetapolita's campfire delight cake a long time ago, and thought it would be a nice big cake to share for my sister-in-law's birthday. That's 6 layers of moist chocolate cake, three layers of toasted marshmallow frosting, two layers of malted chocolate buttercream, the the whole thing is covered with more chocolate frosting.

Because my go-to recipe for chocolate cake is so simple, this impressive cake is just a matter of dirtying dishes... nothing complicated about it.

I split my chocolate cake batter into 3 9-inch pans so I would have nice tall layers to split in half. I let them cool then chilled them a bit before splitting them in half.

Then I made the toasted marshmallow frosting that would be sandwiched between the split cake layers.
The frosting calls for butter, a little powdered sugar, vanilla, a whole jar of marshmallow cream and large marshmallows that have been toasted and melted in the oven. The resulting mess was pretty light, but with a distinct marshmallow flavor. The bits of toasted marshmallow imparted nice flavor and a bit of texture.


Toasted Marshmallow Frosting
recipe source : Sweetapolita

16 large white marshmallows
1 cup (125 g) icing sugar (confectioners' or powdered), sifted
1 cup butter (227 g)(2 sticks), at room temperature
1/2 teaspoon (2.5 mL) pure vanilla extract
1 jar (213 g) marshmallow cream (such as Marshmallow Fluff

Place marshmallows on cookie sheet lined with parchment paper and sprayed with nonstick cooking spray. Place on lower rack of oven, and broil marshmallows until nice and brown on top, between 30-60 seconds. Remove pan from oven and gently turn the marshmallows over, and broil until they are golden brown.
In an electric mixer fitted with paddle attachment, combine butter and icing sugar on low until blended, about 1 minute. Add vanilla and mix on med-high for about 3 minutes.
Add marshmallow cream and toasted marshmallows, and mix on lowest setting for about 1 minute.


I filled the layers and put them back in the fridge to set while I cleaned the mixer bowl and made the chocolate frosting. The recipe calls for belgian chocolate, but having no clue how belgian chocolate differs from regular chocolate, I chose to melt half milk chocolate and half semi-sweet chocolate. Seem to work out allright. Since malt scares some people, I replaced 1/3 of the amount called for with cocoa powder for a less pronounced malt flavor and another hit of chocolate.

Malted Chocolate Frosting 
recipe source: Sweetapolita

1 lb butter (4 sticks)(2 cups)(454 g), at room temperature
4 cups (500 g) icing sugar (confectioners' or powdered), sifted
3/4 cup (75 g) Ovaltine Classic (brown in colour)
1 tablespoon (15 mL) pure vanilla extract
pinch of salt
8 oz (250 g) quality Belgian chocolate, chopped, melted and cooled
1/2 cup (120 mL) whipping (35% fat) cream

In a bowl of stand mixer fitted with paddle attachment, combine the icing sugar and butter and beat on low speed for about 1 minute.
Add malt powder, vanilla and salt, and beat on low until well combined. Add the melted chocolate and beat on medium speed until smooth (about 2 minutes).
Add whipping cream and beat on med-high speed for another minute.

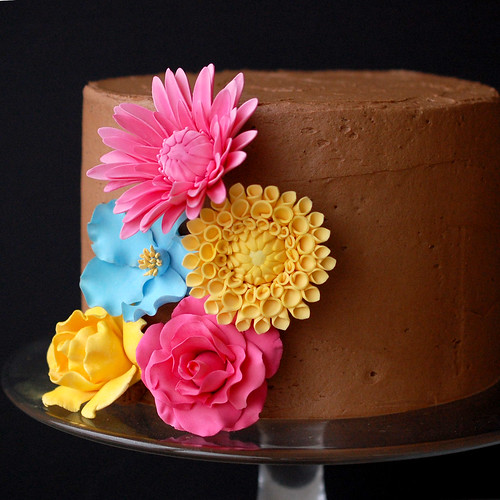
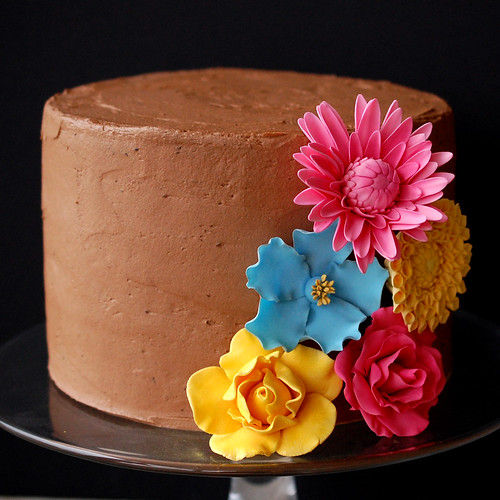
Spread some of the chocolate frosting between the cake layers, the frosted the whole thing with more frosting, and was very surprised how it manage to both stay upright, and level! I did a happy dance while I put it back in the fridge overnight.


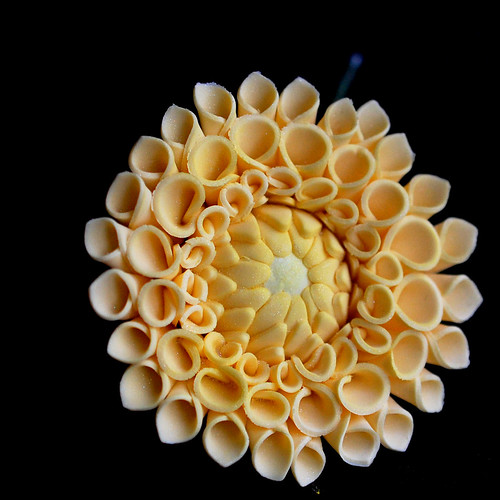
I had asked the birthday girl for her favorite color combination and she came up with neon pink and yellow. So I set out to make gumpaste flowers, loosely inspired by this cake (and I say loosely because I could never replicate such a pretty cake!). She also has a great tutorial for the dahlias which I had never attempted before. Very fun to make, and pretty impressive!


It was a really big cake. 9 inches across and at least 6 inches high. Once cut, it barely fit onto the plates! Half of it generously fed 8 adults and 5 kids.


Saturday, December 1, 2012

mini vanilla bean scones

I usually bake something for my colleagues' birthdays, but this week, I was running around, working too much and not home very often. So when Thursday rolled around and I had to stay at the office until 9, I knew birthday cake was not going to happen.

But when my daughter woke me up in the middle of the night and my mind started racing, there was no way I could fall asleep again. So I went to the living room and worked on a few gumpaste flowers I hadn't had a chance to finish when I realized that I *did* have time to bake.

I didn't have any butter that was soft enough to cream, and I didn't want to use the mixer and wake up the rest of my family, but I remembered that my colleague had asked for vanilla bean scones with vanilla glaze that Starbucks used to make but apparently no longer sells.


Scones are very doable in the middle of the night. Ingredients have to be straight out of the fridge cold, no noisy equipment... So no time for a birthday cake, but birthday scones did happen! And the birthday boy was very happy!

They came together pretty quickly, but I had to add extra cream because the mixture was a little dry. I had to work the dough much more than I wanted to so that I could form 4 circles, then cut each into 8 wedges. I was scared that they would come out tough from all the handling, but they we absolutely fine. Delicate and melt in your mouth tender.

They are very, very vanilla-y though, and the glaze is really sweet. I think next time I would cut back on the vanilla beans (use one instead of two) in the dough. The glaze is a must though. You're eating a scone with a sugary glaze on it... of course it's going to be sweet!


Mini Vanilla Bean Scones
recipe source : the pionneer woman

Prep Time: 20 Minutes | Cook Time: 20 Minutes | Difficulty: Easy | Servings: 12

3 cups all-purpose flour
2/3 cups sugar
5 teaspoons baking powder
1/4 teaspoon salt
2 sticks (1/2 pound) unsalted butter, chilled
1 large egg
3/4 cups heavy cream (more if needed)
2 whole vanilla beans
5 cups sowdered sugar, sifted
1/2 cup whole milk, more if needed for thinning
1 whole vanilla bean


Preheat oven to 350 degrees.

Split the vanilla beans down the middle lengthwise and scrape out all the vanilla seeds inside. Stir seeds into cream. Set aside for 15 minutes.

Sift together flour, 2/3 cup sugar, baking powder, and salt.
Cut cold butter into pats, then use a pastry cutter or two knives to cut the butter into the flour. Keep going until mixture resembles crumbs.

Mix vanilla cream with egg, then combine with flour mixture; stir gently with a fork just until it comes together.

Turn dough onto a floured surface and lightly press it together until it forms a rough rectangle. (Mixture will be pretty crumbly.) Use a rolling pin to roll into a rectangle about 1/2 inch to 3/4 inch thick. Use your hands to help with the forming if necessary.

Use a knife to trim into a symmetrical rectangle, then cut the rectangle into 12 symmetrical squares/rectangles. Next, cut each square/rectangle in half diagonally, to form two triangles.

Transfer to a parchment or baking mat-lined cookie sheet and bake for 18 minutes, removing from the oven just before they start to turn golden. Allow to cool for 15 minutes on the cookie sheet, then transfer to a cooling rack to cool completely.

VANILLA GLAZE

To make the icing, split one vanilla bean in half lengthwise and scrape out the seeds. Stir seeds into milk; allow to sit for awhile. Mix powdered sugar with the vanilla milk, adding more powdered sugar or milk if necessary to get the consistency the right thickness. Stir or whisk until completely smooth.

One at a time, carefully dunk each cooled scone in the glaze, turning it over if necessary. Transfer to parchment paper or the cooling rack. Allow the glaze to set completely, about an hour. Scones will keep several days if glazed.