Sunday, October 30, 2011

halloween ghosts

Halloween kinda snuck up on me this year. I didn't even see the month of October go by, but somehow I managed to get the kids costumes and the house decorated. Even though I bought a pumpkin to turn into a jack-o-lantern, it still sits in the truck of my car, untouched, as does the gingerbread haunted house I wanted to decorate with Cha.

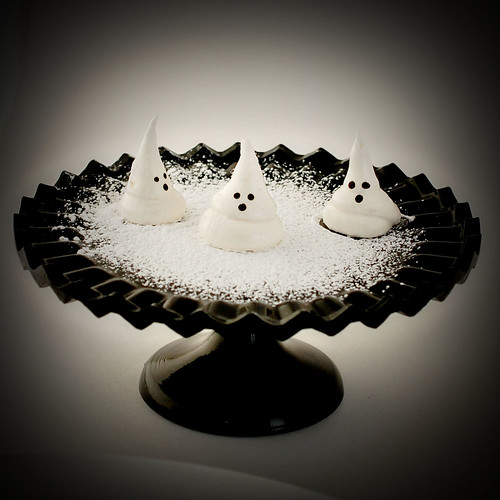
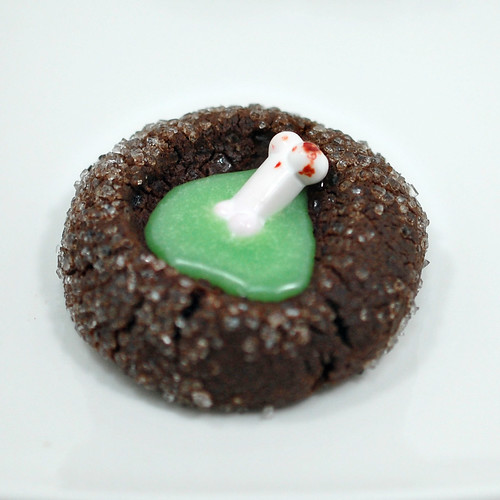
I did carve out some time to make ghosts sugar cookies, and marshmallows. Figured I have a reputation to uphold, and can't send my kid to school without treats!


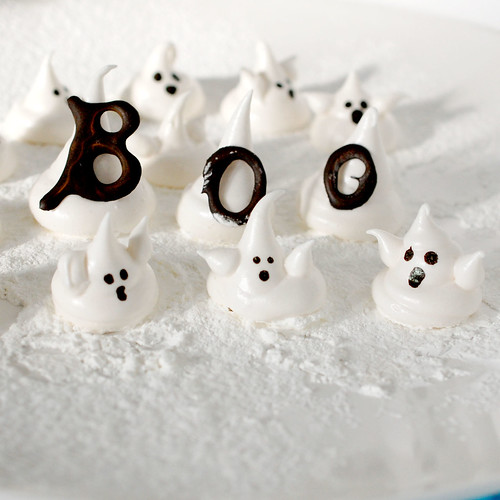
I made the marshmallows to bring to my nephew's birthday party. I had a few extra egg whites in the fridge, and had been meaning to try David Lebowitz's recipe, and I'm glad I did! I think it might be the only recipe I have tried of his, and love the way this one is written. Super clear. Plus, he re uses pots instead of making us wash a mountain of dishes! His post is full of useful information too! Check it out!

Marshmallows
25-50 marshmallows

recipe adapted from David Lebowitz

2 envelopes powdered gelatin
1/2 cup + 1/3 cup cold water
1 cup sugar
1/3 cup light corn syrup
4 large egg whites (1/2 cup, 110g), at room temperature
pinch of salt
2 teaspoons vanilla extract or 1 teaspoon vanilla paste

One part corn starch (or potato starch), one part powdered sugar (about 1 cup each)

1. In a small bowl, sprinkle the gelatin over the 1/2 cup cold water to dissolve and soften.

2. In a small saucepan fitted with a candy thermometer, mix the sugar and corn syrup with 1/3 cup of water. Place over medium-to-high heat.

(Note that you will use this saucepan twice, to make the syrup and melt the gelatin, eliminating the need to wash it between uses).

3. In the bowl of an electric mixer, pour in the egg whites and beat on low speed until frothy. Add the pinch of salt.

4. When the syrup reaches about 210ºF (99ºC), increase the speed of the mixer to high and beat the whites until they are thick and fluffy.

5. When the syrup reaches 245ºF (118ºC), slowly pour the hot syrup into the whites, pouring so that the syrup does not fall on the whisk since some of the syrup will splatter and stick to the sides of the bowl.

6. Scrape the gelatin and water into the pan that you used for the syrup. (There should still be residual heat left in the pan from making the syrup in it to dissolve it).

Pour the liquified gelatin slowly into the whites as they are whipping. Add the vanilla extract or paste and continue to whip for 5 minutes, until the mixture is feels completely cool when you touch the outside of the bowl.

7. Dust a baking sheet evenly and completely with a generous layer of the powdered sugar/cornstarch mixture. (I use a sifter to do this.) Make sure there are absolutely no bare spots.

8. Scoop the marshmallow mixture into a pastry bag fitted with a plain round tip. Pipe desired shapes onto the baking sheet. Allow to dry for at least 4 hours, preferably overnight, uncovered.

9. Put about 1 cup of the marshmallow mixture into a large bowl.

Dust the top of the marshmallows with some of the marshmallow mixture.  Shake the marshmallows vigorously in a wire strainer to remove the excess powder.

Storage: The marshmallows can be made up to one week in advance, and stored in an airtight container.


I let them set overnight, then I drew a face on them with food markers. They were a hit! Very smooshy and a great treat for halloween! I love the sheen that they got too! Very pretty.

As we're not allowed sending candy to school, I made cookies for Cha's classmates. My regular old sugar cookie recipe, but I tried a different recipe for the royal icing. I wasn't quite satisfied with the way the royal icing turned out the last few times I made it, so I thought I'd turn to an expert and get some pointers. Sweetopia uses a recipe from Antonia74. And that's what I used as well! Turned out great! But makes a lot of icing!

Royal Icing Recipe
recipe from Antonia74 via Sweetopia

6 oz (3/4 cup) of warm water
5 Tablespoons Meringue Powder
1 teaspoon cream of tartar
1 kilogram (2.25 lbs.) powdered icing sugar

*** Note; if your meringue powder has no vanilla flavour (vanillin powder) in it, add a teaspoon of clear vanilla to this recipe.

In mixer bowl, pour in the warm water and the meringue powder. Mix it with a whisk by hand until it is frothy and thickened…about 30 seconds.

Add the cream of tartar and mix for 30 seconds more.

Pour in all the icing sugar at once and place the bowl on the mixer.

Using the paddle attachment on the LOWEST speed, mix slowly for a full 10 minutes. Icing will get thick and creamy.

Cover the bowl with a dampened tea-towel to prevent crusting and drying.
Tint with food colourings or thin the icing with small amounts of warm water to reach the desired consistency.  


Again, the food marker came in handy to draw on ghosts faces! I had just the right amount of tiny bags that fit the ghosts perfectly. Topped with a cute sticker to close the bag, we had perfect treats for little halloween ghosts!

I'll be trick-or-treating with Strawberry Shortcake tomorrow, while my husband stays home with my tiny ghost! Wishing everyone a safe and happy halloween!


Thursday, October 27, 2011

povitica

I skipped the last Daring Baker's challenge, because it was croissants from scratch. There was no way I was making that without losing my mind. So I didn't make croissants. I felt guilty not making September's recipe, but on the other hand wasn't very sorry, because it was my first challenge after being back at work, and I was still adjusting to my new life. It's pretty hectic, and weekends are kinda sacred. Not much time for marathon baking sessions.


So this month, I had every intention of participating. The Daring Baker’s October 2011 challenge was Povitica, hosted by Jenni of The Gingered Whisk. Povitica is a traditional Eastern European Dessert Bread that is as lovely to look at as it is to eat!

I was a tiny bit disappointed with the challenge being bread, again, but I though playing around with the filling would be fun. I had fully intended to fill one of the loaves with leftover hazelnut praline, but I didn't have enough, so decided on a cinnamon, brown sugar and cocoa filling for one, and s'mores filling for the other.


Povitica
Makes two loaves

To activate the Yeast:
1 Teaspoon (5 ml/4 ½ gm) Sugar
½ Teaspoon (2½ ml/1½ gm) All-Purpose (Plain) Flour
¼ Cup (60 ml) Warm Water
1 Tablespoon (15 ml/7 gm/¼ oz/1 sachet) Dry Yeast

Dough:
1 Cup (240 ml) Whole Milk
6 Tablespoons (90 ml/85 gm/3 oz) Sugar
1½ Teaspoons (7½ ml/9 gm/1/3 oz) Table Salt
2 Large Eggs
¼ Cup (60 ml/60 gm/½ stick/2 oz) Unsalted Butter, melted
4 cups (960 ml/560 gm/19¾ oz/1¼ lb) All-Purpose Flour, measure first then sift, divided

Filling:
Brown sugar, cinnamon, cocoa
Marshmallow fluff, cocoa, graham crumbs

Topping:
beaten egg white
Melted Butter

To Activate the Yeast:
In a small bowl, stir sugar, flour, and the yeast into the warm water and cover with plastic wrap.
Allow to stand for 5 minutes

To Make the Dough:
In a medium saucepan, heat the milk up to just below boiling (about 180°F/82°C), stirring constantly so that a film does not form on the top of the milk. You want it hot enough to scald you, but not boiling. Allow to cool slightly, until it is about 110°F/43°C.
In a large bowl, mix the scalded milk, the sugar, and the salt until combined.
Add the beaten eggs, yeast mixture, melted butter, and 1 cup (480 ml/280 gm/10 oz) of flour.
 Blend thoroughly and slowly add remaining flour, mixing well until the dough starts to clean the bowl.
Turn dough out onto floured surface and knead, gradually adding flour a little at a time, until smooth and does not stick.
Divide the dough into 2 equal pieces (they will each weight about 1.25 pounds/565 grams)
Place dough in 2 lightly oiled bowls, cover loosely with a layer of plastic wrap and then a kitchen towel and let rise an hour and a half in a warm place, until doubled in size.

To Roll and Assemble the Dough:
Spread a clean sheet or cloth over your entire table so that it is covered.
Sprinkle with a couple of tablespoons to a handful of flour (use flour sparingly)
Place the dough on the sheet and roll the dough out with a rolling pin, starting in the middle and working your way out, until it measures roughly 10-12 inches (25½ cm by 30½ cm) in diameter.
Spoon 1 to 1.5 teaspoons (5ml to 7 ½ ml/4 gm to 7 gm) of melted butter on top.
Using the tops of your hands, stretch dough out from the center until the dough is thin and uniformly opaque. You can also use your rolling pin, if you prefer.
As you work, continually pick up the dough from the table, not only to help in stretching it out, but also to make sure that it isn’t sticking.
When you think it the dough is thin enough, try to get it a little thinner. It should be so thin that you can see the color and perhaps the pattern of the sheet underneath.
Spoon filling evenly over dough until covered.
Lift the edge of the cloth and gently roll the dough like a jelly roll.
Once the dough is rolled up into a rope, gently lift it up and place it into a greased loaf pan in the shape of a “U”, with the ends meeting in the middle. You want to coil the dough around itself, as this will give the dough its characteristic look when sliced.
Repeat with remaining three loaves, coiling each rope of dough in its own loaf pan.
Brush the top of each loaf with a couple of beaten egg whites.
Cover pans lightly will plastic wrap and allow to rest for approximately 15 minutes.

To Bake the Dough
Preheat oven to moderate 350°F/180°C/gas mark 4.
Remove plastic wrap from dough and place into the preheated oven and bake for approximately 15 minutes.
Turn down the oven temperature to slow 300°F/150°C/gas mark 2 and bake for an additional 45 minutes, or until done.
Check the bread at 30 minutes to ensure that the bread is not getting too brown. You may cover the loaves with a sheet of aluminum foil if you need to.
Remove bread from oven and brush with melted butter.
Allow to cool on a wire rack for 20-30 minutes, still in the bread pan. Allowing it to cool in the pan helps the loaf to hold its shape.
It is recommended that the best way to cut Povitica loaves into slices is by turning the loaf upside down and slicing with a serrated knife.


Although not surprised, I was kinda disappointed with the final result of my bread. It was a bit too dry for my taste, but I might try toasting and buttering it for breakfast. To be fair, I think I messed up the amount of flour I was supposed to add to the dough. I found it behaved weirdly. Took forever to double in size, and by the time it had, I had to stuck it in the fridge because I didn't have time to finish the recipe then. It stayed in the fridge overnight and the next day. I brought it back to room temperature before rolling out, not as thinly as I was supposed to because I'm not a very patient baker. I forgot to butter the dough at that point, and made up the filling as I went.

I didn't get very much rise while the bread was baking, but it was done in an hour, like the recipe said. I left it to cool in the pan over night and the next day, without covering it, so maybe that had something to do with the dryness too?


In any case, although not my favorite thing to bake, I have to admit that it was pretty cool cutting into the loaf and seeing the pretty swirls!

Can't wait to see what next month's challenge will be, and see if I'm able to find time to enjoy making it!

Tuesday, October 25, 2011

pumpkin scones

I have a love-hate relationship with pumpkin. I like it in cakes, cupcakes, baked goods that involved butter, sugar, flour and spice, but don't even offer me pumpkin pie, mousse, crème brûlée or any other custardy pumpkin dessert. Not for me! I'll pass, thanks!

We love fall flavors here. Pumpkin, apples, cinnamon, nutmeg... And for some reason, we try to get in as many pumpkin recipes as we can in October...


So pumpkin scones had to be made! These are super tender and almost fluffy pastries, covered in a simple powdered sugar glaze. They are supposed to be drizzled with a spiced glazed too, but I ran out of powdered sugar, and tried to use powdered milk instead, and it got all gritty, and yeah. It was a mess. A tasty mess, but it made my drizzled scones unfit for the camera. The scones were delicious as is, almost dessert worthy with the glaze, and absolutely delicious with the spiced drizzle. Make it. Make sure you have enough powdered sugar!


Pumpkin Sconesrecipe source: Brown Eyed Baker via the shoe box kitchen

For the Scones:
2 cups all-purpose flour
1/4 cup plus 3 tablespoons granulated sugar
1 tablespoon baking powder
1/2 teaspoon salt
1/2 teaspoon ground cinnamon
1/2 teaspoon ground nutmeg
1/4 teaspoon ground cloves
1/4 teaspoon ground ginger
6 tablespoons cold butter, cut into 1-inch cubes
1/2 cup canned pumpkin puree
3 tablespoons half-and-half
1 large egg

For the Powdered Sugar Glaze:
1 cup plus 1 tablespoon powdered sugar
2 tablespoons milk

For the Spiced Glaze:
1 cup plus 3 tablespoons powdered sugar
2 tablespoons milk
1/4 teaspoon ground cinnamon
1/8 teaspoon ground nutmeg
1 pinch ground ginger
1 pinch ground cloves

Preheat the oven to 425 degrees F. Line a baking sheet with parchment paper; set aside.
In the bowl of a stand mixer fitted with fit the paddle attachment, stir together the flour, sugar, baking powder, salt, cinnamon, nutmeg, cloves and ginger. Add the butter and toss with a fork to coat with the flour mixture. Mix on medium-low speed until the texture resembles coarse cornmeal, with the butter pieces no larger than small peas.

In a separate bowl, whisk together the pumpkin, half-and-half and egg. Fold wet ingredients into dry ingredients, and form the dough into a ball. Pat out dough onto a lightly floured surface and form into a 1-inch thick rectangle about 4 inches by 12 inches. Use a large knife to slice the dough making three equal portions. Cut each of the portions in an X pattern (four pieces) so you end up with 12 triangular slices of dough. Place on prepared baking sheet. Bake for 14-16 minutes, or until light brown. Place on wire rack to cool.

While the scones are cooling, make the powdered sugar glaze by mixing the powdered sugar and milk together until smooth. When scones are cool, use a pastry brush to spread plain glaze over the top of each scone. Allow to firm.

While the powdered sugar glaze is firming, combine all of the ingredients for the spiced glaze. Drizzle over each scone and allow the icing to dry before serving (about an hour).


I made these with the intention of them being breakfast, but when I offered a second scone to my husband, he declined and said he was going to get some breakfast. Although they are not quite breakfast material, they sure didn't last! Every single one of them was eaten promptly, but as dessert.

Sunday, October 23, 2011

chocolate mint thumbprint cookies

I really wasn't in the mood to bake these cookies. The guys from Baked say that they should be made year-round, and not just at christmas time, but the combination of mint and chocolate, plus the thumbprint cookie format, just screams christmas!

So I made the dough one day, baked them the next, filled them two days after that. Can you tell I wasn't very motivated? After making the white chocolate mint ganache, and seeing the cheap chocolate I used turn it a yucky yellowish color, I decided to tint it green to hint at the mint taste in the cookies.


Yeah, didn't turn out too great! The ganache looked like green slime! So I decided to pretend they were Halloween cookies, and that was that. On the upside, I kinda like these pics, and the chocolate kinda broke up the pumpkin and apple recipes I have posted, and have planned for the blog!


The cookie batter tasted kinda bitter when raw, but turned out pretty good once cooked and cooled. Quite rich, and the mint taste wasn't very present in the cookie, but it could be the mint chocolate I used. I liked the texture, it wasn't crumbly, or dry, but pleasant, and the sugar crust gave it a nice crunch, and it sparkled beautifully! The cool, minty ganache center was a nice creamy contrast to the crunchiness of the cookie. Best part, they last forever in the fridge.

I used a squeeze bottle to fill the centers of my cookies and that went superbly! When my husband saw the pools of green slime in the middle of the dark cookies, he suggested Halloween cookies, and we found that bloody bone candies left over from last year's clearanced baking decorations added just the right amount of gross, like a ladle in a cauldron of boiling magic potion.


To get the recipe for these, head over to the new Baked Sunday Mornings website, and see how the others fared too! Next up for our group in two weeks: Pumpkin Cheddar Muffins!

Sunday, October 16, 2011

pumpkin whoopie pies

This recipe for Pumpkin Whoopie Pies is one of the first I tried when I got the Baked New Frontiers cookbook. I had to! It was October is the only month during which you can bake with pumpkin. Or maybe that's just me. So pretty much every year since, I have made Pumpkin Whoopie Pies in October.

They are delicious! Moist cake-like cookies, cream cheese filling, two-bite treats.


Pumpkin Whoopie Pies
Recipe source: Baked: New Frontiers In Baking

3 cups all-purpose flour
1 teaspoon salt
1 teaspoon baking powder
1 teaspoon baking soda
2 tablespoons cinnamon
1 tablespoon ginger
1 tablespoon cloves
2 cups firmly packed dark brown sugar
1 cup vegetable oil
3 cups chilled pumpkin puree
2 large eggs
1 teaspoon pure vanilla extract

Cream Cheese Filling:
3 cups confectioners sugar
1/2 cup (1 stick) unsalted butter, softened
8 ounces cream cheese, softened
1 teaspoon pure vanilla extract

Preheat oven to 350 degrees F. Line two baking sheets with parchment paper.
In a large bowl, mix together the flour, salt, baking powder, baking soda, cinnamon, ginger, and cloves together and set aside.
In a separate bowl whisk the brown sugar and oil together until combined. Add the pumpkin puree and whisk to combine thoroughly. Add the eggs and vanilla and whisk until combined.
Add the flour mixture to the pumpkin mixture and mix until completely combined.

Drop heaping tablespoons of the dough onto the prepared baking sheets, about 1-inch apart. Bake for 10 to 12 minutes, until the cookies are just starting to crack on top and a toothpick inserted into the center of the cookie comes out clean. Remove from oven and let cool completely on the pan while you make the filling.
Sift confectioners sugar into a medium bowl and set aside.
In the bowl of an electric mixer fitted with the paddle attachment, beat the butter until it is completely smooth, with no visible lumps. Add cream cheese and beat until combined.
Add confectioners sugar and vanilla and beat until smooth.
Turn half of the cooled cookies upside down, flat side facing up. Use a tablespoon to drop a large dollop of filling onto the flat side of the cookie. Place another cookie, flat side down, on top of the filling. Press down slightly so that the filling spreads to the edges of the cookie. Repeat until all cookies are used. Place whoopie pies into the refrigerator for 30 minutes to firm up before serving.

Sunday, October 9, 2011

oatmeal chocolate chip cake with cream cheese frosting

After being away from the kitchen for what seems like ever, (really only a week, but it was a looong week), I tackled two Baked recipes in one evening. Thankfully, they weren't overly complicated. I made the must-bake-every-October pumpkin whoopie pies, and this week's Baked Sunday Morning recipe, the Oatmeal Chocolate Chip Cake with Cream Cheese Frosting.


We don't purchase many pre-packaged goodies at our house, but my husband is really fond of chocolate chip muffin bars, and they magically appear in our grocery cart pretty often. So when I read over this week's recipe, I was hopeful that we had found an homemade replacement for the store bought bars.

I searched all over the city to find a baking pan with bar-like rectangular cavities (financier pan). No go. Hate that it's impossible to find stuff in brick and mortar stores! Love that you can find anything on the internet, but the internet is no so great for spur of the moment, need-this-now situations! On the other hand, I did find the tart pan I was looking for 9 Baked Sunday Mornings recipes ago.

This recipe is simple enough, but a bit of planning ahead is required, as the oats and butter must be soaked in boiling water for half an hour before continuing with the recipe. You must also coat the chocolate chips in flour, to keep them from sinking in the batter. Otherwise, it's just a matter of mixing eggs, sugar, salt, baking soda, baking powder, and cinnamon. The cooled oats get mixed in, then flour, then the chocolate chips. The mixture gets baked for 40-45 minutes, and that's it!

Unless you want to frost the bars. Then it's your standard butter, cream cheese, powdered sugar and vanilla that gets mixed until creamy and delicious. Truthfully, I didn't make the frosting in the recipe, because I had extra filling from the whoopie pies, so I used that instead!


Oatmeal Chocolate Chip Cake with Cream Cheese FrostingAdapted From: Baked Explorations
Yield: One 9 by 13 Cake

1 cup old-fashioned oats
1/2 cup (1 stick) unsalted butter, cut into small cubes, at room temperature

8 ounces chocolate chips
1/2 teaspoon vanilla
2 tablespoons all-purpose flour

2 eggs, lightly beaten
3/4 cup granulated sugar
1 1/4 cups firmly packed dark brown sugar
1/2 teaspoon salt
1 teaspoon baking soda
1 teaspoon baking powder
1 1/2 teaspoons cinnamon

1 1/2 cups all-purpose flour

For the Cream Cheese Frosting
5 tablespoons unsalted butter
5 1/2 ounces cream cheese, softened
2 cups confectioners' sugar, sifted
3/4 teaspoon vanilla extract
Heat 1 1/4 cups water to boiling.
Place oats and cubed butter in a large bowl and pour boiling hot water over. Wait 30 seconds and stir to moisten all the oats and melt the butter. Set the mixture aside for 25-30 minutes.

Preheat the oven to 375 degrees and position the rack in the center. Spray the sides and bottom of a 9 by 13 inch baking pan with nonstick cooking spray. Line with parchment paper.

Place the chocolate chips in a small bowl and toss them with the vanilla until covered. Then sprinkle 2 tablespoons of the flour over the chips until coated and set aside.

In a separate bowl, whisk together the eggs, both sugars, salt, baking soda, baking powder and cinnamon until combined. Gently fold in the remaining flour and then the chocolate chips and pour the batter into the prepared pan.

Bakes the cake for 40-45 minutes, or until a toothpick inserted in the center comes out clean. Let the cake cool in the pan or on a wire rack for at least 30 minutes.

To Make the Frosting - Beat the butter until it is completely smooth (can be done with a stand or hand mixer). Add the cream cheese and beat until combined. Add the confectioners' sugar and vanilla and beat until completely smooth. Cover, and refrigerate for 30 minutes before using.

Spread a thin layer of the frosting on the cooled cake. The frosted cake can be kept, refrigerated and tightly covered, for up to 3 days.


My husband wouldn't say that he'll stop buying the prepackaged bars, but did admit that these are pretty good! They are good plain, and over the top with the frosting. Easy enough to make regularly, I think this might be added to my regular rotation of snack recipes!

Thursday, October 6, 2011

cinnamon roll cheesecake

I first made this last fall, pre-blog, for my dad's birthday. My husband said it was the best thing he's ever had, or something to that effect. Then I made it again for Christmas. I was asked for the recipe so many times, that the idea of starting a blog slowly started to form in my head.


It's a recipe that has multiple components, but comes together really easily. I'm a lazy baker, and I didn't have any trouble putting this cake together after dinner, for my husband's birthday the next day.

You start by baking the cinnamon roll batter: creaming butter and sugar, adding an egg, milk and some vanilla. Dry ingredients go in, the half of the batter gets spread in a springform pan, while the rest hangs out until later.

After washing out the standmixer bowl, you make the cheesecake filling, by creaming the usual suspects together. The cheesecake filling gets poured over the cinnamon roll batter.

Next, melted butter, brown sugar and cinnamon get combined, and dropped by spoonfuls onto the cheesecake, then swirled in the batter with a knife. And at last, the rest of the cinnamon roll batter gets dropped by spoonfuls onto the cheesecake.

After being baked and chilled, a quick icing made out of more cream cheese gets artfully drizzled on the cake.

This cake is so good! My husband decided that this could be his birthday cake every year.

Peabody's Cinnamon Roll Cheesecake with Cream Cheese Frosting
recipe from the culinary concoctions of peabody

Cinnamon Roll Batter:
2/3 cup white sugar
¼ cup unsalted butter, at room temperature
1 egg, at room temperature
½ cup whole milk, at room temperature
1 tbsp vanilla extract
2 cups flour
2 tsp baking powder
1/2 tsp salt

Cheesecake filling:
2 pkg. (8 oz. each) cream cheese, at room temperature
1 cup sugar
1 tbsp vanilla extract
2 tbsp flour
3 eggs, at room temperature

Cinnamon Filling:
1/3 cup butter, melted
1 cup brown sugar
3 tbsp cinnamon

Cream Cheese Frosting:
2 ounces cream cheese, at room temperature
3 tbsp unsalted butter, at room temperature
1 tbsp lemon juice
2 tsp vanilla
1 cup powdered sugar
milk (if needed to thin frosting)

Preheat oven to 350 degrees F.

Grease a 9-inch springform pan.

Cinnamon Roll Batter:

Using a stand mixer with a paddle attachment cream together the butter and sugar for 3 minutes, until light and fluffy.

Add egg, milk, and vanilla. Beat for another minute. Scrape down bowl.

Sift together flour, baking powder, and salt. Combine the sifted and creamed ingredients together. Mix on low speed until throughly combined.

Spread half of the batter in a thin layer onto the bottom of the springform pan.

For the Cheesecake Filling:

Using a stand mixer (and a clean bowl) fitted with paddle attachment, beat cream cheese and sugar for 2 minutes on medium-high speed.

Add the eggs one at a time, scraping down the bowl after each addition.

Add the vanilla and flour and beat for another minute.

Pour all of the cheesecake batter on top of the cinnamon roll batter in the springform pan.

Cinnamon Filling:

In a small bowl, combine the melted butter, cinnamon, and brown sugar. Mix until thoroughly combined.

Drop spoonfuls of the cinnamon filling over the entire top of the cheesecake. Swirl in the batter with a butter knife.

Take the rest of the cinnamon roll batter and drop spoonfuls over the entire top of cheesecake. Push them down gently in the cheesecake batter.

Bake for about 50-55 minutes, cake will be puffy and lightly browned. Let chill for 20 minutes at room temperature and then cover and move to fridge for 4 hours. Remove cake and let it warm up to room temperature just a bit. Frost with Cream Cheese Frosting.

Cream Cheese Frosting:

Using a stand mixer (and a clean bowl) with paddle attachment, beat the cream cheese and butter together for 2 minutes. Add remaining ingredients and beat until desired consistency is reached. If too thick, thin out with milk.


What I love about this cheesecake, is it doesn't have to look perfect. Mine is lumpy, and unevenly brown, has a huge crack in the middle of it, but doesn't matter! Drizzle on the icing, and you're good to go! No one is going to complain!

The only thing with this particular cake, is that I didn't swirl it well enough, so I got chunks of cinnamon sugar in it... still good, but it would have been better if the cinnamon was more evenly distributed. So swirl, swirl, swirl!