
I thought, ok, I can do this. I've made marshmallows before, and taffy (kinda), and truffles... And then I started reading the challenge post... I got overwhelmed, and fast!
The August 2011 Daring Bakers’ Challenge was hosted by Lisa of Parsley, Sage, Desserts and Line Drive and Mandy of What the Fruitcake?!. These two sugar mavens challenged us to make sinfully delicious candies! This was a special challenge for the Daring Bakers because the good folks at http://www.chocoley.com offered an amazing prize for the winner of the most creative and delicious candy!
So basically, chocolate tempering, all kinds of candies, plus a contest. For this challenge, we needed to make two candies: one chocolate one, and another one of our choice. And to participate in the competition, we had to come up with the most creative and delicious flavours in a chocolate candy.
To get us started, Lisa and Mandy provided us with many recipes. Milk Chocolate & Hazelnut Praline Truffles, Candied Orange & Pistachio Marzipan White Chocolates (Bonbons), Chocolate Bark, Sponge Candy / Honeycomb, Paté de Fruits, Passion Fruit Caramel Filled Chocolates (Bonbons), and Peanut Butter Fudge. Visit the Daring Kitchen for the recipes, and amazing instructions on how to temper chocolate.
How good do these sound! Right away, I knew I was going to make the Milk Chocolate & Hazelnut Praline Truffles (yeah, that didn't happen). I've been wanting to try Pâte de Fruits for a while, so I knew I was going to try that one too. The Passion Fruit Caramel Filled Chocolates sounded interesting, so I thought I could get creative and try my hand at chocolate tempering with that one. My daughter and I have been on a rock sugar kick lately, and I had found a recipe to make the pretty lollipops at home, so I thought I'd give that a try too! Pretty ambitious challenge!
I though I'd ease into this with the Pâte de Fruits. I had all the ingredients and tools on hand, so I thought we'd give it a go, and get the kid to help too!

I though I'd ease into this with the Pâte de Fruits. I had all the ingredients and tools on hand, so I thought we'd give it a go, and get the kid to help too!
This candy is basically a fruit jelly, and made just like jam, except cooked way longer, set until solid, then cut and rolled in sugar. The original recipe called for straining the strawberry purée, but my blender got the purée pretty smooth, so I skipped that step. I also used defrosted strawberries, instead of fresh.
Strawberry Paté de Fruits
Recipe adapted from Elizabeth LaBau, About.com Guide Yields 64 small 1-inch squares
3 cups strawberries, fresh or defrosted from frozen
1 tablespoon lemon juice, fresh
2 cups granulated white sugar
2½ tablespoons liquid pectin
granulated white sugar for rolling
Prepare an 8”x8” pan by lining it with aluminium foil or parchment paper.
Place the strawberries in a blender or food processor and process until very well pureed. Pour them into a medium saucepan along with the 1 tbsp lemon juice and 1/2 cup of the sugar.
Place the pan over medium-high heat, and insert a candy thermometer. Cook the mixture, stirring constantly, until it is hot, around 140°F.
Add the remaining 1.5 cups of sugar and the liquid pectin, and lower the heat to medium. Continue to cook, stirring frequently, until the mixture registers 200°F.
At this point, turn the heat to low and hold it at 200°F for 2-3 minutes.
After this, return the heat to medium and bring it up to 225°F. This process will take some time, especially with the heat on medium, so have patience and be diligent in stirring frequently so the bottom doesn't scorch.
Once the fruit paste reaches 225°F/107°C, turn the heat to low and keep it at that temperature for an additional 2-minutes.
Remove the pan from the heat and scrape the strawberry pate de fruit mixture into the prepared pan, smoothing it into an even layer.
Allow the pate de fruit mixture to set at room temperature for several hours, until completely cool and firm. Use a sharp knife to cut it into very small squares, and roll the individual pieces in granulated sugar.
The strawberry pate de fruits can be served immediately, or refrigerated in an airtight container for up to a week. If refrigerated, the pieces may need to be re-rolled in granulated sugar before serving.
Although the first few steps went quickly, bringing the fruit/sugar mixture up to a temperature of 225 degrees did take a while. From mixing together the ingredients to pouring the cooked mixture in the pan, it took about an hour. I let it set overnight, and the next morning, I peeled off the parchment, very happy that the candy came off of it pretty well considering I didn't oil the paper as recommended. I cut the candy in small squares, and got my four-year-old to coat the cubes in sugar. She had a blast doing this, but she ended up being disappointed in the candy. It was fun to make, and cool to see that you can actually make jelly candies at home, but they are not something I would go out of my way to make (or eat) again. Although the recipe states that it should be refrigerated and eaten within a week, I kept mine at room temperature in a lidded container for a good three weeks, and they were fine.

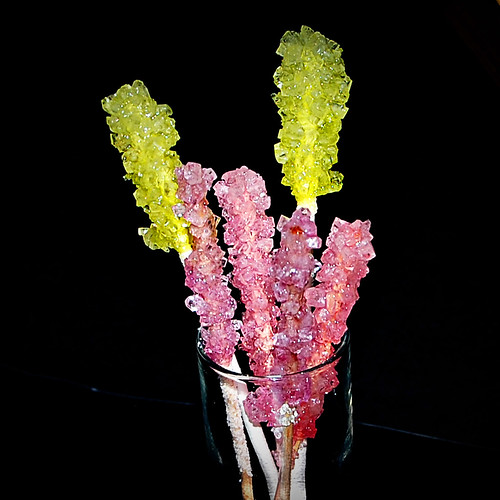
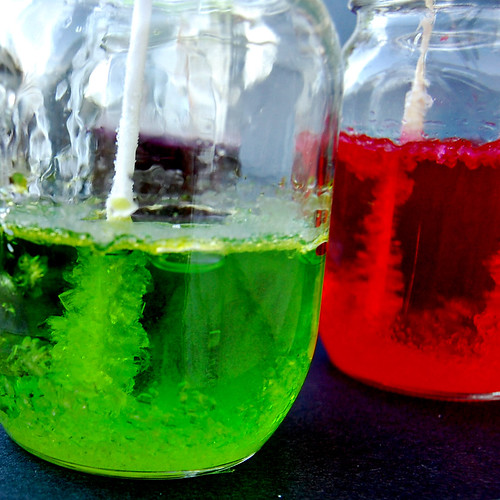
While I was still planning out what to make with the chocolate, and what equipment I needed to buy to temper the chocolate, I used my last four cups of sugar making rock candy lollipops. This is basically sugar, dissolved in water, colored and flavored. A sugar covered lollipop stick is then inserted in the solution and left for a few days until the sugar forms crystals around the stick.
A very simple recipe, but the prep was time consuming for me. The recipe suggest clothespins to hold the lollipop sticks, but I could only find two. So I taped chopsticks together and inserted my sticks between the two chopsticks so they could be suspended in the sugar solution. I was almost out of sugar, so I had to rummage the cupboards to find the required 4 cups. I ended up using sugar cubes to round out the last cup.
I was also interested in finding out if the sugar used to initially coat the stick would dictate the size of the crystals, so I covered some of the sticks with fine granulated sugar, and some of them with coarse decorating sugar. Although my experiment was far from scientific, it seems that the size of the sugar grains on the stick had less impact on the finish product than the amount of sugar that was able to adhere to the stick. I guess the sugar had no problem sticking to the "paper" lollipop sticks, so they were the biggest of the bunch. The green candies were also the only ones that weren't flavored (purple was grape flavored, and red was strawberry flavored). So I'm also wondering if the flavoring hindered the growth of sugar crystals? I guess I'll have to make more to find out for sure!
Rock Candy
Recipe adapted from Elizabeth LaBau, About.com Guide
2 cups water
4 cups granulated sugar
1/2-1 tsp flavoring extract or oil (optional)
food coloring (optional)
Wash three glass jars thoroughly with hot water to clean them. Secure 6 wooden sticks to clothespins so they can be balanced in the jars without touching the bottoms and sides.
Wet your wooden skewer, and roll it in granulated sugar. This base layer will give the sugar crystals something to “grab” when they start forming. Set the skewer aside to dry while you prepare your sugar syrup.
Place the water in a medium-sized pan and bring it to a boil. Begin adding the sugar, one cup at a time, stirring after each addition, until dissolved. Once all the sugar is dissolved in the water, continue boiling the syrup for 10-15 minutes.
Divide the syrup between the three jars. If you are using colors or flavorings, add them at this point. If you are using an extract, add 1 tsp of extract, but if you are using flavoring oils, only add ½ tsp, and make sure you don’t stand right in front of the pan—the scent can be very strong as it rises in the steam. Add 2-3 drops of food coloring and stir to ensure even, smooth color.
Allow the sugar syrup to cool for approximately 10 minutes, then lower the sugared skewer into the syrup until it hangs about 1 inch from the bottom.
Carefully place your jars in a cool place, away from harsh lights, where it can sit undisturbed. Cover the top loosely with plastic wrap or paper towel.
You should start to see sugar crystals forming within 2-4 hours. If you have seen no change to your skewer after 24 hours, try boiling the sugar syrup again and dissolve another cup of sugar into it, then pour it back into the jar and insert the skewer again.
Allow the rock candy to grow until it is the size you want. Once it has reached the size you want, remove it and allow it to dry for a few minutes, then enjoy or wrap in plastic wrap to save it for later.
Although this is quite fun to make at home, and see the crystals form, it's not the best use of sugar. There has to be enough syrup in the jars to reach a good portion of the skewer to form the lollipop, and since the skewer can't touch the bottom, the sides or other skewers, I was only able to fit 2 skewers per jar. So 4 cups of sugar created only 6 lollipops and I had lots of sugar syrup leftover, so that's quite a waste. Cool to make once, but easier to buy, for sure!
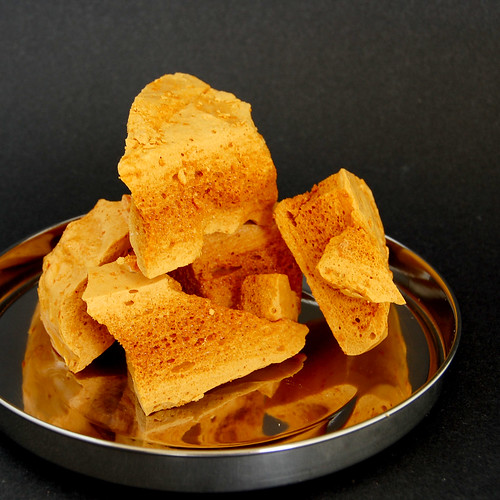
The one candy I wasn't interested in was the sponge taffy. It's hard, it tastes like baking soda... wasn't appealing to me. But when I was taking to my husband about the challenge, he got really excited about this candy ("it's like a homemade crunchie bar!"), so I figured I could make it for him, since it's not overly complicated. Many Daring Bakers made this early on in the month and posted about it in the forum, so I got to observe how they fared and which recipe they used. I guess there's a recipe out there with gelatine in it that created a candy with finer air bubbles, so I went with that, hoping that it wouldn't be as hard to bite into as I remembered this candy to be from my youth.
The one candy I wasn't interested in was the sponge taffy. It's hard, it tastes like baking soda... wasn't appealing to me. But when I was taking to my husband about the challenge, he got really excited about this candy ("it's like a homemade crunchie bar!"), so I figured I could make it for him, since it's not overly complicated. Many Daring Bakers made this early on in the month and posted about it in the forum, so I got to observe how they fared and which recipe they used. I guess there's a recipe out there with gelatine in it that created a candy with finer air bubbles, so I went with that, hoping that it wouldn't be as hard to bite into as I remembered this candy to be from my youth.
Sponge Taffy
recipe adapted from Wilde in the Kitchen
¼ tsp gelatin
1 tsp water
1 ½ cups sugar
½ cups corn syrup
½ cup water
scant 1 tbsp baking soda
Line a rimmed baking sheet with parchment paper.
In a small bowl, sprinkle gelatin over 1 tsp water and allow to bloom.
In a medium stock pot with high sides, mix sugar, corn syrup and 1/2 cup water together. Heat over medium heat and stir until sugar dissolves and mixture comes to a boil. Wash down any sugar crystals from the sides with a wet pastry brush. Clip on candy thermometer and heat to 310° F. Do not stir after you have clipped the thermometer on, the sugar will self stir.
Remove from heat and let sit for two minutes, bubbling should subside. Add gelatin and whisk, be careful, the sugar syrup will bubble up. Sift baking soda over syrup and whisk vigorously. Return mixture to the heat and whisk for 30 seconds. The sugar will rise up in the pot, a lot!
Quickly pour into prepared pan, it should come out in a big blob. Do not spread the mixture, just let it settle into the pan. Allow to cool completely (about 2 hours or overnight) before removing from the pan.
Either break into odd pieces or cut into squares (this is a messy process!). To cut into squares - using a serrated knife, score the candy at 1-inch intervals. Snap the candy apart at the score lines. Then score and break into squares.To my surprise, it was really, really good. It was crisp, but not hard, and didn't taste of baking soda. I think I was maybe 15 seconds away from burning it, so there's a note of very caramelized sugar, but overall, it was a fine candy. It did make a lot though. I had to take the candy out of the pan I had it in to cool and transfer it to a baking sheet. Good thing I had poured it onto parchement paper.
The chocolate part of the challenge scared me. I had had bad experiences in the past trying to dip truffles in chocolate, and wasn't eager to work with chocolate again. But I thought that learning how to temper chocolate would be a great thing to know how to do, and maybe, just maybe, would make dipping things in chocolate more enjoyable.
Basically, to temper chocolate you have to melt chocolate and bring it to a certain degree on a chocolate thermometer, then cool it down by agitating it or by adding more chocolate to it, then warm it up again to a working temperature so it can be used. Properly tempered chocolate will coat things thinly and evenly, will have a nice snap when you bite into it, will not melt as fast, and will not bloom (get gray spots) when exposed to extreme temperatures. Molded chocolate should be shiny.
I had all kinds of ideas for the chocolate portion of the challenge. I wanted to make filled chocolates, and decorate them, and paint them and I wanted to dip stuff too. Then I actually tried to temper chocolate, and failed. Twice.
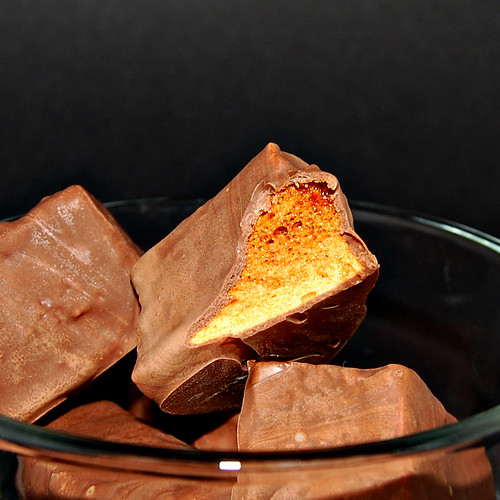
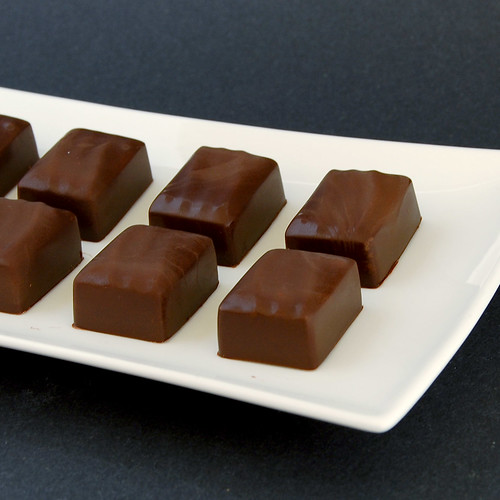
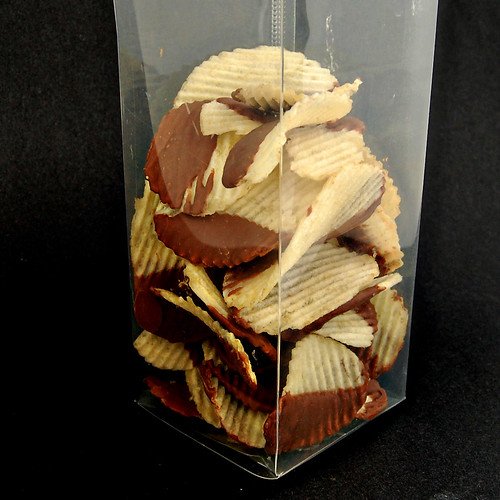
Although I failed to temper it properly, I did manage to make milk chocolate peanut butter cups, coat some pieces of the honeycomb toffee and dip plain chips in the remainder of the chocolate.
I tried to temper dark chocolate a few days later, and failed again, while trying to make bonbons with nanaimo bar filling. They came out not as soft as the milk chocolate, but the pieces of honeycomb toffee that I had dipped in that dark chocolate bloomed like crazy. They were not very good looking, but still tasted good.
So I'm blaming my thermometer for that one. I got a new thermometer because I really wanted to succeed at tempering chocolate, but life got in the way of my challenge, and next thing I knew, it was posting day (what a month it's been!). If only I had one more week! I thought about posting late, but decided against it, since even if I had one more week, I doubt I'll have time (or the energy) to try tempering again.
Overall, this challenge was pretty frustrating for me. Getting high quality chocolate, the molds, failing twice at tempering, the mess it made, yeah, August wasn't a good month for me. Plus, I was working with a broken camera lens, so I'm very not impressed with this post... Hopefully next month will be better! (And I'm hoping to get a new lens in the next few days! Yah!)
I'm going back to work in a week, after being on maternity leave for a little over a year. So gone are the days where I get to spend hours planning and executing my challenges. And reading the forums. But I'm sure I'll find the time somehow to keep up with these challenges, as they have been a blast so far! But, please, pretty please September, be gentle on me!
Oh, and my fellow Daring Bakers made incredible candies! Check out their blogs and the slideshow on the Daring Kitchen site!
Oh my, I think you were the most active Daring Baker this month! I've never seen so many creative things all at once, including a science project! You are the Candy Lady! Bravo!
ReplyDeleteWow to you it may not have been a good month but the photos tell another story! Great candies and great photos!
ReplyDeleteYour rock candies are beautiful! So creative. Very nicely done.
ReplyDeleteeverything looks so beautiful. Great job!
ReplyDeleteYour sponge candy (all of your candies!) turned out great! This challenge was so fun, like an addition to what I've been doing all year. I love your rock candy, the colors are great :)
ReplyDeleteYou were so busy! I'm impressed at all the chocolates you found time to make! The rock candies are just stunning--such bright colors!
ReplyDeleteAmazing job!
ReplyDeleteMy daughter's eyes popped at seeing all your creations but she loved the rock candy most..I will attempt this with her tomorrow..
hats off to your creativity
What a great post! I love the picture of the rock candy in the jars - looks like a mad scientist's candy lab ;) I also love the potato chips dipped in chocolate - brilliant! I wanted to dip my sponge toffee in chocolate as well, but by the time it came to that I was so SICK of dealing with chocolate that I left it naked, so I admire your perseverance! Congrats on this challenge - you certainly nailed the spirit of it :)
ReplyDeleteBecause of you I have rock candy crystalizing as nI sit here...! Your candies look and sound beautiful, even if the chocolate didn't temper as you had hoped. Those chocoalte dipped chips are calling my name... Thanks for sharing your adventures!
ReplyDeleteYour rock candy, well, simply rocks..I can't stop staring at the neon rocks of sugar beauty. It could be in the MOMA in a case, because it's truly art! All of your candies are gorgeous (love the chocolate dipped potato chips too..brilliant!) and you know what? Prior to rolling in sugar..I like the look of the pate de fruit with the strawberry seeds. Thanks so much for taking part in our challenge this month!
ReplyDeleteEverything here looks great, but the rock candies are the best!
ReplyDeleteGood for you to try all these different recipes and candies. Candy making is an art and takes practice. You have a great start. I think you have done really, really well especially for so many new skills. Don't get discouraged and in no time you'll be a pro...your treats already look great.
ReplyDeleteAwesome job with this - you went all out and it all looks so delicious. I was so inspired by your rock candy that I tried it myself. It didn't work for me, but I am pretty sure that has more to do with me than anything else... LOL. I am so impressed with all of your candies!!
ReplyDeleteLove the rock candy suckers - will have to make some of those for my son - he would love them.
ReplyDeleteI'm sorry this challenge was so frustrating for you, but it certainly helps us appreciate how the pros make their chocolates! I'll never look at another moulded chocolate again without knowing the effort that goes into it.
ReplyDeleteYour rock candy lollipops are gorgeous, love the bright colours, and I'm glad you enjoyed the honeycomb :)
Thanks for taking part in the challenge.
*squee*!! Rock candy on a stick! Gosh does that bring back some childhood memories. We used to always go to a local amusement park that had an old-timey candy store...I'd always get the rock candy on a stick. I wonder if it's still there..hmm...oh, but excellent job!
ReplyDeleteBeautiful job despite the frustration! I think a lot of us know how you feel after this month's challenge! I could definitely go for some of those potato chips.
ReplyDeleteThose rock candy on the stick look so good! All of your candies look so professional!And I love th idea of salty and sweet- the chocolate covered potato chips! As always you rocked this challenge!
ReplyDeleteWow - you had such a great time with this challenge and so productive - your candys are devine - thanks for the comments on my blog :)
ReplyDeleteLOVE the rock candy!
ReplyDeleteWow! Were you busy! It all looks wonderful! I want to try one of your chips... such a good idea. The rock candy looks like so much fun too!
ReplyDeleteYou did an outstanding job! Everything looks so professional! Love the pate..I'm still going to make that. I was entertaining Irene and never got mine made due to preparing for the storm and then being without power for 20 hours. I would love to post next week.
ReplyDeletej adore ta créativité!!tes bonbons sont superbes!!ces couleurs, ces saveurs, tout est une parfaite réussite!!bravo!!
ReplyDeleteOoh, wow, that's a lot of sweets! Hm, well, don't be too hard on yourself. You say that it's not a good month for you, but you made a lot of chocolate and candy. It's a good learning experience that would give you more ideas later on.
ReplyDeleteAnd for the record, those photos look good enough to eat!