Sunday, May 27, 2012

pulla

May’s Daring Bakers’ Challenge was pretty twisted – Ruth from The Crafts of Mommyhood challenged us to make challah! Using recipes from all over, and tips from “A Taste of Challah,” by Tamar Ansh, she encouraged us to bake beautifully braided breads.

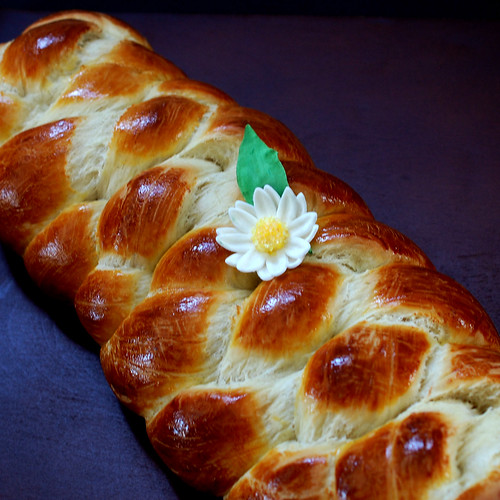
But really, the mandatory item was to make an enriched bread which is braided or shaped, so I took this opportunity to make Pulla for the first time. Pulla is a braided bread, enriched with eggs, butter and milk, and flavored with cardamom. My husband's mom's family is from Finland, and although I've had pulla a couple of times over the last decade, but my husband fondly remembers his papa making it and having in the afternoon with his grandparents. So I thought it was about time I learned to make it myself.


When I was about ready to make this, my in-laws were moving house, so I didn't think it was the best time for me to ask for a recipe. Back when I first joined the Daring Bakers, we had made a yeasted coffee cake that had a similar texture to pulla, and Audax, one of the most active members of the group had suggested a recipe for pulla, the one I used for this challenge, with slight modifications.

Pulla
recipe adapted from allrecipes.com

2 cups milk
1/2 cup warm water (110 degrees F/45 degrees C)
1 (.25 ounce) package active dry yeast
1 cup white sugar
1 teaspoon salt
2 teaspoon ground cardamom
4 eggs, beaten
9 cups all-purpose flour
1/2 cup butter, melted
2 egg yolks, beaten

Warm the milk in microwave. In the bowl of a stand mixer, dissolve the yeast in the warm water. Stir in the lukewarm milk, sugar, salt, cardamom, 4 eggs, and enough flour to make a batter (approximately 2 cups). Beat until the batter is smooth. Add about 3 cups of the flour and beat well; the dough should be smooth and elastic in appearance. Add the melted butter or margarine, and stir well. Beat again until the dough looks glossy. Stir in the remaining flour until the dough is stiff. Let rest for 15 minutes. 
Knead the dough until smooth and satiny, about 8 minutes with the stand mixer. Place in a lightly greased mixing bowl, and turn the dough to grease the top. Cover with a clean dishtowel. Let rise in a warm place until doubled in bulk, about 1 hour. Punch down, and let rise again until almost doubled.
Turn out onto a floured surface, and divide into 2 parts. Divide each half into 4. Roll each piece into a 12 to 16 inch strip. Braid 4 strips into a loaf. Lift the braids onto greased baking sheets. Let rise for 20 minutes. Brush each loaf with egg wash. Bake at 350 degrees F for 25 to 30 minutes.


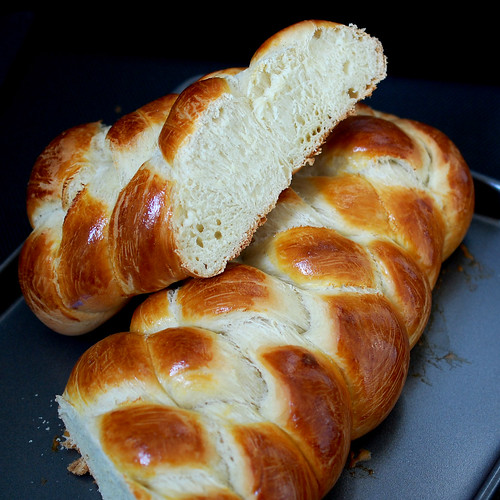
Now going over the recipe, I realize that I didn't let the dough rise twice, but without ill effects, as we thought this bread was close to being perfect! I used Ruth's method to braid the dough with four strands, which was way easier than anticipated, especially when singing the process to myself: over, under, over, next, over, under, over next... 


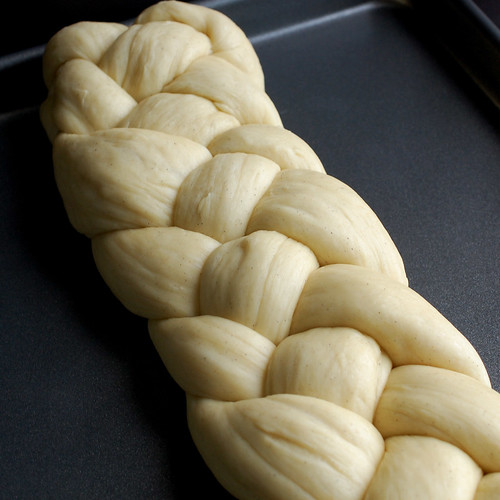
I made two loaves, and learned the hard way why you need to taper the ends of the dough strips: my second loaf came out pretty misshapen, with the middle being nice straight and skinny, and the ends being thick and round. I stuck it in the freezer so we could enjoy it later!

Way too sweet to eat it alongside a meal, I love it toasted, with butter, honey or nutella! Thanks for the challenge Ruth!


To see what other Daring Bakers thought of this challenge, check out the www.thedaringkitchen.com


Sunday, May 20, 2012

banana peanut butter pie

When mother's day rolled around, it just so happened that the next recipe on the Baked Sunday Mornings recipe schedule was perfect for my mom, who has a banana with peanut butter on it for breakfast almost every single morning. I had fully intended to make if for her, but life got in the way, and I brought morning glory muffins to breakfast instead. (My dad's favorite, kinda weird, the breakfast being for mother's day...)


Although I don't think I ever had banana pie, I still wanted to make this recipe because I skipped a lot  of Baked Sunday Mornings recipes, and felt bad. And it was straightforward enough. Plus it wasn't banana flavored pudding, which sounds gross, but vanilla pudding topped with bananas.

Made the crust one morning, the pudding in the afternoon, and the banana layer and peanut butter topping the next morning.


The crust was easy enough, but dirtied the appliance I most hate washing, the food processor. I was scared that the crumbs wouldn't hold together to make the crust, but of course, they did. The pudding was next, and I must have read the directions wrong, as I was fully prepared to boil the mixture for 5 minutes. I was surprised to see that it took no time at all to make. But with pudding, you really have to go with your gut. And when the pudding is thick enough, it's time to take it off the heat!  I always love being reminded how easy it is to make pudding from scratch.I loved the look of this one, with the vanilla bean seeds throughout.


The peanut butter topping gave be a bit more trouble, as it was a bit too thick to easily accept the folding in of the whipped cream. I'm sure I lost some airiness with my vigorous "folding" but I managed to get it fully incorporated, eventually.


I topped the pie with Godiva chocolate pearls, mainly because in between the time I decided to make the pie and bought chocolate covered peanuts, and when I actually made the pie, we had eaten all the peanuts. But I really like the look of the chocolate pearls! Too bad they are so insanely expensive!


Turns out, it's a pretty yummy pie! I was test tasting a tiny slice before lunch, and gave a bit to the toddler who, when she got around to putting the spoon in her mouth, immediately demanded more, then pointing up at the pie wanting a slice of her own. She had a big piece after lunch too! I liked that I was able to cleanly slice it. (Presentation is important!) The peanut butter topping was much richer than I would have expected, but was quite good. The only thing is those chocolate pearls... did absolutely nothing for this pie! Wish I had left them off completely!

To see how the other Baked Sunday Mornings members thought of this pie, click on through to the blog! Oh, and the recipe is posted here!


Monday, May 7, 2012

oreo chocolate cake

Often, my older daughter will ask if what I'm serving her for dinner is "healthy". She's not concerned about her own health, but rather trying to judge the likelihood of me giving her an oreo cookie for dessert if she asks. I'll often give in if she has eaten a balanced meal beforehand, and it just makes her day. So while trying to come up with a cake for her birthday party, we thought that an oreo cake would be perfect for her. Plus, I have had my fill of cake decorating lately, so I was happy to leave the food coloring in the cupboard for once!


The last few times I baked a chocolate cake or cupcakes, I used new recipes, and I happily went back to my old standard chocolate cake recipe for this one. It is so superior! I really think I have found THE chocolate cake recipe! It's moist, it's not too sweet, so easy to make, and it comes out perfect! I've blogged about it many times before, so i'm not going to repost the recipe. This time, I had just the right amount of batter to make two 9-inch layers, and two 6-inch layers that I stashed in the freezer for another use.

The oreo filling is quite simply american buttercream with chopped oreo cookies in  it. Before adding the cookies, I removed some of the plain vanilla frosting to a piping bag so I could decorate the top.

Oreo Frosting
recipe adapted from Wilton

1/2 cup shortening
1/2 cup softened butter
1 tsp clear vanilla extract
8 tsp whipping cream
1 pound powdered sugar
8 oreo cookies, each chopped into about 6 pieces

Cream the shortening and butter together. Add the vanilla and whipping cream and mix until incorporated. Add the powdered sugar and mix until smooth. If the consistency of the frosting is too stiff, add some whipping cream until desired creaminess is achieved. Fold in the chopped oreo cookies.


I simply sandwiched the filling between the two layers of chocolate cake, then added a layer of ganache to the top of the cake. Ganache is basically equal parts heavy cream and chocolate. Chopped chocolate is put into a bowl while the cream is heated to near boiling. The cream then gets poured over the chocolate and left to melt the chocolate for a few minutes. Then, by stirring the mixture from the center of the bowl outwards, a  perfectly smooth and creamy chocolate glaze is created. I find it added a nice element to this cake, and would not skip it. It was delicious!

So happy that this cake concluded my daughter's four birthday parties! Moving on!


Sunday, May 6, 2012

malted waffles

I really like making waffles. Much more than making pancakes. I find it simpler, and they are so much more impressive. So I leave the pancake flipping to my husband and haul out our massive waffle maker whenever it's my turn to make breakfast.


It's the second time I've made the malted waffles from the Baked Explorations book, and both times, they were  gobbled up in no time! I have to admit that I didn't divulge that they contained malted milk powder because my husband thinks that he hates malted anything...

I like that the recipe is really easy. No separating eggs, and whipping whites to lighten the batter... nope! Just  mixing the dry ingredients in a large bowl, the wet ingredients in another, then combining the two until the mixture just comes together! Easy!

We topped them as suggested, with chocolate chips and maple syrup! And then downed a big glass of milk!


For the recipe and to see how the other Baked Sunday Mornings bakers did, click on through to the blog!

Wednesday, May 2, 2012

espresso banana muffins

I had bananas ripening on the counter and they were past their prime eating out of hand stage. So they quickly became banana muffins. To be frank, I had wanted a healthier recipe than this one, but there was no moving my daughter from in front of the computer. She was lost on youtube... So I had to fall back on my collection of neglected cookbooks, and remembered this banana muffin recipe from the first Baked cookbook.


The Baked guys include espresso powder in these, and it totally boosts the flavor of these incredibly moist muffins.

In typical quickbread fashion, the dry ingredients are mixed in one bowl, and the wet ingredients in another, then they quickly get mixed together until just combined. It is one of their easier, less involved recipe, and you've got to love the simple, simple method that get you the most ridiculously moist muffins!

Baked’s Banana Chocolate Chip Espresso Muffins
Recipe source: Baked: New Frontiers in Baking, by Matt Lewis and Renato Poliafito

1-1/2 cups mashed, very ripe bananas (about 4)
1/2 cup sugar
1/4 cup firmly packed light brown sugar
1/2 cup (1 stick) unsalted butter, melted
1/4 cup whole milk
1 large egg
1-1/2 cups all-purpose flour
1 teaspoon instant espresso powder
1-1/2 teaspoons baking soda
1 teaspoon salt
1 cup (6 ounces) semisweet chocolate chips

Preheat the oven to 350 degrees. Spray a 12-cup muffin pan with nonstick cooking spray.
In a medium bowl, stir together the bananas, sugars, butter, milk, and egg.
In another medium bowl, whisk together the flour, instant espresso powder, baking soda and salt. Make a well in the middle of the dry ingredients. Pour the wet ingredients into the well and stir just until combined. Fold in the chocolate chips.
Fill each cup about 3/4 full. Bake in the center of the oven for 20-25 minutes, until a toothpick inserted in the center of the muffin comes out clean.
Move the muffin pan to a cooling rack, and let cool for 15 minutes. After 15 minutes, remove the muffins from the pan and let them finish cooling on the cooling rack.
Muffins can be stored in an airtight container for up to 2 days.


I was too lazy to melt butter, so I used vegetable oil instead, with no noticeable change in the final product. I also almost never measure mashed banana and use what I had on hand, in these muffins, 3 medium ones. And switched out the cup of chocolate chips for half a cup of miniature ones. Super yummy! I love keeping those in the freezer for buzy mornings.