Wednesday, December 28, 2011

peanut butter oatmeal cookies

Before I go and post yet *another* cake on this blog, I thought I'd mix it up a bit, and talk about these cookies I made for my work's cookie swap earlier in the month.

I had great intentions of making these, or if they failed, these, but both cut-out recipes didn't pass muster. So at the very last minute, I whipped these oatmeal peanut butter cookies and gave them some Christmas bling with a pretty red ribbon.


I doubled the recipe, and got the four dozen cookies that I needed, plus a couple for quality control. The original recipe also includes a peanut butter filling to make sandwich cookies that I highly recommend. So freaking good!

Peanut Butter Oatmeal Cookies
Recipe source: Rara Bakes
1/2 cup butter, softened
1/2 cup peanut butter
1/2 cup white sugar
1/2 cup brown sugar
1 egg
1 tsp vanilla extract
1/2 tsp baking soda
1/2 tsp salt
1/4 tsp baking powder
3/4 cup flour
1 cup oatmeal

Cream together butter, peanut butter, and sugars. Add egg and vanilla. Mix well.
Add baking soda, salt, baking powder, and flour. Stir. Fold in oatmeal.
Scoop out tablespoonfuls onto a baking sheet.

Bake at 350 for 9-10 minutes or until edges lightly brown. Let cool on cookie sheet for 1 minute, then move cookies to a cooling rack.


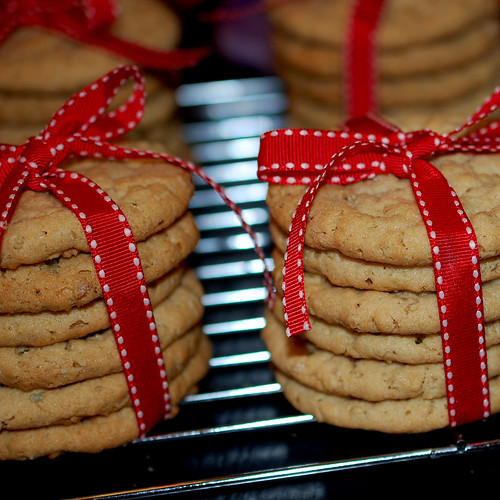
I'm thinking we should change the formula for our cookie swap next year... We were 9 participating, so we decided to make 1/2 dozen cookies per person... but that's still a lot of cookies!

Saturday, December 17, 2011

poinsettia cake

I think these cake decorating classes are starting to pay off! Royal icing poinsettias in a chocolate cake basket-weaved flowerpot.


One week until Christmas eve... So not ready!

Wednesday, December 14, 2011

book cake

When I first saw this cake from Sprinkle Bakes, I immediately sent the link to my mom, who works in a library, knowing she'd be amazed. She was. So when she said she had a xmas party to organize for the people who volunteer their time at the library, I thought it was the perfect opportunity to see if I could make something like it.


I still had some wafer paper sheets from my daughter's last birthday cake, so we ordered a butterfly punch and a paragraph stamp and crossed our fingers it would get to us in time!

My friend Gen had bought a book-shaped cake pan a few weeks prior, so I was super happy when she let me borrow it. No carving necessary! That thing holds a lot of batter! I doubled a double vanilla pound cake recipe, and it barely filled one side of the book. So moved on to plan B, send my husband to get some boxed cake mix, prepared two of those, and baked the cake. I should have read the directions that said to trim the top of the cake while still in the pan *before* I flipped it over cooling racks. Of course the book cracked right in the middle! Lesson learned! Cake needs to have a flat surface before turning it out of the pan. Common sense really, but I didn't think of it. Nothing a lot of icing couldn't fix!


Since I had never worked with fondant before, I was super happy to see that there was a quick 3-hour class at my local craft store the weekend after we decided to attempt this cake. Although the point of the class was learning how to make tiered cakes, the instructor said I could make anything I wanted, and helped me cover the book cake with fondant. It's a good thing I took the class, because if I had been at home all by myself, there is no way I would have rolled the fondant 3 times to get it to the right size. I would have chucked the whole thing in the garbage and given up. That's how much patience I have.

While everyone else in the class were working on their tall cakes, I found a stamp with a paragraph of text on it, thinned out some black gel food coloring, and brushed it on the stamp with a small paintbrush, before stamping some wafer paper. It only took about... 5 or 6 sheets to get 2 that I liked enough to put on the cake!

So once the cake was covered in fondant, I left in the freezer until a couple days before the party. I rolled chocolate fondant to make the book cover, trimmed it using the cake pan as a guide, plopped the frozen cake in the middle, and laid the wafer paper pages on top. Since the cake was defrosting, the moisture from the frozen fondant made the wafer paper stick to the cake in all the right places. I punched out a few butterflies from the remainder of the stamped wafer paper, and "glued" them on the cake with some light corn syrup. A couple of metal wire thingies sported a few more butterflies.


Not quite as pretty as the inspiration for the cake, but for my first fondant cake, I think it's pretty good! Now if I could just find a class to help me take better pictures when there is no natural light around!